Authentication in the development of modern websites or applications is necessary for security and trust reasons.
Web service providers are responsible for safeguarding their resources and the data of their users; therefore, authentication mechanisms are essential for safeguarding sensitive data, ensuring a secure and smooth online experience for users.
This article will cover a brief introduction of authentication, the importance and a simple method of adding Login authentication in a react project.
Let’s get started!
What is Authentication?
Authentication is the process of identifying the identity of a user, and granting permissions to allow users access resources.
This is necessary to prevent unauthorised access - this creates trust between a service provider and clients.
Imagine using a service where you'll be required to use your personal identity and bank information to pay for a solution. If there's no means of security, your sensitive information would be easily retrieved and used for different fraudulent activities.
There are many reasons why authentication is important, and they include;
Authentication protects systems and information from unauthorised access.
Authentication helps build trust and reputation of an organisation because it shows that the organisation cares to protect sensitive information of users or clients.
Authentication maintains the integrity of a system by ensuring only authorised users can perform actions within the applications and its resources.
Authentication can help to monitor the pattern of a user, detect and investigate suspicious user activities.
Checkout this article that covers more about authentication.
Login Authentication in React
Login is a process that allows users access to a website, system or application, when they provide certain credentials, which is usually a username with email or password.
The process of login is to ensure users are who they say they are - upon confirmation, users are allowed access to functionalities, resources, etc
A login is typically created via a form in any project, and the form would have input fields where users enter their username, email or password. The form is then submitted to the server to verify that the credentials are accurate. If the credentials are accurate the user gets access, and if not, access is denied.
It’s an interface that everyone that’s signed up to certain website or application encounters before being able to access its feature. A typical example is signing into your email account or a banking app.
Now that you’ve understood what authentication, and its benefits entails, let’s get started with creating the Login form, handling the user input and also performing the authentication logic.
The first step before creating the login form is to create a registration form. This is necessary because the details users register with, will be used to log into a system or application.
Prerequisite: You should know how to create a React project using $ npm create vite@latest or any other package manager for your JavaScript Project, and also be familiar with how to create a basic React form.
Registration Form
Let’s create a simple Registration Form styled with tailwind CSS
import React from "react";
import { useState } from "react";


const RegistrationForm = () => {
  const [formData, setFormData] = React.useState({
    firstName: "",
    lastName: "",
    email: "",
    password: "",
  });


  function handleChange(event) {
    setFormData((prevFormData) => {
      console.log({
        ...prevFormData,
        [event.target.name]: event.target.value,
      });
      return {
        ...prevFormData,
        [event.target.name]: event.target.value,
      };
    });
  }


  return (
    <section className=" ml-32 w-96 h-72">
      <div className="leading-10">
        <p className="text-4xl mt-10">Registration Form </p>
        <form action="" className="mt-10 w-full">
          <label htmlFor="firstname">First Name:</label>
          <input
            type="text"
            id="firstname"
            placeholder="First Name"
            onChange={handleChange}
            name="firstName"
            value={formData.firstName}
            className=" bg-slate-200 w-full block "
          />


          <label htmlFor="lastname">Last Name:</label>
          <input
            type="text"
            id="lastame"
            placeholder="Last Name"
            onChange={handleChange}
            name="lastName"
            value={formData.lastName}
            className=" bg-slate-200 w-full block "
          />


          <label htmlFor="email">Email:</label>
          <input
            type="email"
            id="email"
            placeholder="Email"
            onChange={handleChange}
            name="email"
            value={formData.email}
            className=" bg-slate-200 w-full block "
          />


          <label htmlFor="password">Password:</label>
          <input
            type="password"
            id="password"
            placeholder="Password"
            onChange={handleChange}
            name="password"
            value={formData.password}
            className=" bg-slate-200 w-full block "
          />


          <button type="submit" className="px-6 mt-10 bg-black text-white">
            <span>Register</span>
          </button>
        </form>
             </div>
    </section>
  );
};


export default RegistrationForm;
Code Breakdown;
Starting from the top, useState Hook is imported from react to set-up the state of the form.
import React from "react";
Create State:
 const [formData, setFormData] = React.useState({
    firstName: "",
    lastName: "",
    email: "",
    password: "",
  });
formData: is the state variable that holds the current values of the form input.
setFormData: function that updates the formData state.
React.useState: sets up the formData state with an object that starts with an empty string for our input value.
handleChange function:
function handleChange(event) {
    setFormData((prevFormData) => {


      console.log({
        ...prevFormData,
        [event.target.name]: event.target.value,
      });


      return {
        ...prevFormData,
        [event.target.name]: event.target.value,
      };
    });
  }
event: It represents what triggers the function (in this case, typing into an input field)
setFormData: updates the form data
prevFormData: uses spread operator to copy the values from previous state or keeps a copy of existing data so it's not overwritten.
[event.target.name]: It refers to the "name" attribute of the input field where change occurs.
event.target.value: takes note or records new data the input field receives.
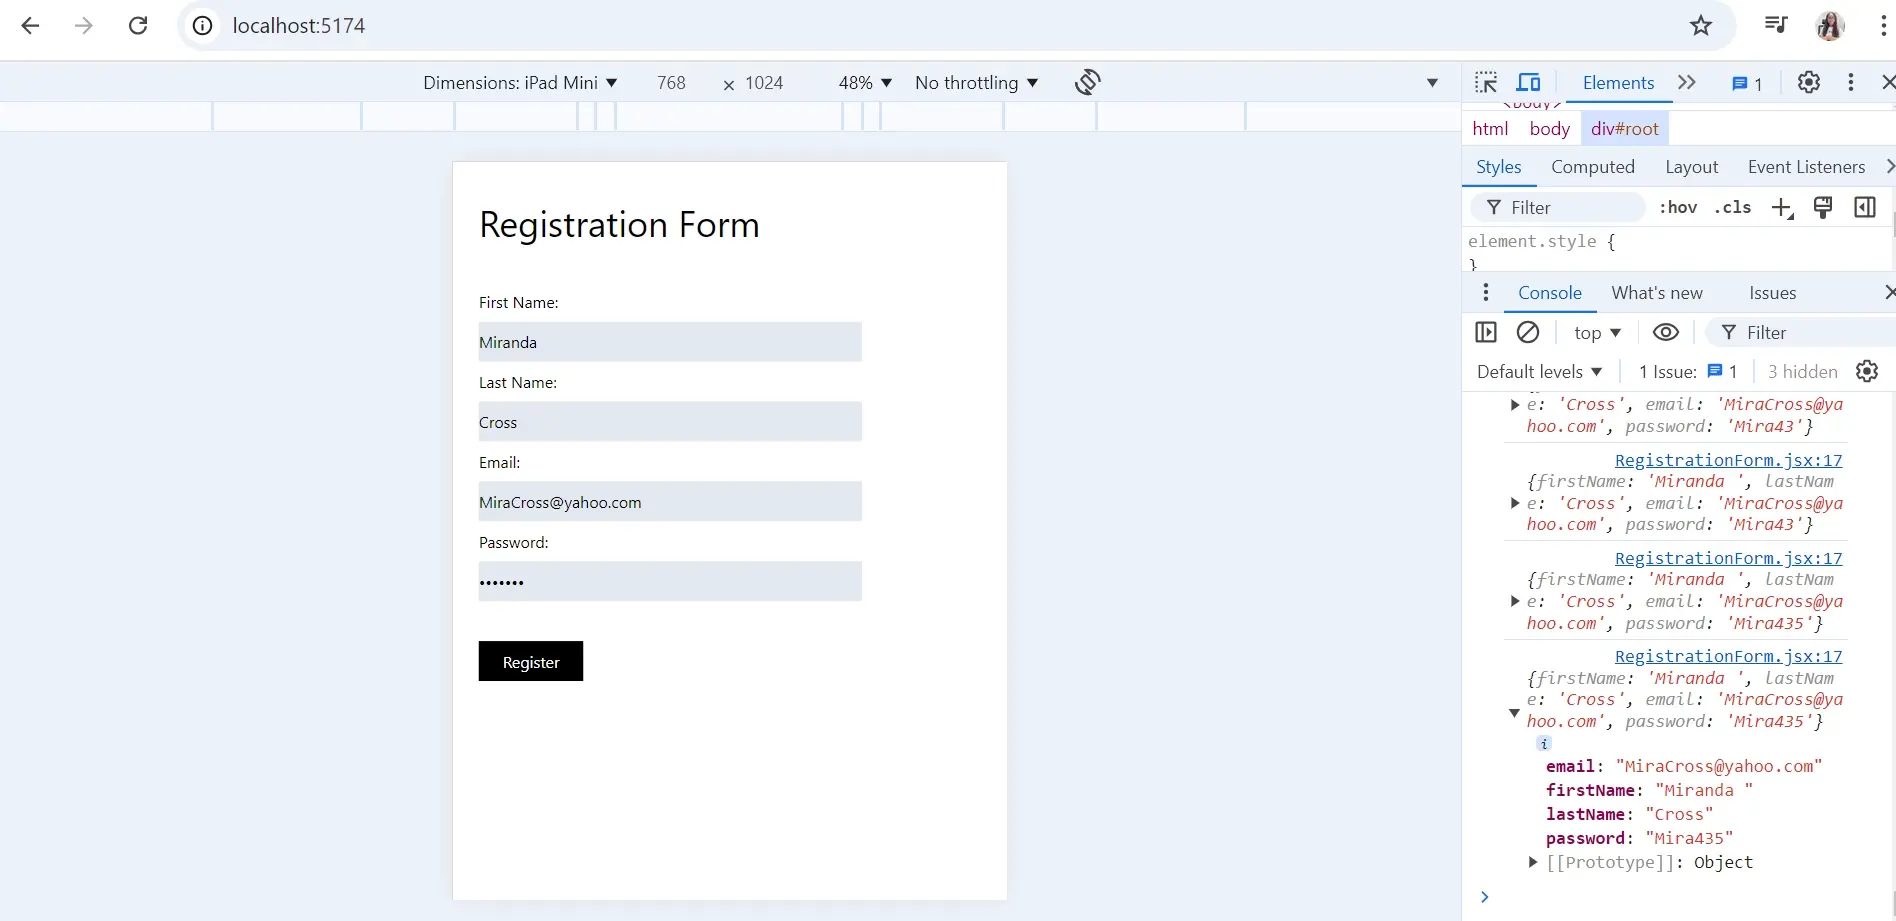
The handleChange function logs to the console the updated state for "formData". This is to ensure that the form is being updated when the input changes, that is, when we’re typing values in it.
The Form Input
          <label htmlFor="email">Email:</label>
        <input
            type="email"
            id="email"
            placeholder="Email"
            onChange={handleChange}
            name="email"
            value={formData.email}
            className=" bg-slate-200 w-full block "
          />
The Form contains input fields including firstname, lastname, email, password, and register button.
label: each input field has a label element that is linked with it, and the label instructs users to enter certain information.
type: describes the type of input field e.g., text, email, and password.
id: assigns a unique identifier to the input field.
placeholder: hints users on what information is required.
onchange: event handler that listens for changes in the input field.
name: attribute to identify the data that is entered when form is processed.
value: value attribute makes the input field controlled by React state, and displays the current value of the state.
- Aside: for form Validation you can use the HTML attribute “required” or create a custom validation for your form. Custom form validation is not included in the example above, but it’s something you can also try out*.
Create a JSON Server
The next step is to store the data from the form. To achieve this, you have to create a fake JSON server that will store the credentials entered into the input field when a user registers.
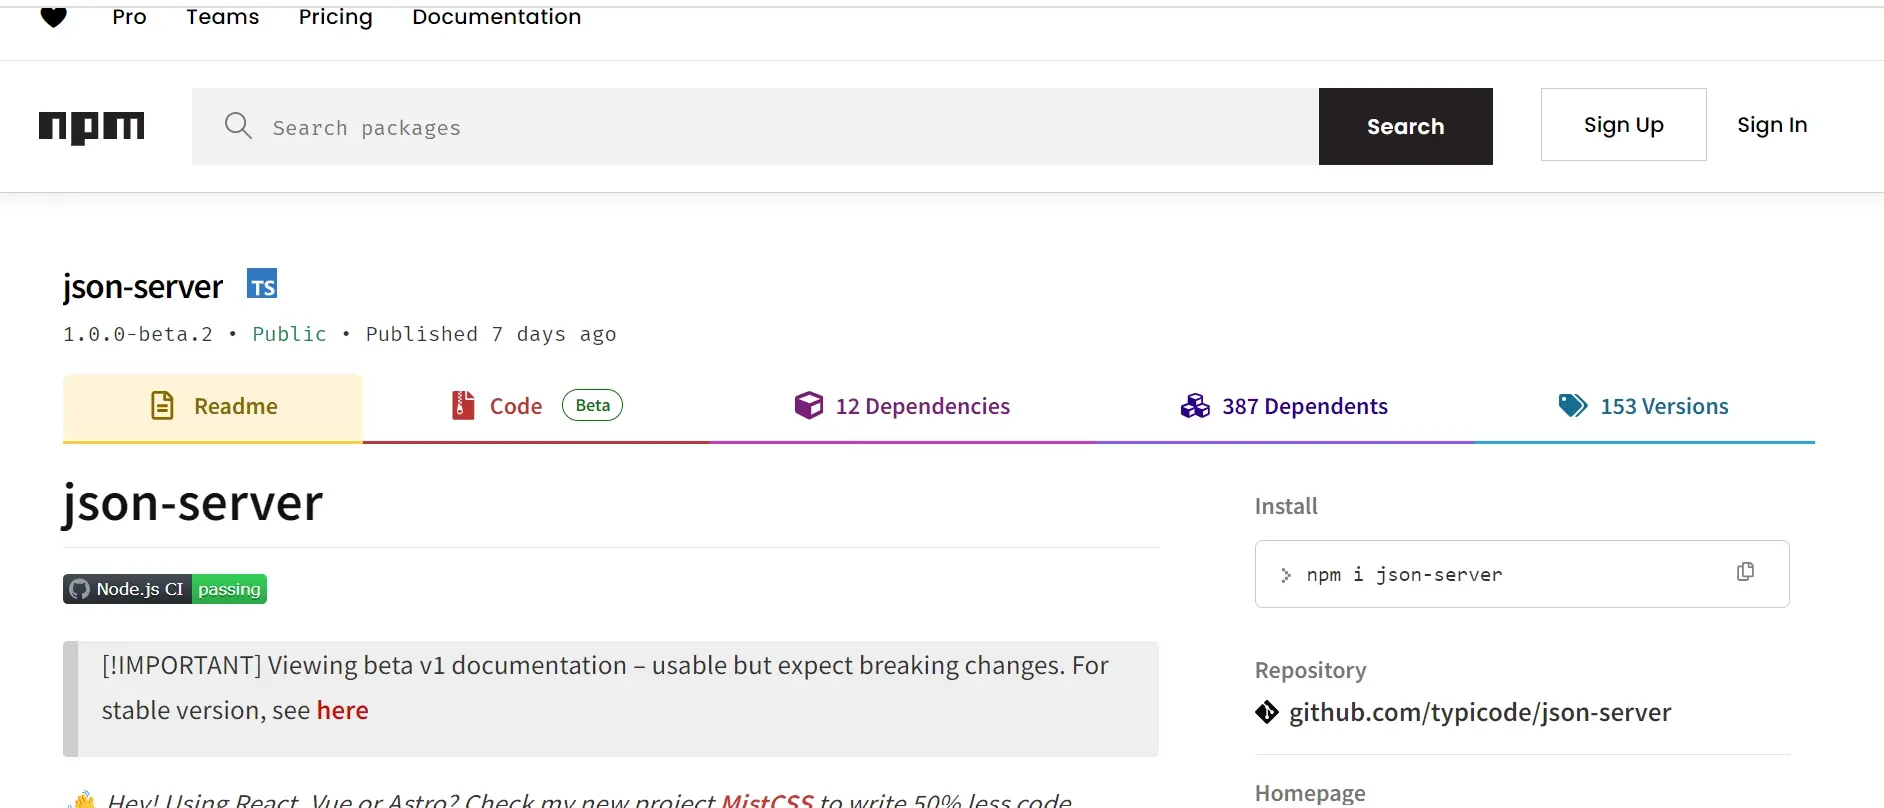
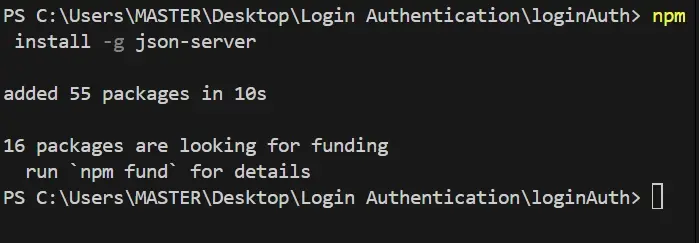
To create a json-server, copy the command npm install -g json-server and install. The -g flag included in the command means global, and it tells npm to install the package globally instead of locally making it accessible from anywhere on your system.
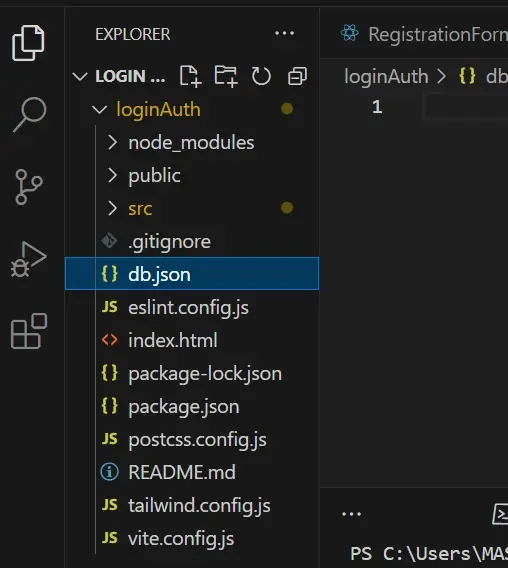
After installing json-server, you need to create a file containing the json data in the root directory of your project folder. You can name the file db.json.
In the db.json file create an object and name it "users" with an array [] of objects like the image below;
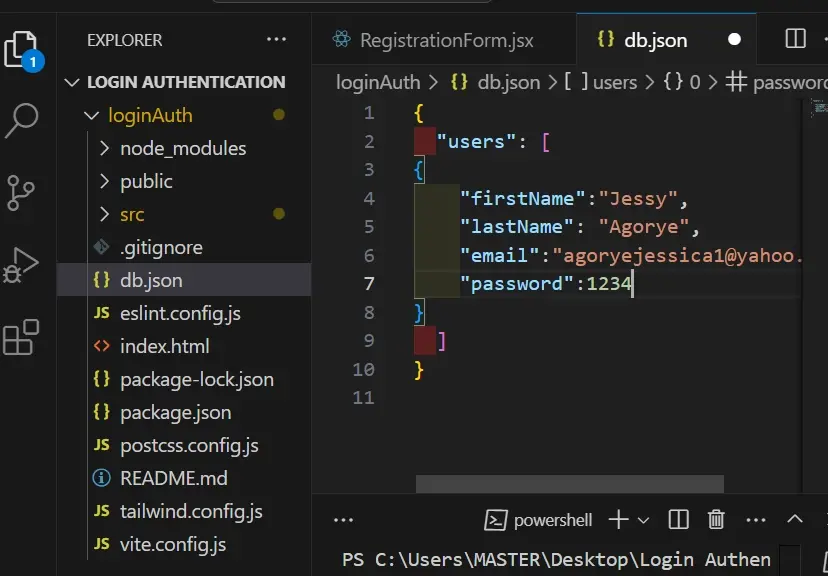
In the file, create a dummy array of users’ object like the above image, this will be removed later in the project.
The next step is to start the json server, you can achieve this by simply typing the following command in the terminal.
npx json-server --watch db.json
Note: if your project is already running on port 3000 you need to create another port for the server to run by following the command below.
npx json-server --watch db.json --port 8080

Copy the endpoint and place it in the URL bar to display the output, and you will see the dummy text previewed on the web page.
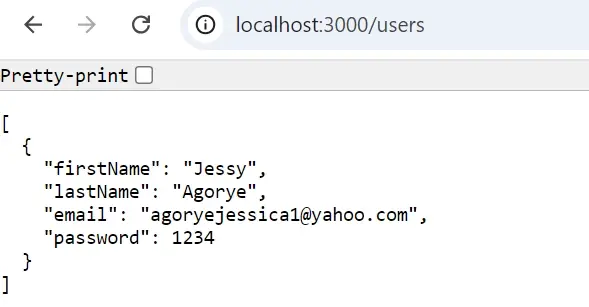
Now that the json server has been created successfully, let’s move to the next step which is creating the logic for the registration form.
Registration Logic
In this section, you will simply send data from the registration form to the JSON file you created.
Create proceed Registration function - this comes after the handleChange function that was created at the start of the project.
  const proceedRegistration = (e) => {
    e.preventDefault();
    fetch("http://localhost:3000/users", {
      method: "POST",
      headers: { "Content-Type": "application/json" },
      body: JSON.stringify(data),
    })
      .then((response) => {
        if (!response.ok) {
          throw new Error("Network response was not ok");
        }
        return response.json();
      })
      .then(() => {
        toast.success("Registered Successfully");


      })
      .catch((err) => {
        toast.error("Failed: " + err.message);
      });
  };
Code Breakdown;
proceed Registration function is used to submit the user registration form data to the json server.
e.preventDefault prevents the default behaviour of the form submission which reloads the page, this way instead of the browser handling submission, you can handle the form submission with JavaScript.
Send POST Request
fetch: fetch function makes the network request
"http://localhost:3000/users”: This is the URL of the server endpoint where you are sending data to.
method “POST”: refers to the type of request which is used to send data to the json server in this case.
headers: specifies that the request body contains JSON data
body: changes data object into JSON string to send in the request body
.then: runs after the server responds, and the promise returned by fetch is successful. It contains logic to check for errors
If block: if statement checks the status of the response
throw new Error: throws an error if the response is not ok
return res.json(): Parses Json data from server response (converts server response to format that the application understands, in this case json)
toast.success: is a toast notification displays a success message
catch: catches and handles error that may occur during the request
toast.error: is a toast notification that displays the error message
How to Add Toastify to your Project
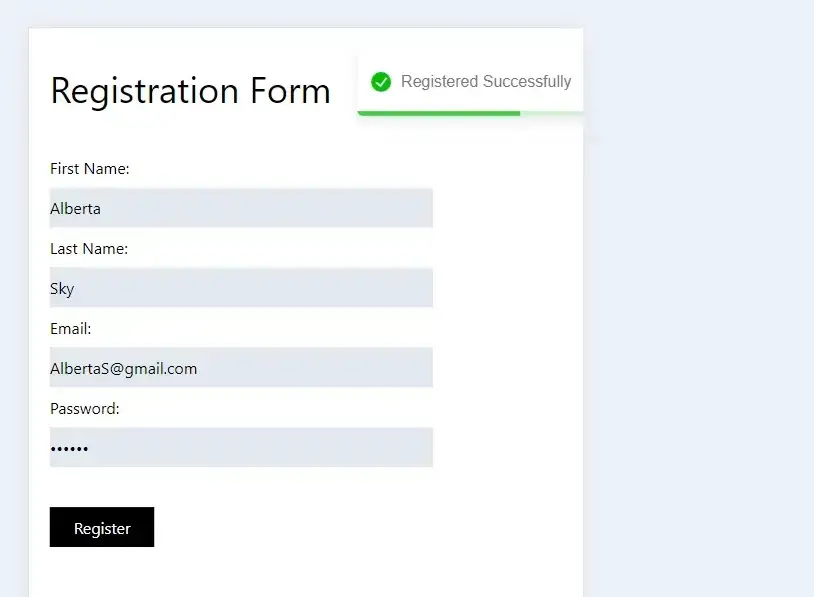
Copy the command npm i react-toastify and run it in your terminal.

In your component file, import toastify like so;
import { ToastContainer, toast } from 'react-toastify';
import 'react-toastify/dist/ReactToastify.css';
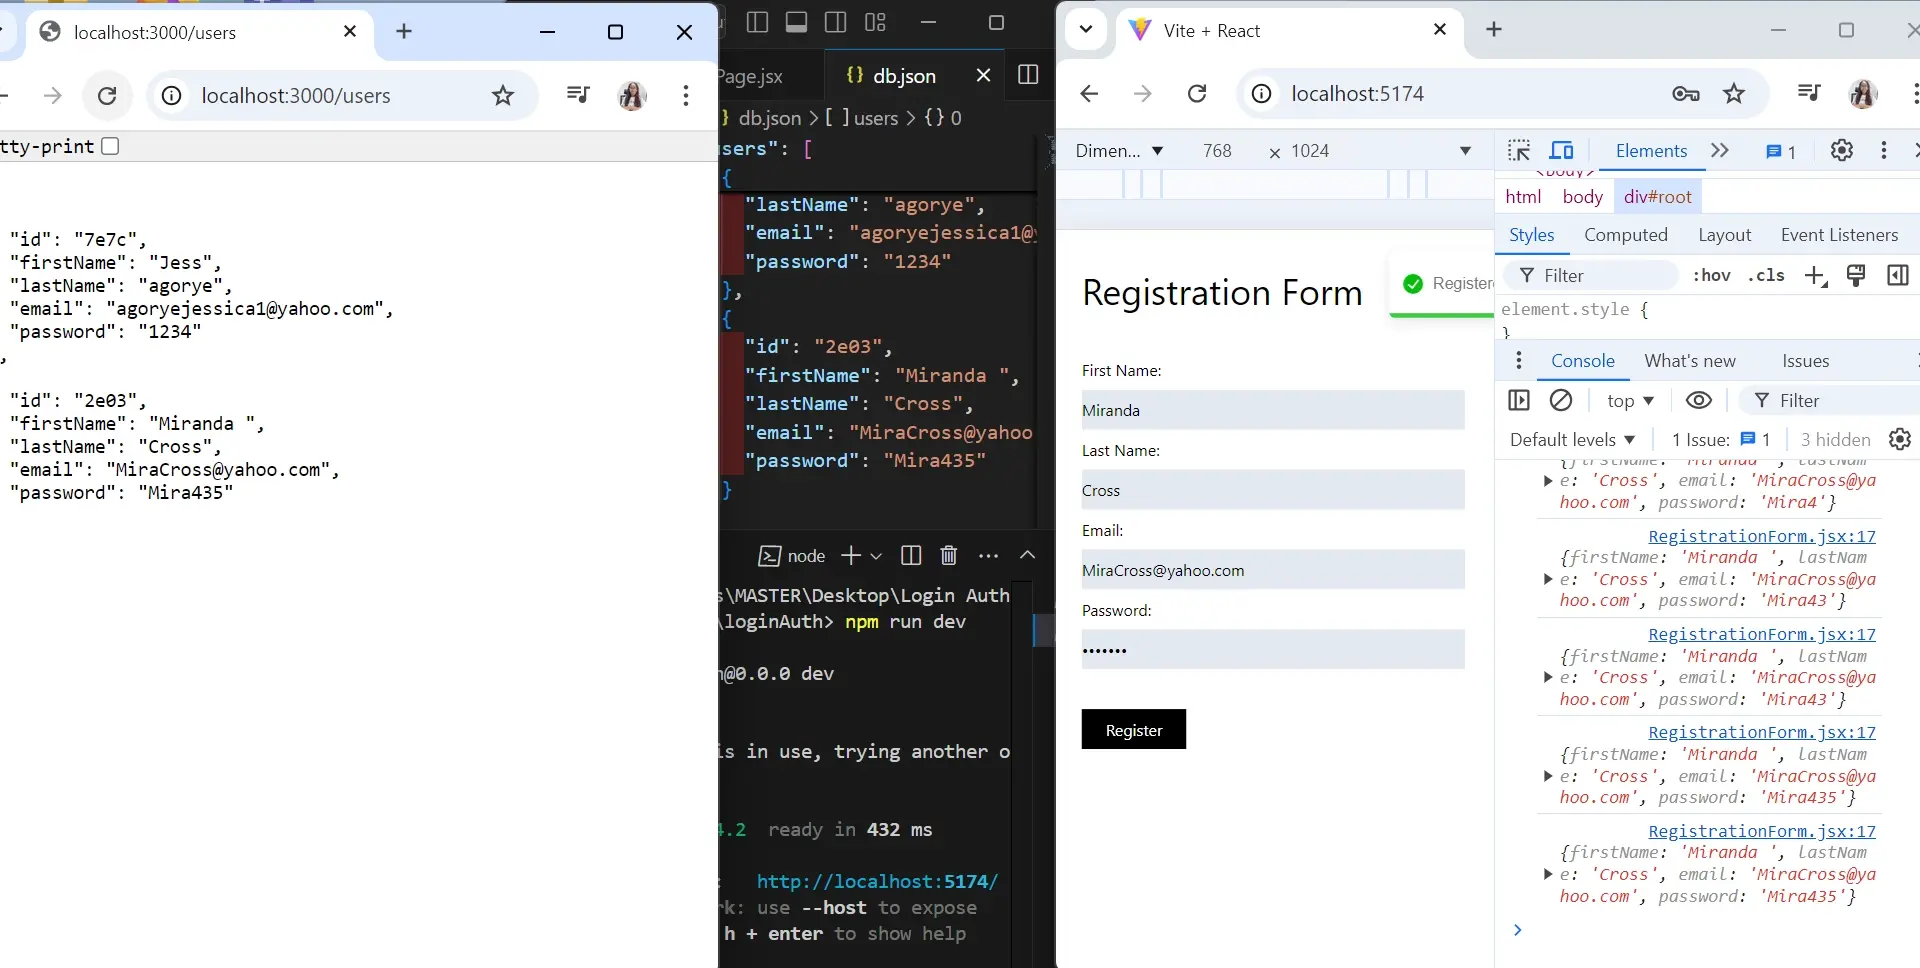
Now, you can test to ensure that your json server is receiving the value from the form input.
Create Login Form
You can use the registration form to create a login form, all you need to do is make some adjustments. In the form example below, there are two input fields, one for email and the other for password.
These tells the users what credentials is required to log in to the website.
import React from "react";
import { useState } from "react";


const LoginForm = () => {
  const [formData, setFormData] = React.useState({
    email: "",
    password: "",
  });


  function handleChange(event) {
    setFormData((prevFormData) => {
      console.log({
        ...prevFormData,
        [event.target.name]: event.target.value,
      });
      return {
        ...prevFormData,
        [event.target.name]: event.target.value,
      };
    });
  }


  return (
    <section className=" ml-32 w-96 h-72">
      <div className="leading-10">
        <p className="text-4xl mt-10">Log In </p>
        <form action="" className="mt-10 w-full">
          <label htmlFor="email">Email:</label>
          <input
            type="email"
            id="email"
            placeholder="Email"
            onChange={handleChange}
            name="email"
            value={formData.email}
            className=" bg-slate-200 w-full block "
          />


          <label htmlFor="password">Password:</label>
          <input
            type="password"
            id="password"
            placeholder="Password"
            onChange={handleChange}
            name="password"
            value={formData.password}
            className=" bg-slate-200 w-full block "
          />


          <button type="submit" className="px-6 mt-10 bg-black text-white">
            <span>Log In</span>
          </button>
        </form>
        <p>
          Forgot password? <a href="#">Click here</a>
        </p>
      </div>
    </section>
  );
};


export default LoginForm;
Before writing the logic for the login form you can redirect users from the registration form to the login page after registration is complete.
To achieve this, use the useNavigate hook in react by installing react-router dom .
Setting up Routes with React Router DOM
To install react router dom, copy and paste npm i react-router-dom command in your terminal.

Create Routes to the different pages in your project in this case, the routes are created in the APP component;
import { BrowserRouter as Router, Route, Routes } from "react-router-dom";
import HomePage from "./components/HomePage";
import RegistrationForm from "./components/RegistrationForm";
import LoginForm from "./components/LoginForm";


function App() {
  return (
    <>
      <Router>
        <Routes>
          <Route path="/" element={<HomePage />} />
          <Route path="/register" element={<RegistrationForm />} />
          <Route path="/login" element={<LoginForm />} />
          <Route path="/products" element={<Products />} />


        </Routes>
      </Router>
    </>
  );
}


export default App;
You can create different pages as you prefer; the purpose for creating routes is to navigate from one page to another.
For instance, we have a home page with two buttons: register and login.

The flow of the website is a follow;
After filling the registration form, and submitting the necessary credentials, the user will be redirected to a login page.
After the user fills the login details, the user is directed to the products page.
After creating the routes successfully, you can now use the useNavigate hook within the project.
useNavigate Hook
To work with the useNavigate hook, the following code is placed after the state of formData in the registration form.
const navigate = useNavigate();
Like so;
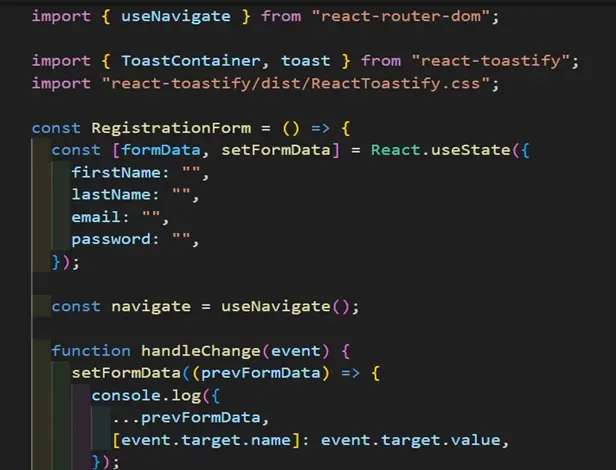
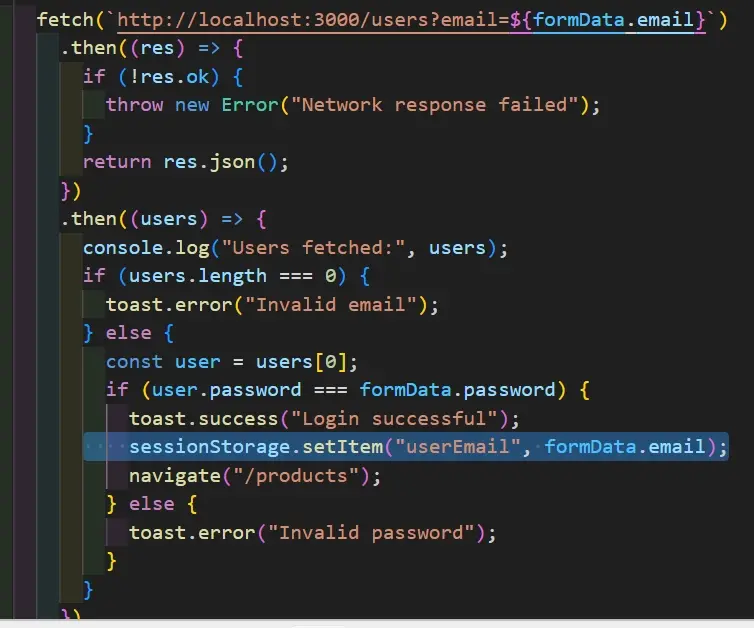
navigate function “navigate (“/login”) is placed after the toast notification to redirect users to the login page after registration is completed.
navigate("/login");
Like so;
Login Logic
import React from "react";
import { useState } from "react";
import { useNavigate } from "react-router-dom";


import { ToastContainer, toast } from "react-toastify";
import "react-toastify/dist/ReactToastify.css";


const LoginForm = () => {
  const [formData, setFormData] = React.useState({
    email: "",
    password: "",
  });


  const navigate = useNavigate();


  function handleChange(event) {
    setFormData((prevFormData) => {
      console.log({
        ...prevFormData,
        [event.target.name]: event.target.value,
      });
      return {
        ...prevFormData,
        [event.target.name]: event.target.value,
      };
    });
  }


  const proceedLogin = (e) => {
    e.preventDefault();
    if (validate()) {
      console.log("proceed");


      fetch(`http://localhost:3000/users?email=${formData.email}`)
        .then((res) => {
          if (!res.ok) {
            throw new Error("Network response failed");
          }
          return res.json();
        })
        .then((users) => {
          console.log("Users fetched:", users);
          if (users.length === 0) {
            toast.error("Invalid email");
          } else {
            const user = users[0];
            if (user.password === formData.password) {
              toast.success("Login successful");
              sessionStorage.setItem("userEmail", formData.email);
              navigate("/products");
            } else {
              toast.error("Invalid password");
            }
          }
        })
        .catch((err) => {
          console.error("Fetch error:", err);
          toast.error("Login failed due to: " + err.message);
        });
    }
  };


  const validate = () => {
    let result = true;


    if (formData.email === "" || formData.email === null) {
      result = false;
      toast.warning("Please enter username");
    }


    if (formData.password === "" || formData.password === null) {
      result = false;
      toast.warning("Please enter password");
    }


    return result;
  };

return (
  // insert login form here


);
Code Breakdown
The proceedLogin is a function that is called when the form is submitted.
if (validate()){ : Checks if the form passes the validate function which is written after the proceedLogin function.
console.log("proceed"): logs "proceed" to show that the form passed the validation stage.
fetch("url"): sends a GET request to the JSON server at http://localhost:3000/users, including a query parameter that filters users by email retrieved from formData.
The first .then block handles the server's response, if the response fails it throws an error message. If the response is okay, it is parsed as JSON.
the second .then block logs the user fetched from the json server to the console.
if statement - checks if the user is not found and displays an error message using toast notification.
the second if statement checks to see if user is found, and if the password the user enters matches the formData.password, after which it will display a “login successful” message using toast notification
navigate - redirects users to the product page after login is successful.
.catch handles error during the process of fetching the data, and logs the error to the console displaying an error message of why the login failed.
Validate Form
const validate = () => {
    let result = true;


    if (formData.email === "" || formData.email === null) {
      result = false;
      toast.warning("Please enter username");
    }


    if (formData.password === "" || formData.password === null) {
      result = false;
      toast.warning("Please enter password");
    }


    return result;
  };
The validate arrow function checks the validity of the form data.
result is set to true to determine if the form is valid or not, it is set as true because we assume the form is valid until there are reasons why it's not
The first if statement checks if the email field in formData is empty or null. If the statement is true the result is set to false stating the form is invalid, also displaying a warning message using toast notification.
The second if statement checks if the password field in the formData is an empty string or null. If this statement is true, the result is set to false to show that the form is not valid, and also displays a warning message to enter valid credentials.
return result is used to indicate if the form is valid or invalid
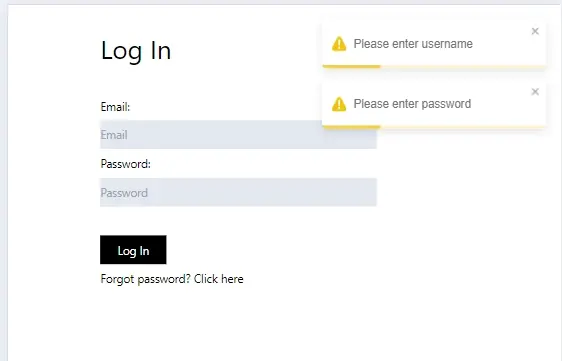
This is what the form would look like if the email and password field are either an empty string or null.
Test1:
Test the form by entering the email and password using any of the users’ credentials stored in the JSON server.
Login is Successful
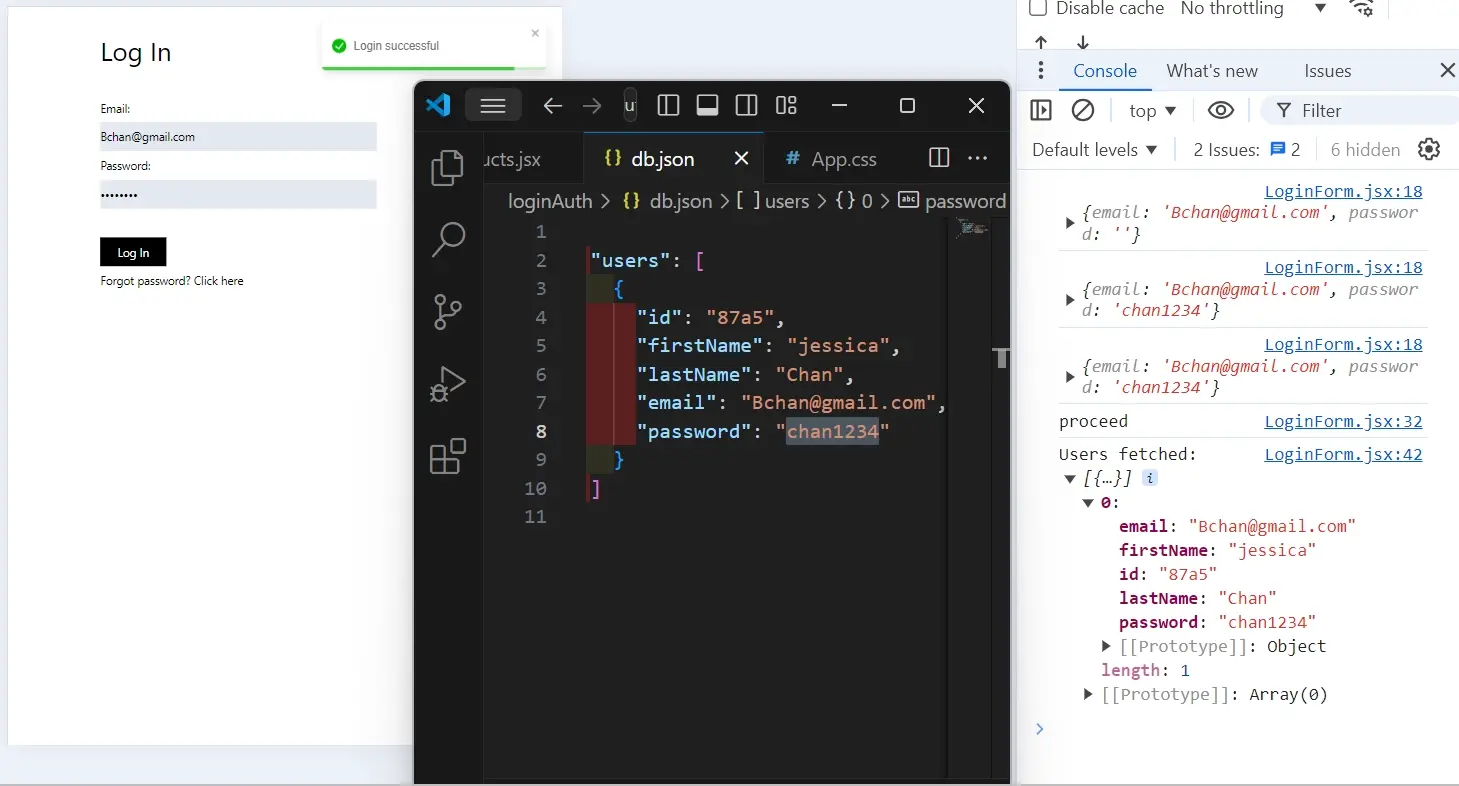
We’re receiving an object “users fetched” which means that we have the data.
Test 2:
Use email and password that isn’t registered in the json server.
Login Failed
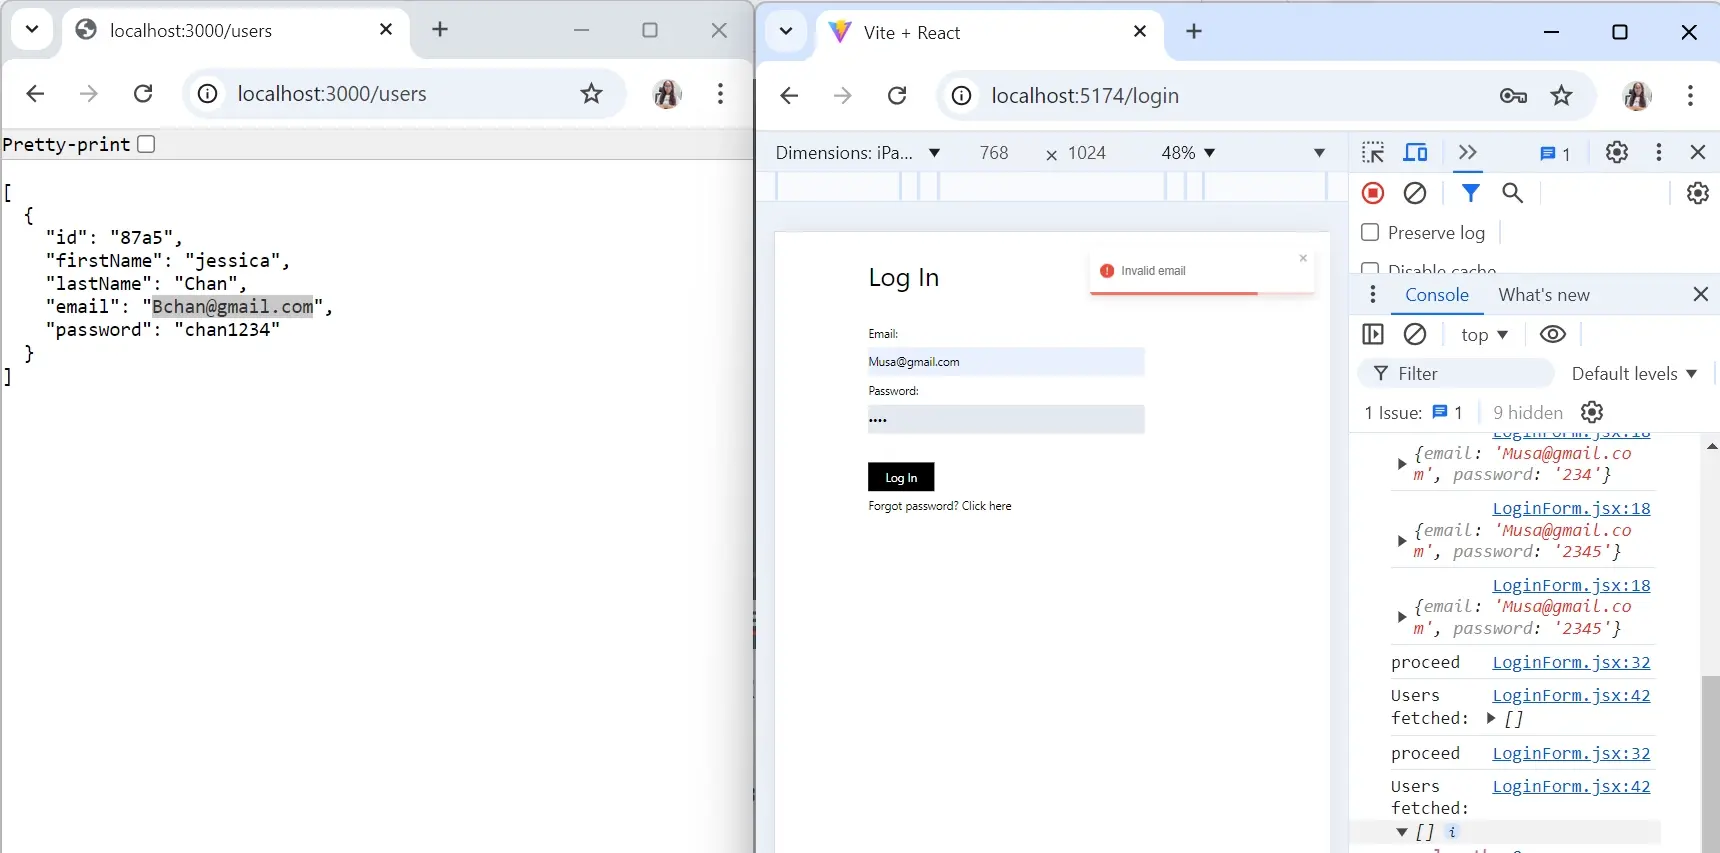
In the example database, there’s only one registered user, if you try an email and address that’s not recorded, you will get an error, just like the above image.
Login Authentication
Let’s implement a basic form of authentication using Session Storage, Navigate and React useEffect hook.
A products page was created earlier in the example. Now, to ensure that users cannot navigate the products page without logging in first, you need to do the following;
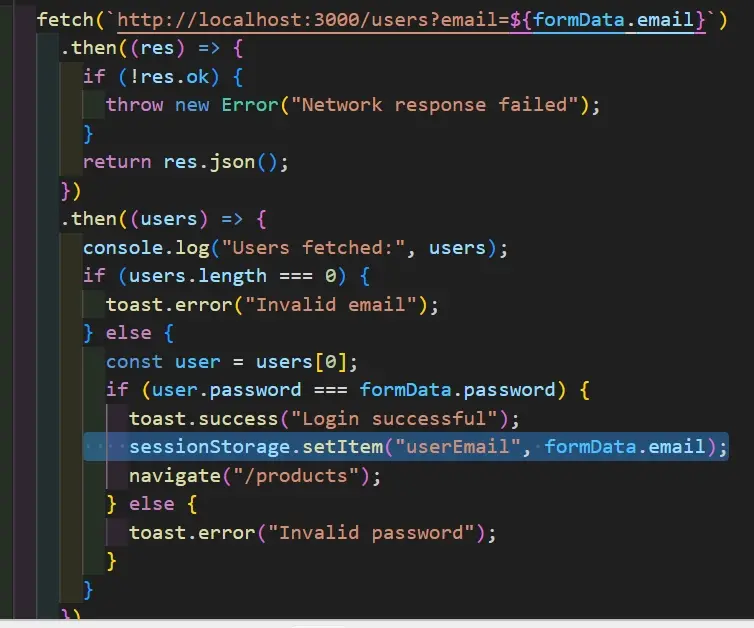
In the proceedLogin function add the following code;
sessionStorage.setItem("userEmail", formData.email);
Use the image below as reference;
Go to your products page and add the following code,
  const navigate = useNavigate();


  useEffect(() => {
    let userEmail = sessionStorage.getItem("userEmail");


    if (userEmail === "" || userEmail === null) {
      navigate("/login");
    }
  }, []);
Here’s the image for reference.
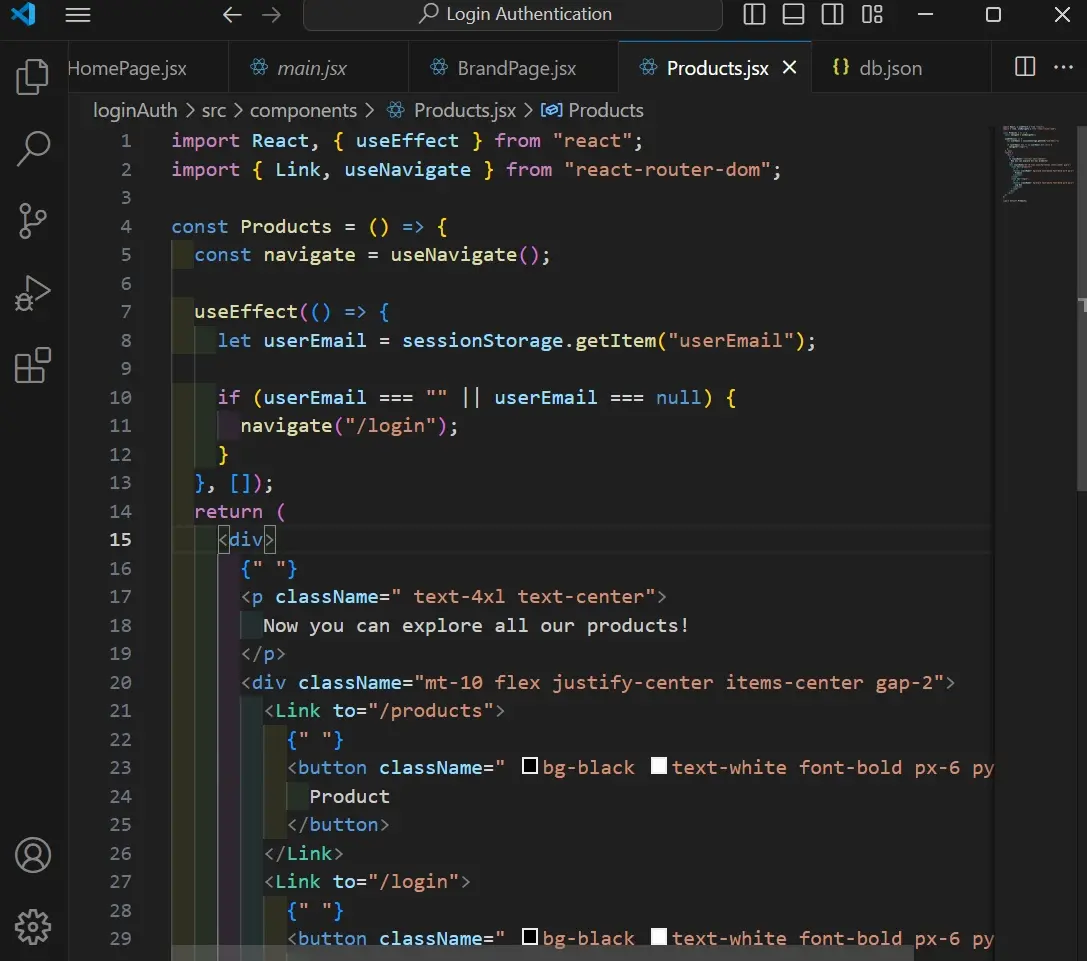
By doing this, the useEffect will run when you navigate to the products page. During the process, it will check if the user is logged in to determine whether to display the products page.
In this example, the if statement checks if user email is stored in session storage, which determines that the user is logged in. If the email is an empty string or null, it means there's no email stored.
If there’s no email stored, the navigate("/login") redirects the user back to the login page.
In a real-world scenario or more complex production environment, there are different authentication methods that can be used to manage user access and secure applications. Some common authentication types include;
Token-Based Authentication: Which can be used to add additional layer of security, usually a second form of verification like OTP, SMS code, etc
OAuth authentication: Allows users access to third-party applications using existing credentials from a trusted service e.g., google.
Biometric Authentication: Biometric authentication uses physical features to verify users’ identity e.g., facial recognition.
2FA (Two-Factor Authentication): 2FA requires two methods of identification like the typical email / password with a verification code.
Single Sign-On authentication: SSO allows users login once to access multiple services via a centralised server.
API key Authentication: API key ensures only request keys are granted access to an API.
Summary
Frequently Asked Questions
Will zero trust hinder user experience by adding extra layers of authentication?
Zero trust does not mean compromising user experience. The goal is to balance robust security with user convenience. Modern authentication methods and adaptive controls ensure security without causing inconvenience.
Can I use JavaScript frameworks like React or Vue.js in my WordPress plugin?
Yes, you can. Enqueue your scripts properly using wp_enqueue_script(). Ensure compatibility with WordPress core and consider using the REST API for seamless communication.
Are there specific hosting requirements for JavaScript frameworks like React, Angular, or Vue.js?
Answer: Generally, hosting for client-side JavaScript frameworks like React, Angular, or Vue.js does not require specialized servers since the frameworks run in the user's browser.
What's the role of multi-factor authentication (MFA) in a Zero Trust reseller hosting model?
MFA adds an extra layer of security by requiring users to provide multiple proofs of identity before gaining access, aligning with the zero-trust principle of strict authentication.

Jessica Agorye is a developer based in Lagos, Nigeria. A witty creative with a love for life, she is dedicated to sharing insights and inspiring others through her writing. With over 5 years of writing experience, she believes that content is king.
View all posts by Jessica Agorye


