Welcome to our in-depth guide on understanding Kubernetes. Whether you're a seasoned developer, an IT professional, or a beginner stepping into the world of container orchestration, this guide is designed to provide a clear, comprehensive, and engaging understanding of Kubernetes and how it can serve you in your projects.
So let's get started right away with some definitions.
What is Kubernetes?

Kubernetes, also known as K8s, is an open-source system that simplifies the process of deploying, scaling, and managing applications housed in containers. It organizes containers into logical groupings, making their management and discovery more straightforward.
Initially developed by Google, Kubernetes is now managed by the Cloud Native Computing Foundation (CNCF). It leverages Google's extensive experience – over 15 years – in running large-scale workloads, along with the best practices and innovative ideas from the broader community.

Kubernetes is a powerful tool for managing distributed systems with resilience. It can handle scaling and failover of your applications, offer different deployment strategies and manage canary deployment for your system.
Why Use Kubernetes?
Kubernetes addresses numerous prevalent challenges associated with distributed systems, including service discovery, scaling, load balancing, and executing rolling updates. It empowers developers by providing the flexibility to utilize on-premise, hybrid, or public cloud infrastructure, enabling them to seamlessly shift workloads as per their requirements.
Kubernetes is not a conventional, all-encompassing Platform-as-a-Service (PaaS) system. It maintains user autonomy and adaptability in crucial areas while introducing potent features for service deployment and scaling.
Prominent companies such as Spotify, Pinterest, and Box have transitioned to Kubernetes, gaining advantages such as enhanced developer productivity, increased operational efficiency, and a sturdier infrastructure. These organizations have experienced notable reductions in resource expenses due to the optimized hardware resource utilization facilitated by Kubernetes.
Core Concepts of Kubernetes
Kubernetes utilizes a number of fundamental principles to aid in the control and orchestration of containers:
Pods: A Pod is the most basic and elementary unit in the Kubernetes object model that you have the ability to create or deploy. It signifies an active process within your cluster and has the capacity to host one or more containers.
Services: A Service within the Kubernetes system is an abstraction that identifies a logical assembly of Pods and facilitates the exposure of external traffic, load balancing, and service discovery for these Pods.
Volumes: A Volume within Kubernetes is a directory that could potentially contain data, and is accessible to a Container as an element of its filesystem. Kubernetes is compatible with a wide variety of Volumes, each possessing distinct attributes.
Namespaces: Namespaces function as a mechanism to distribute cluster resources among multiple users. In a production environment, a cluster can be segmented into numerous namespaces.
Deployments: A Deployment offers a declarative method for updating Pods and ReplicaSets. You outline a desired state in a Deployment, and the Deployment Controller modifies the actual state to align with the desired state in a controlled manner.
But how does this all go together? Let’s discuss architecture next.
Kubernetes Architecture
The structure of Kubernetes is split into two primary components: the Control Plane (Master Nodes) and the Data Plane (Worker Nodes).
Master Nodes: The master node is tasked with preserving the intended state of the cluster, such as the running applications and the container images they utilize. The master node oversees worker nodes and pods within the cluster.
Worker Nodes: Worker nodes are the ones that actually execute the applications and workloads. Each worker node is a physical or virtual machine, and each machine is managed by the master node.
Got all that? Now let’s turn our attention to how to set up a Kubernetes environment using the knowledge you’ve acquired thus far.
Setting Up a Kubernetes Environment
Creating a Kubernetes environment involves a series of steps, from installing the required software to forming your initial cluster. Here's a concise overview of the process:
1. Install Kubernetes
The first step in setting up a Kubernetes environment is to install Kubernetes itself. There are several methods to accomplish this, and the best one for you depends on your specific needs and environment.
One common method is to use a package manager, which is a tool that automates the process of installing, updating, and removing software. For Ubuntu, the package manager is called apt, and for CentOS, it's called yum.
Here's a brief rundown of how you might install Kubernetes using apt on Ubuntu:
First, you need to update your packages. You can do this with this command:
sudo apt-get update
Next, you need to install some software that Kubernetes depends on. This includes apt-transport-https, which allows the package manager to transfer files over https, and docker.io, which is the Docker engine that will run your containers. You can install these with this command:
sudo apt-get install apt-transport-https docker.io
Now you're ready to add the Kubernetes package repository. You can do this with the following commands:
curl -s https://packages.cloud.google.com/apt/doc/apt-key.gpg
sudo apt-key add -echo "deb http://apt.kubernetes.io/ kubernetes-xenial main"
sudo tee/etc/apt/sources.list.d/kubernetes.list
After adding the repository, you can install Kubernetes with this command:
sudo apt-get install kubelet kubeadm kubectl.
Alternatively, you can install Kubernetes using a binary package provided by the Kubernetes project. This involves downloading the package from the Kubernetes GitHub repository, extracting the files, and moving them to the appropriate directories on your system.

This method requires more manual steps, but it gives you more control over the installation process and allows you to install specific versions of Kubernetes.
Regardless of the method you choose, after installing Kubernetes, you should verify the installation by running the command kubectl version. This will display the version of Kubernetes that you installed, and confirm that the installation was successful.
2. Set Up the Master Node
After Kubernetes is installed, the subsequent step is to set up the master node. The master node is tasked with managing the state of the Kubernetes cluster, including the scheduling of pods and maintaining the intended state of the applications running on the cluster.
Setting up the master node involves initializing the cluster with the kubeadm init command and then setting up a network plugin.
3. Join Worker Nodes to the Cluster
Following the setup of the master node, the next step is to join one or more worker nodes to the cluster. This is achieved using the kubeadm join command, which needs to be run on each worker node. The command includes a token and the IP address of the master node, which are used to securely join the worker node to the cluster.
4. Install a Network Plugin
Kubernetes necessitates a network plugin to manage communication between pods. There are multiple network plugins available for Kubernetes, including Calico, Weave, and Flannel. The network plugin is typically installed as a set of pods in the cluster.

5. Deploy an Application
Once the cluster is set up and the network plugin is installed, you can commence deploying applications. This generally involves creating a deployment configuration file that describes the application and then using the kubectl apply command to create the deployment.
6. Test the Cluster
After an application is deployed, you should test the cluster to ensure everything is functioning correctly. This can involve scaling the application, updating the application, or simulating a node failure to observe how the cluster reacts.
Deploying an Application with Kubernetes
The process of deploying an application with Kubernetes involves multiple steps, from crafting a Docker image for your application to outlining a Kubernetes Deployment.
Here's a concise explanation of the process:
Transform Your Application into a Container
Kubernetes operates applications in containers, so the initial step is to transform your application into a container. This usually involves writing a Dockerfile that outlines how to construct a Docker image for your application. The Dockerfile incorporates instructions for installing any required dependencies, as well as directives on how to initiate your application.
Construct a Docker Image
Once you possess a Dockerfile, you can utilize Docker to construct a Docker image for your application. This involves executing a command like docker build -t my-app which instructs Docker to build an image using the Dockerfile in the current directory and to tag the image with the name my-app.
Transfer the Docker Image to a Registry
After constructing a Docker image, you need to transfer the image to a Docker registry. This is a place where Docker images are stored and can be accessed from. You can use a public registry like Docker Hub, or you can use a private registry. To transfer an image to Docker Hub, you would use a command like docker push my-app.

Formulate a Kubernetes Deployment
A Kubernetes Deployment is a resource that describes a desired state for your application. The Deployment informs Kubernetes of the number of replicas of your application to run, as well as which Docker image to use for your application. You define a Deployment using a YAML or JSON file, and then apply it using the kubectl apply command.
Expose Your Application
Once your application is operational, you need to expose it so that users can access it. In Kubernetes, this is typically done using a Service, which is a stable endpoint that directs traffic to one or more Pods. You define a Service using a YAML or JSON file, and then apply it using the kubectl apply command.
Scale Your Application
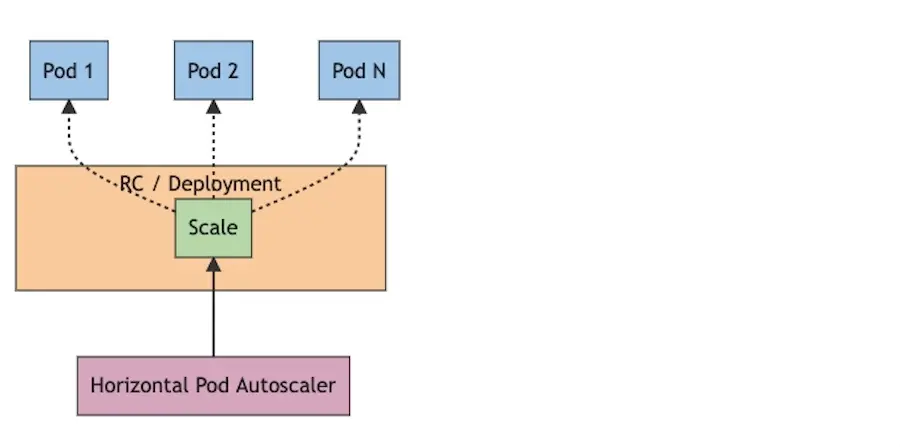
Kubernetes simplifies the process of scaling your application to accommodate more traffic. You can scale your application by increasing the number of replicas in your Deployment. This can be done manually using the kubectl scale command, or automatically using a Horizontal Pod Autoscaler.

Update Your Application
Kubernetes also simplifies the process of rolling out updates to your application. You can update your application by altering the Docker image in your Deployment and then applying the updated Deployment using the kubectl apply command. Kubernetes will gradually roll out the update to minimize disruption to your users.
Get Started with Kubernetes
Kubernetes has become the go-to solution for container orchestration, providing a robust platform for deploying and managing distributed systems. As you continue your journey with Kubernetes, remember that the Kubernetes community is a valuable resource.
There are numerous resources available to help you further your understanding of Kubernetes. The official Kubernetes documentation is a great place to start. For more hands-on learning, consider the Kubernetes Basics tutorial. If you prefer a structured learning path, the Introduction to Introduction to Kubernetes course on edX is a fantastic resource.
Finally, when it comes to hosting your Kubernetes applications, consider Verpex Hosting. Verpex offers a range of cloud hosting services that are perfect for running Kubernetes. With Verpex, you can focus on building your applications while they take care of the infrastructure. Good luck on your Kubernetes journey!
Frequently Asked Questions
Can I choose between managed and unmanaged services?
Yes, for both VPS and dedicated hosting you have a choice of both. It all depends on how much control and responsibility you’d like over your servers.
How can managers foster TRM development in their employees?
Managers can foster TRM development in their employees by tailoring their management style to the employee's TRM level, providing training and skill development opportunities, assigning challenging tasks and projects, and empowering employees to make decisions.
What type of web hosting supports SaaS?
SaaS is provided via cloud-based hosting environments such as cloud, dedicated, and managed hosting. Choosing the best hosting type depends on the specific needs of the application. A reliable hosting provider is crucial for a successful SaaS deployment.
How quickly can I deploy an application using SaaS hosting?
Applications can be quickly deployed using SaaS hosting, which usually takes just a few minutes.

Brenda Barron is a freelance writer and editor living in southern California. With over a decade of experience crafting prose for businesses of all sizes, she has a solid understanding of what it takes to capture a reader's attention.
View all posts by Brenda Barron


