Understanding your website's performance is a must. How else can you possibly improve? And Google Tag Manager (GTM) offers a powerful way to track and analyze user interactions on your WordPress site. Unlike basic analytics tools, GTM allows for more customized tracking, enabling you to understand your audience's behavior in greater depth.
That's why we've put together this guide that will walk you through the process of integrating GTM into your WordPress website, step by step.
What is Google Tag Manager?
Google Tag Manager (GTM) is a free, powerful tool designed to manage and deploy tracking tags on your website without needing to modify the code.
At its core, GTM involves two main components: tags and triggers. Tags are snippets of code or tracking pixels from third-party tools like Google Analytics, Facebook Pixel, or other advertising platforms.
Triggers, on the other hand, are the conditions you set to determine when these tags should be activated or fired on your website. For example, you might set a trigger to fire a tag every time a user submits a contact form.
Benefits of Using GTM in WordPress
Integrating GTM with your WordPress site brings several key benefits, including:
Simplified Tag Management: GTM's user-friendly interface allows you to easily add, edit, or remove tags without touching your site's source code. This means less risk of code errors and more control over your tracking tools.
Enhanced Tracking Capabilities: With GTM, you can track a wide array of user interactions, from clicks and form submissions to time spent on a page. This data is invaluable for understanding user behavior and improving your site's performance.
Faster Website Changes: Since GTM operates independently of your site's code, changes made within GTM are reflected almost instantly on your site. This speed is crucial for timely updates, especially in fast-paced marketing environments.
Reduced Dependency on Developers: GTM's ease of use means that even those with limited technical expertise can manage their site's tracking tools, reducing the need for constant developer intervention.
Preparing to Add GTM to WordPress
Before diving into the integration of Google Tag Manager with your WordPress site, you should be sure of one key aspect:
Ensure Administrative Access to Your WordPress Site
To integrate GTM, you'll need administrative privileges on your WordPress site. This access allows you to edit theme files or install plugins, which are crucial steps in the integration process. Make sure you have these rights, or if you're working with a team, confirm that someone can provide you with the necessary access.
Key Considerations Before Installation
Before proceeding with the integration, here are some key considerations to keep in mind:
Backup Your WordPress Site: It's a golden rule in website management -- always backup your site before making any changes. This precaution ensures that you can restore your site to its previous state if anything goes awry during the integration process. You can use various WordPress plugins or your hosting provider's tools to create a backup.
Be Mindful of Performance Impact: Integrating new features like GTM can influence your site's performance. While GTM is designed to be lightweight and efficient, it's still adding extra functionality to your site. After integrating GTM, keep an eye on your site's speed and user experience. Tools like Google PageSpeed Insights can be handy for monitoring performance post-integration.
By taking these preparatory steps and considerations into account, you're setting the stage for a successful and hassle-free integration of Google Tag Manager with your WordPress site.
Step-by-Step Guide to Adding GTM to WordPress
Integrating Google Tag Manager with your WordPress site might seem daunting, but it's quite straightforward. Here's a step-by-step guide to get you through the process smoothly.

Creating a GTM Account
1. Visit Google Tag Manager: Start by navigating to the Google Tag Manager website. If you're not already logged in, you'll need to sign in with your Google account.
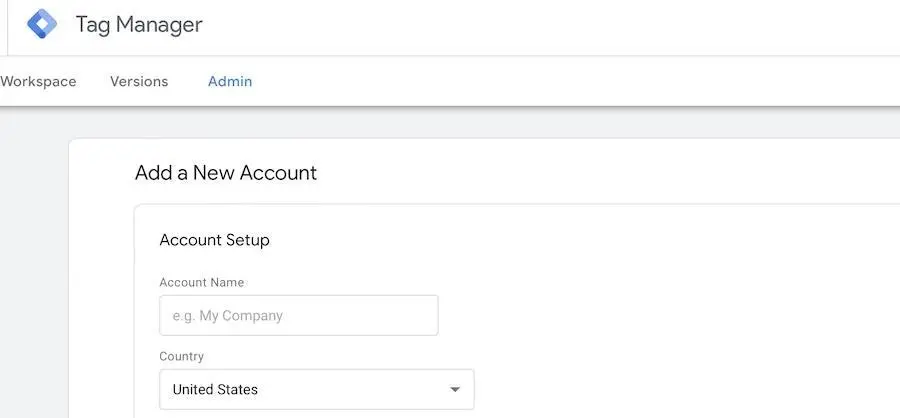
2. Set Up Your Account and Container: Once logged in, click on Create Account. Name your account (typically, this would be your company or website name). Next, create a container for your website. Containers hold all your tags, such as those for Google Analytics, AdWords, and other services. Choose Web as the target platform.
3. Note Your GTM ID: After setting up your account and container, you'll be given a GTM ID (looking something like GTM-XXXX). Keep this ID handy as you'll need it for the WordPress integration.
Installing GTM on WordPress
There are two primary ways you can complete this step.
Option 1: Manual Installation
1. Locate the GTM Code Snippets: In your GTM dashboard, you'll find two pieces of code. These need to be added to your WordPress site.
2. Edit Your Theme Files: Access your WordPress dashboard and navigate to Appearance > Theme Editor. Be cautious here; editing theme files directly can affect your site's functionality.
3. Insert the Code Snippets: Find your theme's header.php file. Paste the first code snippet immediately after the
tag. Then, locate the opening tag and paste the second code snippet right after it.4. Save Your Changes: After inserting both snippets, save your changes. It's crucial to ensure that the codes are placed correctly to avoid any issues.
Option 2: Using a Plugin

1. Choose a GTM Plugin: There are several plugins available for integrating GTM with WordPress. A popular choice is Google Tag Manager for WordPress.
2. Install and Activate the Plugin: In your WordPress dashboard, go to Plugins > Add New. Search for your chosen GTM plugin, install it, and then activate it.
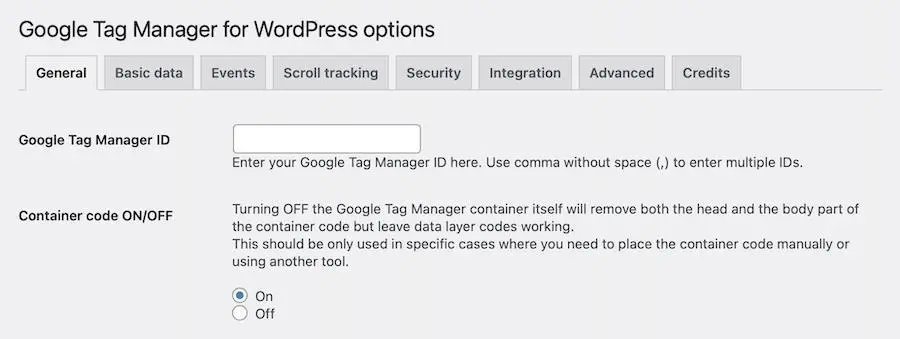
3. Configure the Plugin Settings: Once activated, navigate to the plugin's settings. Here, you'll need to enter your GTM ID. The plugin will then automatically add the necessary GTM code to your site.

4. Check for Additional Features: Some plugins offer extra features like setting up data layers or configuring specific tracking options. Explore these settings to maximize your GTM usage.
Verifying the Installation
Once you've added GTM to your WordPress site, it's important to verify that it's working correctly. You can use the Preview mode in GTM to ensure that tags are firing as expected. This step is a must to ensure that your tracking data will be accurate.
Common Issues and Troubleshooting
Even with a careful setup, you might encounter some hiccups when integrating Google Tag Manager with your WordPress site. Here are some common issues and their solutions to help you troubleshoot effectively.
GTM Code Not Working
If you're having trouble getting GTM to work on your WordPress site, these are some steps to try:
Incorrect Code Placement: Ensure that the GTM code snippets are placed correctly in your WordPress theme files. The first snippet should be immediately after the
<head>tag, and the second right after the opening<body>tag in theheader.phpfile.Cache Issues: If you're using a caching plugin or service, clear your site's cache after installing GTM. Caching can sometimes prevent new changes, like the addition of GTM code, from being immediately visible.
Conflicts with Other Plugins or Themes
If you're experiencing conflicts between GTM and other plugins or your theme, here's what you can do:
Plugin Conflicts: Some WordPress plugins, especially those related to caching or security, might interfere with GTM. Try deactivating other plugins one by one to identify if there's a conflict.
Theme Issues: Occasionally, a theme's code or settings might conflict with GTM. If you suspect this, temporarily switch to a default WordPress theme (like Twenty Twenty-Three) to see if the issue is resolved.
Data Not Showing in GTM or Analytics
If you're not seeing data in GTM or Google Analytics, here's what you can do:
Tag Configuration: Double-check your tag configurations in GTM. Incorrect setup or typos in tag settings can lead to data not being captured correctly.
Trigger Misconfiguration: Ensure that triggers are set up correctly. A common mistake is setting a trigger that's too specific or too broad, causing tags not to fire as intended.
Security and Privacy Concerns
Lastly, if you have security or privacy concerns related to using GTM, here's what you should know:
Review Tag Sources: Only use tags from reputable sources. Unverified third-party tags can pose security risks.
Compliance with Privacy Laws: Ensure that your use of tags and data collection complies with privacy laws like GDPR or CCPA. This might involve setting up consent mechanisms for cookies or data collection.
Get a Better Handle on Your WordPress Site with GTM
Integrating Google Tag Manager with your WordPress site can significantly enhance your ability to track and analyze user behavior, ultimately leading to more informed decisions and a better-performing website. While the process might seem technical at first glance, following the steps outlined in this guide will make the integration smooth and manageable.
Remember, the key to successful integration lies in careful preparation, accurate implementation, and effective troubleshooting. And by keeping an eye on common issues and knowing how to resolve them, you'll ensure that GTM works seamlessly with your WordPress site, providing valuable insights into your website's performance.
And speaking of performance, if you're looking for a reliable hosting solution that complements your WordPress site's needs, consider Verpex Hosting. Verpex offers optimized hosting for WordPress that ensures your site runs smoothly, loads quickly, and remains secure. That's a pretty powerful combination.
Frequently Asked Questions
How can I integrate advanced analytics and tracking into my WooCommerce theme?
You can integrate analytics by adding tracking codes or using analytics plugins.
Can I track the delivery status or open rates of my bulk emails from Gmail?
Gmail does not offer built-in tracking for bulk emails, but you can use third-party tools or extensions to track the delivery status and open rates of your bulk emails.
How do I get help with my WordPress site?
There’s never a moment we won’t be here to support the development of your website and your business. Unlike many of our competitors, we’re online 24/7, providing support to our users whenever they need it. We provide a live chat experience so we can quickly communicate in real time, meaning you can swiftly get back to enhancing your customers’ experiences.
How do I transfer my WordPress site for free?
There are many WordPress Migration plugins that are free, including WP Staging, Duplicator, All-in-One Migration, WPvivid Backup, Migrate Guru, and many more.

Brenda Barron is a freelance writer and editor living in southern California. With over a decade of experience crafting prose for businesses of all sizes, she has a solid understanding of what it takes to capture a reader's attention.
View all posts by Brenda Barron


