
If you've spent more than five minutes in Figma, you already know how powerful (and addictive) it can be. From wireframing a new app to collaborating with your dev team or just nudging pixels into place, every click counts.
But if you’re doing all that clicking with your mouse alone, you’re working harder than you need to.
Figma is packed with keyboard shortcuts designed to save you time and help you work more efficiently. Once you start using them, you’ll wonder how you ever lived without them.
In this guide, we’ll cover the most essential Figma shortcuts. From basic navigation and shape tools to layering, alignment, and collaboration, we’ll cover it all with clear examples and visual aids to make it easy to follow.
Let’s dive in.

How to Access Figma Shortcuts
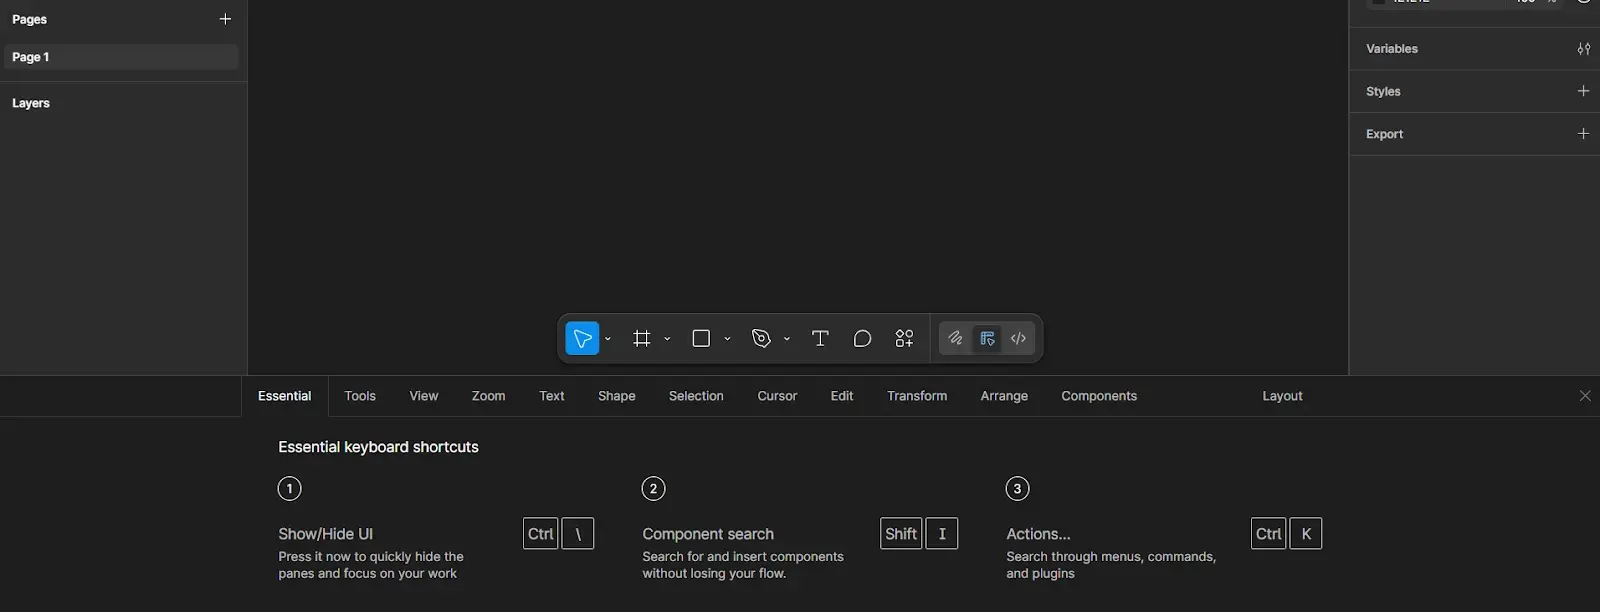
Before we discuss the list of shortcuts, let’s briefly cover how you can explore them right inside Figma.
Figma has a built-in shortcut viewer that you can open with a simple command:
- Mac:
Command + Shift +? - Windows:
Ctrl + Shift +?
Once opened, you’ll see a categorized list of all available keyboard shortcuts. It’s searchable, so you can type “align” or “frame” to find exactly what you need.
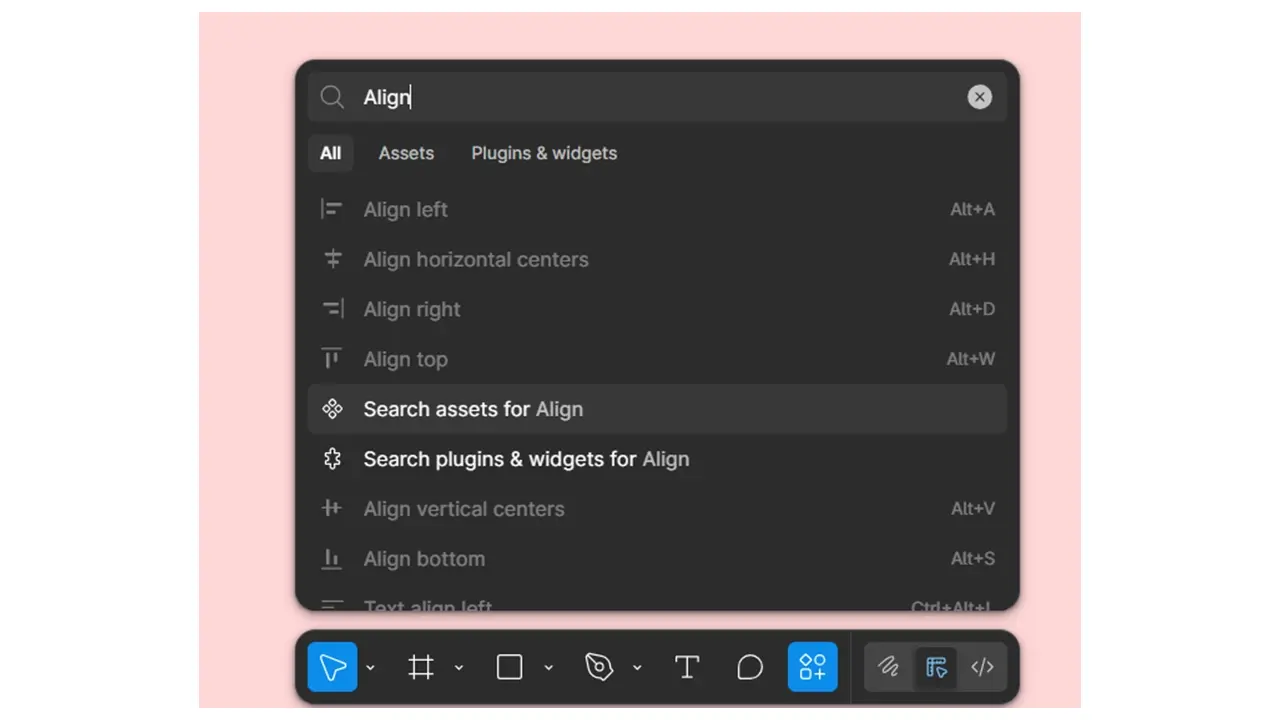
Another handy tool is the Quick Actions menu. You can open it by pressing:
- Mac:
Command + / - Windows:
Ctrl + /
Think of it as a spotlight search for Figma. You can type the name of any action, like “Add Auto Layout” or “Align Center,” and it’ll execute it without needing to click through menus. It's also a great way to explore new commands.
Navigation Shortcuts
Moving around the Figma canvas efficiently is one of the first things that can boost your workflow. If you're constantly reaching for the Zoom tool or dragging your mouse across the screen just to find an artboard, these shortcuts will be your new best friends.
Zooming In and Out
Get a closer look at your design or zoom out to see the big picture:
- Zoom In:
Cmd + (Mac) / Ctrl + (Windows) - Zoom Out:
Cmd - (Mac) / Ctrl - (Windows)
You can also use your trackpad or scroll wheel while holding Cmd or Ctrl to zoom interactively.
Move Around the Canvas
Instead of dragging scrollbars, just hold the Spacebar and click-drag your mouse to pan around. This is especially useful when working on large design systems or multiple frames.
- Pan Tool:
Hold Spacebar + drag
Focus In or Out
Want to quickly focus on a specific selection or zoom out to view everything? Use:
- Zoom to Selection:
Shift + 2 - Zoom to Fit All:
Shift + 1
These shortcuts are perfect when you lose track of your frame or want to show your full design in one view.
Show or Hide the Figma UI
Sometimes, all you need is a clean view of your design, no panels, no distractions. Hide the interface with:
For Toggle UI:
- Mac:
Cmd + \ - Windows:
Ctrl + \
This is great for presenting or recording your design on screen without clutter.
Selection and Layer Shortcuts
Figma’s design power lies in its ease of use with layers. From selecting nested elements to locking and hiding objects, mastering these shortcuts will help you manage complex designs easily.
Select Elements Quickly
Select All on Canvas:
Cmd + A(Mac) /Ctrl + A(Windows) – Selects every element on the current page.Select Inside Groups:
Cmd + Click(Mac) /Ctrl + Click(Windows) – Lets you dive into grouped elements without ungrouping them.Select Parent Group or Frame:
Esc– PressingEscwill move your selection up the hierarchy, perfect for nested designs.
Locking and Unlocking Layers
Locking elements help prevent accidental changes, especially handy when working on background elements or grid systems.
To Lock a Layer:
- Mac:
Cmd + Shift + L - Windows:
Ctrl + Shift + L
To Unlock All Layers: Right-click → Unlock All or use Cmd + Shift + L again if nothing is selected
Show or Hide Elements
Need to temporarily remove an item from view without deleting it?
To Hide/Show Layer:
- Mac:
Cmd + Shift + H - Windows:
Ctrl + Shift + H
Great for toggling between design states or cleaning up your canvas while reviewing layouts.
Select Same Type or Property
You can quickly select all objects with the same properties using the right-click menu or the search bar but shortcuts help when doing it repeatedly.
- While this one doesn’t have a direct keyboard shortcut by default, using Quick Actions
Cmd/Ctrl + /and typing "Select all with same" makes it snappy.
Shape & Frame Tools
Designing in Figma often starts with simple shapes and frames. Whether you're building wireframes, buttons, icons, or layouts, knowing these tool shortcuts will let you move from idea to structure in seconds without touching the toolbar.
Common Shape Tools
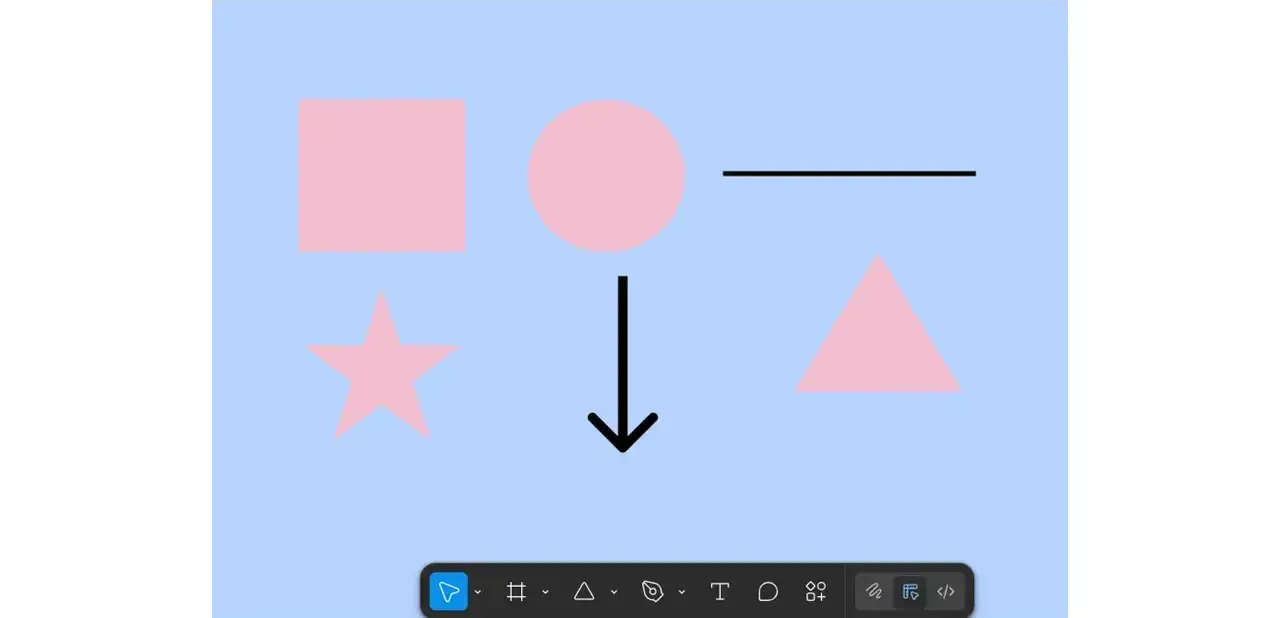
These are the most frequently used shapes in Figma. To create an element, tap the key and click-drag it on your canvas.
- Rectangle Tool:
R - Ellipse Tool:
O - Line Tool:
L - Arrow Tool:
Shift + L - Place Image:
Shift + Ctrl/Cmd + K
You can also hold Shift while drawing to maintain perfect proportions like a square or circle.
Frame Tool
Frames are the backbone of Figma layouts. They're used for artboards, screen designs, or nesting elements with constraints and auto layout.
- Frame Tool:
F
After selecting the Frame tool, you can choose a preset size (e.g., iPhone 14, Desktop, Tablet) from the right-hand panel, or click and drag to draw one manually.
Vector Tool for Custom Shapes
If you're creating icons or custom paths:
- Pen Tool (Vector):
P - Move Tool:
V - Bend Tool:
Shift + Cmd/Ctrl + B
These are more advanced tools, but incredibly useful for precise design.
Pro Tip: Use Shift + R to Toggle Rulers
Rulers help with pixel-perfect alignment and spacing, especially when working on detailed UI or print assets.
- Toggle Rulers:
Shift + R
Text & Typography Shortcuts
Text is a vital part of almost every design headlines, labels, buttons, paragraphs you name it. Knowing how to add, style, and tweak typography with shortcuts can drastically improve your workflow and keep your hands on the keyboard.
Adding and Editing Text
- Insert Text Tool:
TTapT, then click anywhere on the canvas to start typing.
Once your text layer is selected, you can use the following shortcuts to format it on the fly:
Basic Text Formatting
- Bold:
Cmd + B (Mac)/Ctrl + B (Windows) - Italic:
Cmd + I (Mac)/Ctrl + I (Windows) - Underline:
Cmd + U (Mac)/Ctrl + U (Windows)
Text Size and Style Adjustments
- Increase Font Size:
Cmd + Shift + >/Ctrl + Shift + > - Decrease Font Size:
Cmd + Shift + </Ctrl + Shift + < - Align Left:
Cmd + Shift + L/Ctrl + Shift + L - Align Center:
Cmd + Shift + T/Ctrl + Shift + T - Align Right:
Cmd + Shift + R/Ctrl + Shift + R
These let you quickly match typography to your layout without needing to scroll through the properties panel.
Text Auto Width, Height, and Fixed Size
You can also toggle how Figma treats your text box:
- Auto Width / Auto Height / Fixed Size: Use the right sidebar, or access via Quick Actions (
Cmd/Ctrl + / →type "Resize text box")
Pro Tip: Combine this with Auto Layout for super flexible components!
Copy and Paste Text Styles
When you want to apply consistent typography across different elements:
To Copy Text Style:
- Mac:
Cmd + Option + C - Windows:
Ctrl + Alt + C
To Paste Text Style:
- Mac:
Cmd + Option + V - Windows:
Ctrl + Alt + V
Perfect for replicating titles, button styles, or body copy styling.
Grouping, Aligning & Distributing Elements
Once you’ve placed your shapes, text, or UI components, the next step is organizing them cleanly and consistently.
Figma gives you several powerful shortcuts to group items, align them precisely, and distribute them evenly across your layout. Here's how to take full control.
Grouping and Ungrouping
Group Elements:
Cmd + G(Mac) /Ctrl + G(Windows) – Combines selected layers or objects into one group for easier movement or styling.Ungroup Elements:
Shift + Cmd + G(Mac) /Shift + Ctrl + G(Windows) – Breaks grouped items back into individual elements.
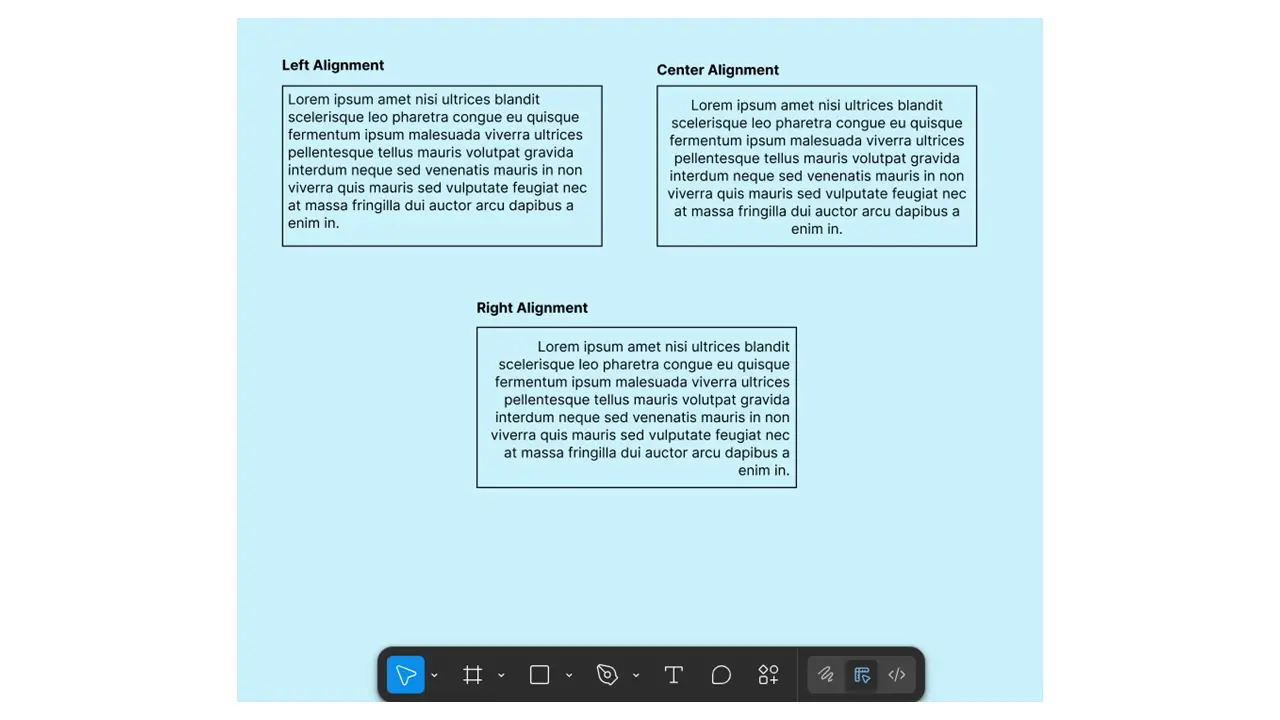
Aligning Elements
Figma provides several alignment shortcuts to keep your design pixel-perfect:
- Align Left:
Option + A(Mac) /Alt + A(Windows) - Align Center (Horizontally):
Option + H/Alt + H - Align Right:
Option + D/Alt + D - Align Top:
Option + W/Alt + W - Align Middle (Vertically):
Option + V/Alt + V - Align Bottom:
Option + S/Alt + S
These shortcuts come in handy when arranging headers, buttons, or icons within frames and components.
You can also hold Option/Alt while dragging elements to see real-time distance measurements between them.
Tidy Up Shortcut
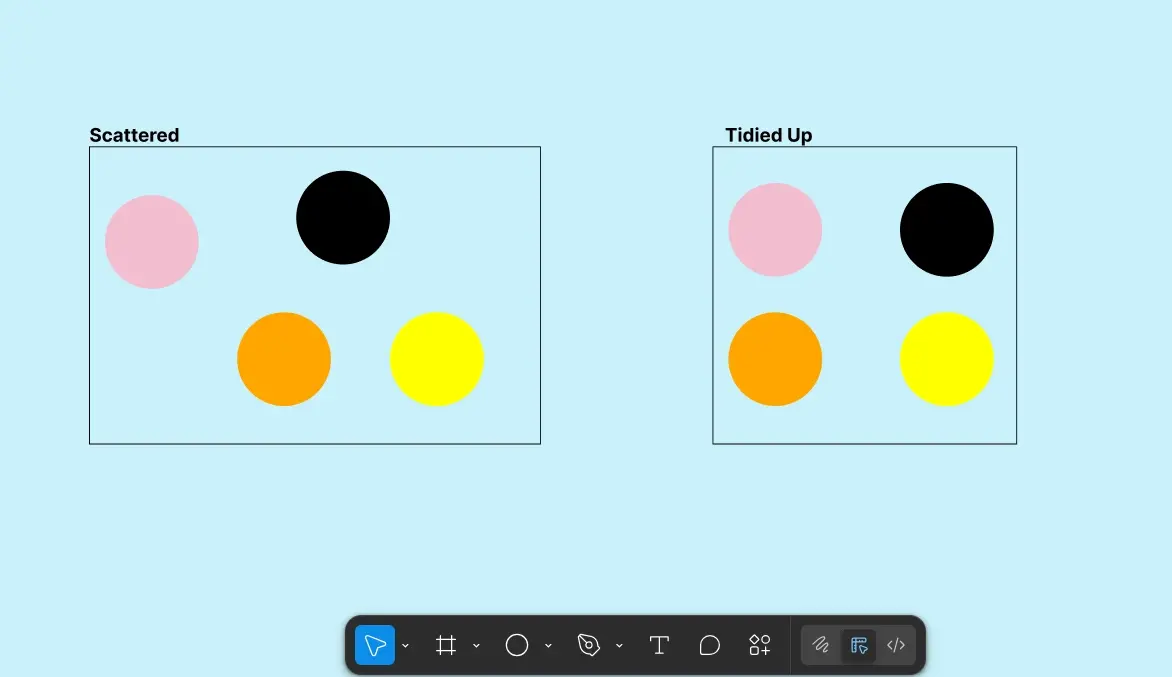
One of Figma’s best layout tools is Tidy Up:
- Mac:
Shift + Cmd + Option + T - Windows:
Shift + Ctrl + Alt + T
This shortcut automatically aligns and distributes selected objects into neat rows or columns based on their current layout perfect for organizing button sets, image grids, or icon lists in one click.
Components & Assets
If you want to work smart (not just fast) in Figma, mastering components is a must. Components let you create reusable elements like buttons, nav bars, or cards that stay consistent throughout your designs. And with a few simple shortcuts, managing them becomes effortless.
Create and Use Components
Create Component:
- Mac:
Cmd + Option + K - Windows:
Ctrl + Alt + K
Turns any selected element into a reusable component.
Detach Instance:
- Mac:
Cmd + Option + B - Windows:
Ctrl + Alt + B
Converts a component instance back into a regular frame. This is useful when you need to customize an element without affecting the main component.
Swap Components Easily
To swap one component instance for another:
- Use the properties panel on the right when the instance is selected
- Or use Quick Actions (
Cmd/Ctrl + /) and type: “Swap instance”
Insert Components from the Assets Panel
Toggle Assets/Design Panel:
- Mac:
Option + 2 - Windows:
Alt + 2(Windows)
You can drag components directly onto your canvas or click to place.
Variants & Component Properties
If you're working with Variants (e.g., Primary vs. Secondary buttons), you can change properties like state, size, or icon visibility right from the properties panel.
No shortcut by default, but combining with Quick Actions makes it seamless.
Commenting & Collaboration
One of Figma’s biggest strengths is real-time collaboration. Whether you're working with a design team, handing off to developers, or gathering feedback from stakeholders, knowing how to comment and communicate effectively in Figma saves everyone time.
These shortcuts help you do that without breaking your design flow.
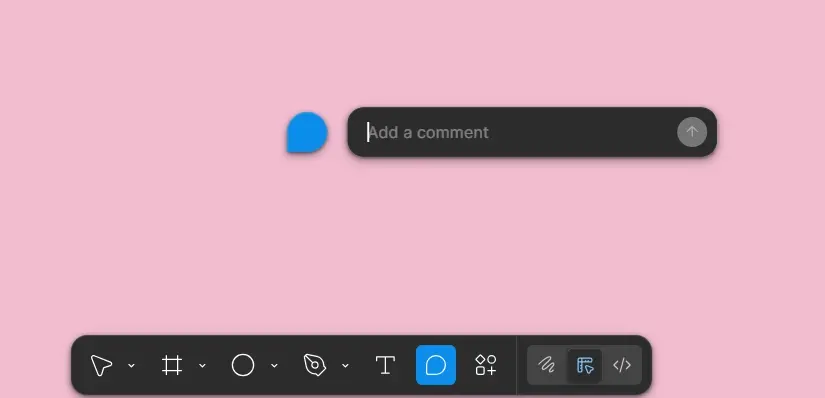
Enter Comment Mode
- Toggle Comment Mode:
Press
Cto switch to comment mode instantly.
This allows you to click anywhere on the canvas and leave contextual comments without selecting or editing anything.
Show or Hide Comments
Show/Hide Comments Panel:
- Mac:
Cmd + Shift + C - Windows:
Ctrl + Shift + C
This toggles the visibility of all comment threads on the canvas.
Navigate Comments
Once you’re in comment mode, use your arrow keys to jump between comments on the canvas. It’s not a formal shortcut per se, but it works great for quick review sessions.
- Up/Down Arrows: Move between comments
- Enter/Return: Open a selected comment

Final Thoughts
Learning keyboard shortcuts might seem like a small thing, but the time you save really adds up, especially when you're deep in a design sprint or collaborating with developers. From navigating the canvas faster to aligning elements perfectly, these shortcuts help you focus more on creating, and less on clicking around.
We’ve covered a wide range from the basics like shapes and text, to power tools like components, comments, and Quick Actions.
Whether you're a developer dabbling in design, a solo creator, or part of a fast-paced design team, mastering these shortcuts is one of the easiest ways to level up your workflow.
So here’s your next step: Pick 5 shortcuts from this guide and use them in your next Figma session. Once they become second nature, add 5 more. Before you know it, you’ll be navigating Figma like it’s second nature.
Happy designing!
Frequently Asked Questions
Will AI replace web developers and web designers in the website development industry?
No, AI is unlikely to replace web developers and designers. Instead, it automates routine web development tasks, allowing professionals to focus on more complex and creative aspects of website creation.
What makes a good glassmorphism website design?
A good glassmorphism website design features a harmonious balance of blurred backgrounds, light and shadow effects for depth, and minimalistic elements that draw attention without overwhelming the user, all while maintaining legibility and a clean layout.
How can I ensure my website's design remains relevant to evolving web trends?
To ensure your website's design remains relevant to evolving web trends, regularly update its layout, incorporate current design trends, and adapt to user feedback and analytics insights.
How do AI web design tools enhance the creative process for professional designers?
AI web design tools automate repetitive tasks, analyze user data for insights, and suggest web design ideas, allowing designers to focus on more complex and creative aspects of site design.

Joel Olawanle is a Software Engineer and Technical Writer with over three years of experience helping companies communicate their products effectively through technical articles.
View all posts by Joel Olawanle


