
Many WordPress websites benefit from having certain content or pages accessible only to logged-in users. Whether you're building a membership site, a private client portal, or an internal company intranet, restricting access to specific areas is a common requirement.
In this article, you’ll learn the process on how to make WordPress pages login-only using a free and effective plugin. We'll cover everything from installation to configuration, along with practical case scenarios to illustrate why this functionality is so valuable.

Why Make WordPress Pages Login-Only? Case Scenarios
Before getting into the "how," let's explore some common scenarios where restricting page access to logged-in users becomes essential. Understanding these use cases will highlight the versatility and importance of this WordPress functionality.
- Membership Websites
- Private Client Portals
- Internal Company Intranet / Employee Hub
- Exclusive Community Forums or Discussion Boards
- Early Access / Beta Content
- Personal Blogs / Family Websites
Membership Websites
This is perhaps the most common reason to make pages login-only. If you're running a membership site, you want to offer exclusive content, resources, or services to your paying subscribers or registered members. Examples include:
Premium Articles/Content: Gating in-depth articles, reports, e-books, or video tutorials for members only.
Online Courses: Providing access to course modules, lessons, quizzes, and discussion forums exclusively for enrolled students.
Exclusive Downloads: Offering downloadable assets like templates, software, or digital products only to members.
Member Directories: Allowing members to view profiles of other members within a community.
Private Client Portals
Freelancers, agencies, and businesses often need a secure space to share confidential information with their clients.
Project Updates: Providing clients with a dedicated page to view project progress, timelines, and deliverables.
Document Sharing: Securely sharing contracts, invoices, drafts, or sensitive documents that only the specific client should access.
Feedback & Collaboration: Creating private pages for clients to provide feedback on designs, content, or other project elements.
Personalized Content: Delivering tailored reports or resources relevant to an individual client.
Internal Company Intranet / Employee Hub
For businesses, a WordPress site can serve as an effective internal communication and resource hub.
Company Announcements: Sharing internal news, policies, and updates that are only relevant to employees.
HR Resources: Providing access to employee handbooks, HR forms, vacation request systems, and payroll information.
Team Collaboration: Creating private pages for specific departments or teams to share project-related documents and discussions.
Training Materials: Hosting internal training modules, onboarding resources, or standard operating procedures.
Exclusive Community Forums or Discussion Boards
If you're building a private community around a specific niche or interest, you might want to ensure only registered and approved members can participate.
Members-Only Discussions: Creating forums or discussion boards where conversations are restricted to logged-in members.
Private Groups: Allowing users to create and manage their own private groups within the community.
Early Access / Beta Content
Before launching a product, service, or new content, you might want to offer early access to a select group of users for testing or feedback.
Beta Program Pages: Providing beta testers with access to pre-release software, features, or content.
Sneak Peeks: Offering an exclusive glimpse of upcoming content or designs to a loyal audience.
Personal Blogs / Family Websites
Sometimes, you might want to share personal content, photos, or updates with a limited audience of friends and family.
Family Photo Albums: Creating private galleries that only family members can view.
Personal Journals: Sharing thoughts or experiences with a trusted circle.
How to Make WordPress Pages Login-Only
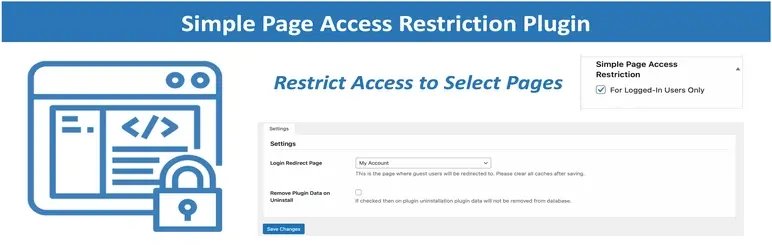
For this tutorial, we will use the Simple Page Access Restriction plugin. It's a lightweight and easy-to-use plugin that provides the core functionality needed to restrict access to pages (and posts) to logged-in users only, and allows for redirection of non-logged-in users. This plugin is perfect for scenarios where you need simple content protection without the overhead of a full-fledged WordPress membership plugin.
Now, let's get into the practical steps of setting up your WordPress pages to be login-only.
- Install the Simple Page Access Restriction Plugin
- Configure the Plugin's Global Settings
- Restrict Individual WordPress Pages (or Posts)
- Test the Restriction
Step 1: Install the Simple Page Access Restriction Plugin
Log in to your WordPress Admin Dashboard: Go to ‘yourwebsite.com/wp-admin’ and enter your credentials.
Navigate to Plugins: In the left-hand sidebar, hover over "Plugins" and click on "Add New."
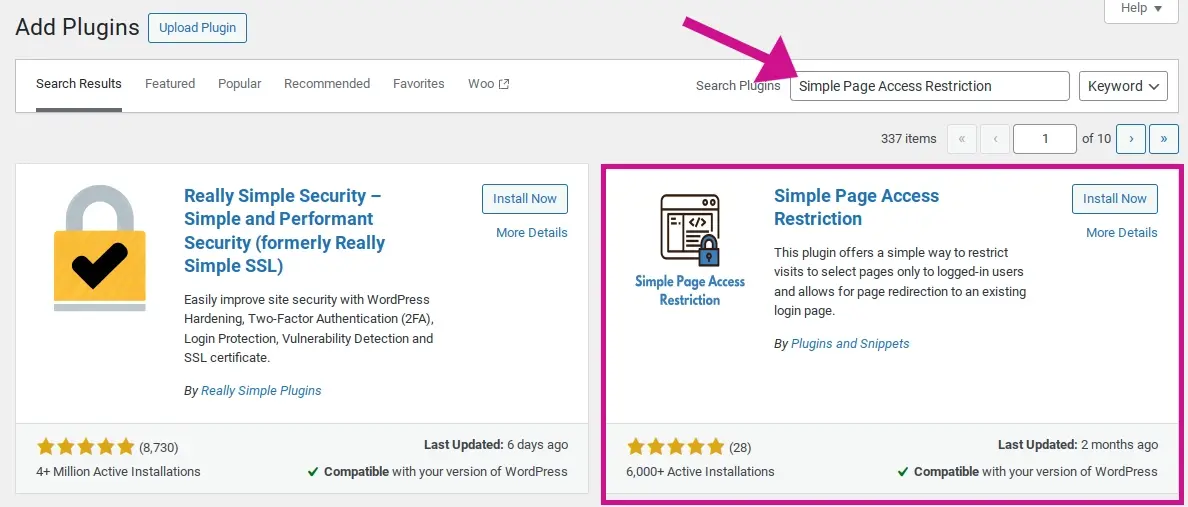
Search for the Plugin: In the search bar on the top right, type "Simple Page Access Restriction" and press Enter.
Install the Plugin: You'll see the Simple Page Access Restriction plugin by "Plugins and Snippets" in the search results. Click on the "Install Now" button next to it.
Activate the Plugin: Once the installation is complete, the "Install Now" button will change to "Activate." Click "Activate" to enable the plugin on your website.
Step 2: Configure the Plugin's Global Settings
After activating the plugin, you'll find a new menu item in your WordPress dashboard.
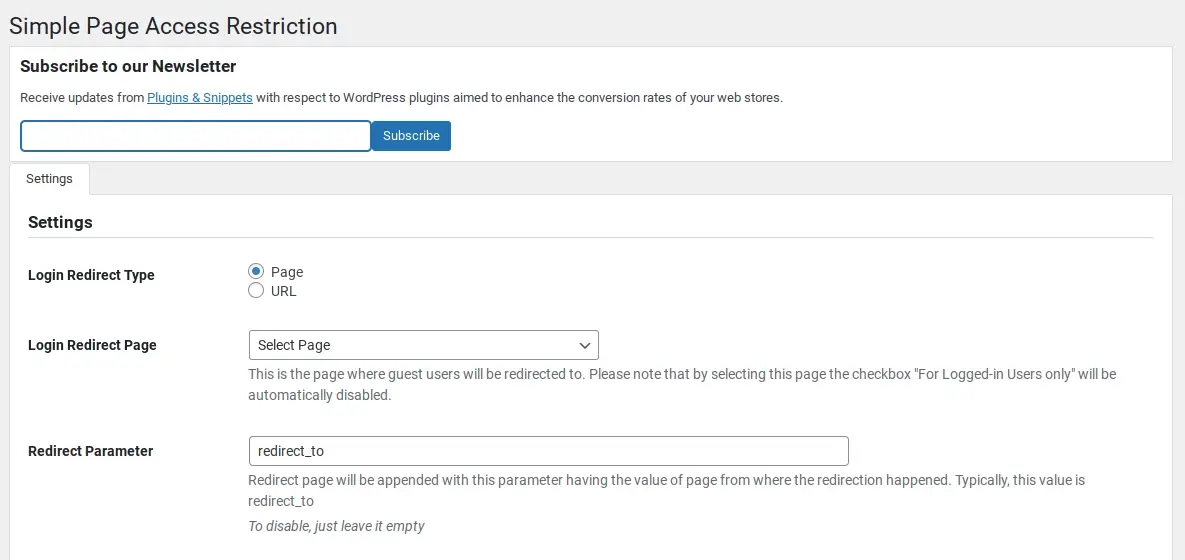
Access Plugin Settings: In the left-hand sidebar, hover over "Settings" and click on "Simple Page Access Restriction."
Define a Login Redirect Page: This is a crucial step. When a non-logged-in user tries to access a restricted page, they will be redirected to the page you specify here.
a. You can either choose an existing page from the dropdown menu (example - your default WordPress login page, or a custom login page you've created).
b. Alternatively, you can enter a custom URL if your login page is external or not a standard WordPress page.
Recommendation: It's best practice to create a dedicated "Login" page on your WordPress site if you don't have one, and then select that page here. This provides a consistent and branded experience for your users. You can create a new page by going to "Pages" > "Add New" and adding a login form (many themes and other plugins offer login form blocks or shortcodes).
Save Changes: After selecting or entering your desired Login Redirect Page, click the "Save Changes" button.
Step 3: Restrict Individual WordPress Pages (or Posts)
Now that the plugin is configured, you can start restricting access to specific pages or posts.
Edit the Page/Post you want to restrict:
a. For Pages: Go to "Pages" > "All Pages." Find the page you want to make login-only and click "Edit."
b. For Posts: Go to "Posts" > "All Posts." Find the post you want to make login-only and click "Edit."
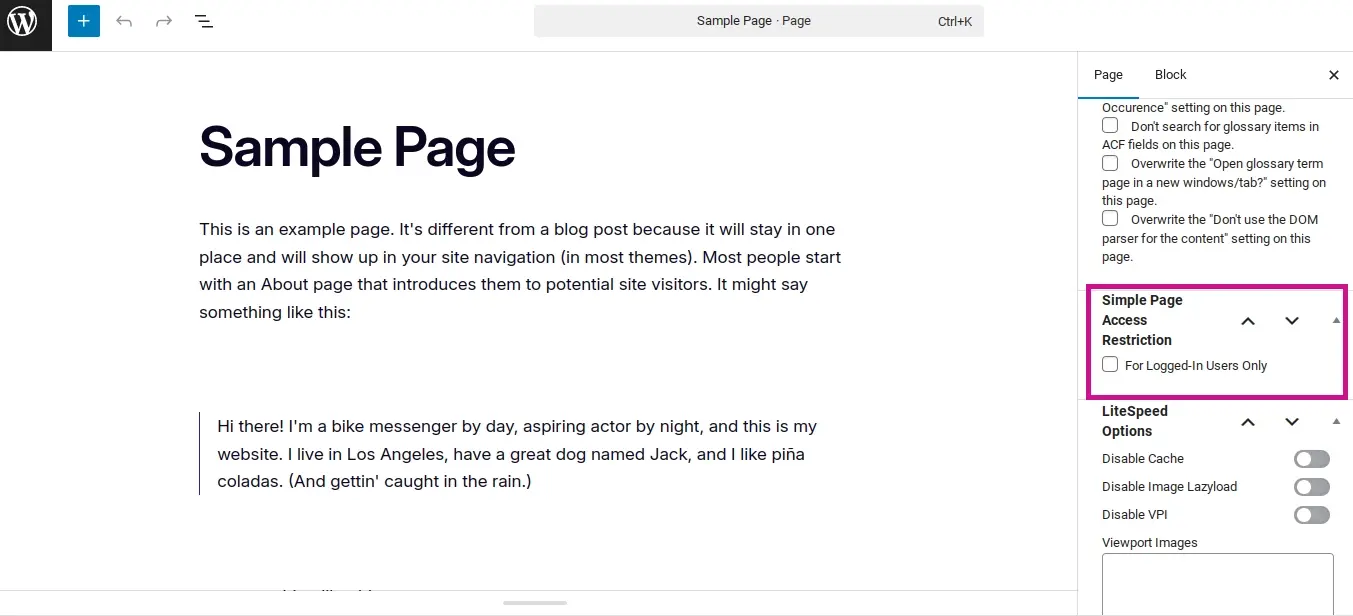
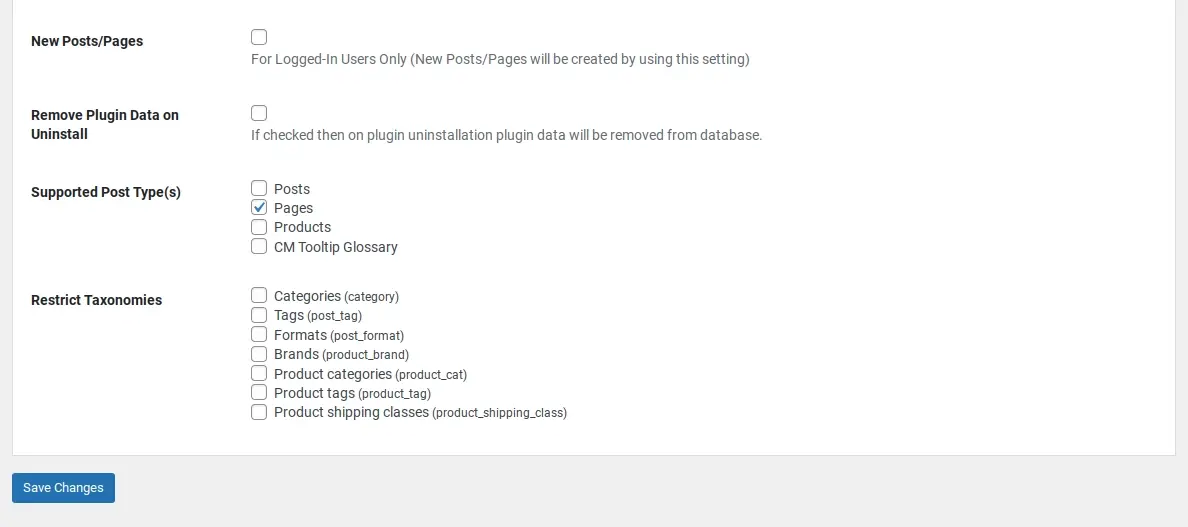
Locate the Simple Page Access Restriction Meta Box: On the page/post editing screen, scroll down. On the right-hand side, you should see a new meta box titled Simple Page Access Restriction (or similar, depending on your WordPress version and other plugins).
Enable Restriction: Inside this meta box, you'll find a checkbox labeled "For Logged-In Users Only." Check this box.
Update the Page/Post: After checking the box, click the "Update" (or "Publish") button to save your changes.
Step 4: Test the Restriction
It's essential to test your settings to ensure everything is working as expected.
Open an Incognito/Private Browser Window: This is important because you are currently logged in to your WordPress admin. An incognito window simulates a logged-out user.
Navigate to the Restricted Page: In the incognito window, enter the URL of the page you just restricted.
Verify Redirection: You should be automatically redirected to the Login Redirect Page you configured in Step 2. If you are, the restriction is working correctly!
Log in and Test Access: Now, log in using a valid user account on your WordPress site (example: a test user, or your own if you're comfortable). After logging in, try accessing the restricted page again. You should now be able to view its content.
Additional Considerations and Best Practices
While the Simple Page Access Restriction plugin is straightforward, keep these points in mind for a more user-friendly experience:
- Custom Login Page vs. Default WordPress Login
- User Roles and Permissions
- Menu Visibility
- Search Engine Optimization (SEO)
- User Registration
- User Experience for Restricted Content
- Security Best Practices
Custom Login Page vs. Default WordPress Login
While the default WordPress login page ('yourwebsite.com/wp-login.php') works, creating a custom login page within your site's design often provides a more professional and branded experience. Many themes and other plugins (like Elementor Pro, SeedProd, or dedicated membership plugins) offer easy ways to design custom login pages.
User Roles and Permissions
The Simple Page Access Restriction plugin primarily restricts content to ANY logged-in user. If you need more granular control, such as restricting content to specific user roles (example - only "Subscribers" or "Editors"), you might need a more advanced membership or content restriction plugin. However, for basic "login-only" functionality, this plugin is sufficient.
Menu Visibility
Restricting a page means non-logged-in users can't access it directly, but they might still see the page listed in your navigation menus. Consider conditionally displaying menu items based on user login status. Some themes or other plugins offer this functionality. If not, users will be redirected when they click the menu item, which is acceptable but can sometimes feel a bit jarring.
Search Engine Optimization (SEO)
Be aware that making pages login-only can affect their visibility in search engine results. Search engine crawlers typically cannot "log in" to view restricted content. If the content is meant to be private, this is usually the desired outcome. If you have content that you want to be private but still discoverable, you might need a different approach (example - password protection for specific content blocks, if your plugin supports it, rather than full page restriction).
As a note, even if search engines can’t see the contact on restricted pages, you may want to set the page to no-index. SEO plugins like Yoast SEO or Rank Math have options to allow you to set individual page and post settings to set it to no-index, and discourage search engines from crawling and listing the page or post in the search engine results (SERPs).
User Registration
If you want users to be able to register on your site to gain access to login-only content, ensure that user registration is enabled in your WordPress settings.
- Go to "Settings" > "General."
- Make sure the "Anyone can register" checkbox is ticked under "Membership."
- Also, consider the "New User Default Role" here.
User Experience for Restricted Content
When a user is redirected to the login page, it's helpful to provide clear messaging. You can customize your login page to say something like, "This content requires you to be logged in. Please log in or register below." This helps guide the user and reduces frustration.
Security Best Practices
While restricting access helps, always follow general WordPress security best practices:
- Use strong, unique passwords for your admin and user accounts.
- Keep WordPress, your theme, and all plugins updated to their latest versions.
- Consider a security plugin for brute-force protection and other common threats.

In Summary
Making WordPress pages login-only is a fundamental feature for many website types, from membership platforms to private client portals. The Simple Page Access Restriction plugin offers a free, efficient, and user-friendly way to make WordPress pages login-only. By following the steps outlined in this tutorial, you can effectively control who can access specific content on your WordPress site, enhancing privacy, exclusivity, and overall user management. Remember to always test your configurations thoroughly and consider the overall user experience for both logged-in and logged-out visitors.
Frequently Asked Questions
Is WordPress free for students?
WordPress is free. Besides buying a domain, the only initial cost is for hosting.
Can I migrate to WordPress.com?
Yes, you can migrate to WordPress.com by exporting your existing site content and importing it into your new WordPress.com site using the built-in import/export tools.
Do more plugins slow down WordPress?
Yes, more plugins can slow down WordPress, especially if they are poorly coded, resource-intensive, or conflict with each other. It's important to use only essential, well-optimized plugins to maintain site performance.

Nile Flores is a long time professional blogger, as well as WordPress website designer and developer from the St. Louis Metro East. Nile blogs at NileFlores.com, where she’s passionate about helping website owners, whether they’re small business owners or bloggers. She teaches about Blogging, Social Media, Search Engine Optimization, Website Design, and WordPress. Additionally, Nile loves to speak at WordCamps (WordPress conferences) across the United States. When Nile isn’t knee-deep in coding, she’s a proud mom of a college student, and enjoys oil painting, cigar smoking, nail art design, and practicing traditional Okinawan kempo karate.
View all posts by Nile Flores

