Stress testing your website is one of the most important things you can do to ensure its success.
For example, if you are launching a new website, or if you're offering a great discount and expect a huge influx of visitors, things can quickly go wrong if your website can't handle an increased number of users.
One way to avoid this is to stress test different aspects of your site to ensure that it can continue to perform well even under strained conditions.
Read the rest of this article to discover the different ways to test your site and the steps you can take to ensure that it's capable of handling large-scale requests by active users.
What is Stress Testing?
Stress testing allows you to determine whether or not your website can handle a certain amount of traffic and still work properly under different or abnormal conditions.
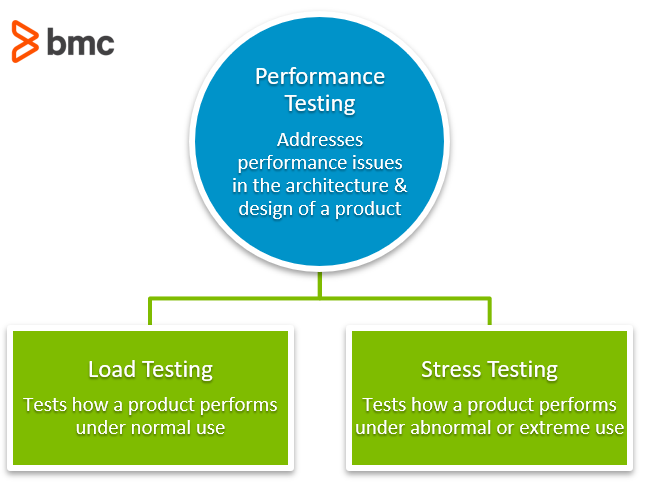
Although many people use stress testing and load testing interchangeably, they are actually different terms.
Where load testing tests how your website performs under normal use, stress testing actually pushes past the normal boundaries to show you how your site performs under extreme use.
Both these tests are a part of performance testing which addresses performance issues in your website's architecture and design.
Your site is designed to handle a certain amount of traffic. This figure varies according to your hosting plan.
The stress test simulates a high number of visitors to your website to see if it can handle the increased load.
Different testing tools come with different features. But at its basis, the process of stress-testing a website is the same. It involves simulating an ever-increasing number of visitors and halting when your website crashes.
So, for instance, you might check to see how long it takes your site to load when there are a particular number of visitors at the same time. You can then use your findings to optimize your website to provide a better experience for users.
If you have limited server resources, it's very likely that a sudden spike in traffic will take your website down. That's why I recommend you use advanced hosting solutions like managed cloud servers.
Even if your website doesn't yet experience large volumes of traffic, you can have the peace of mind of knowing that as it grows, you'll be able to handle the influx of new visitors - especially during peak hours.
What to Check for When Load Testing?
The process of load testing your website involves a number of tests, and it's important for you to understand them if you're going to test your website effectively.
Each test focuses on a different area or specific behavior of your server or website. In other words, each one tests a different “load”, and in order to get a clear picture of how your website performs, you must go through a number of tests, and perform these tests in regular intervals.
Examples of load test metrics include average response time, peak response time, error rate, etc.
After each test, you can make the necessary changes to your website in order to improve performance before testing again.
There are four main load testing types, which are as follows:
Common Load Testing
This test observes the response time of a website page depending on how many visitors are on it.Capacity Testing
This test determines the number of users the server and website can handle before response time falls below required standards.Stress Testing
This test is used to determine breaking points on a website, and the reasons why they occur.Soak Testing
This test monitors trends and changes in behavior to detect problems on the website or server during prolonged user activity.
Depending on the type of tool you use, you may be able to generate a simulated load mimicking different user behaviors, such as changing pages, performing queries, or loading various other functions.
The best stress testing tools may even have the capacity to map out logical flows for different scenarios.
Having said that, here are the steps to follow to stress test your website properly so you know at what point performance starts to degrade.
How to Stress Test Your Website: 5 Easy Steps
If you're ready to load-test your website, then all you have to do is follow the easy steps outlined below. But first, you must choose the right tool to do so.
You can stress test your website using open-source tools, software, or plugins - some of which are free, and others paid.
Here are some popular options to consider:
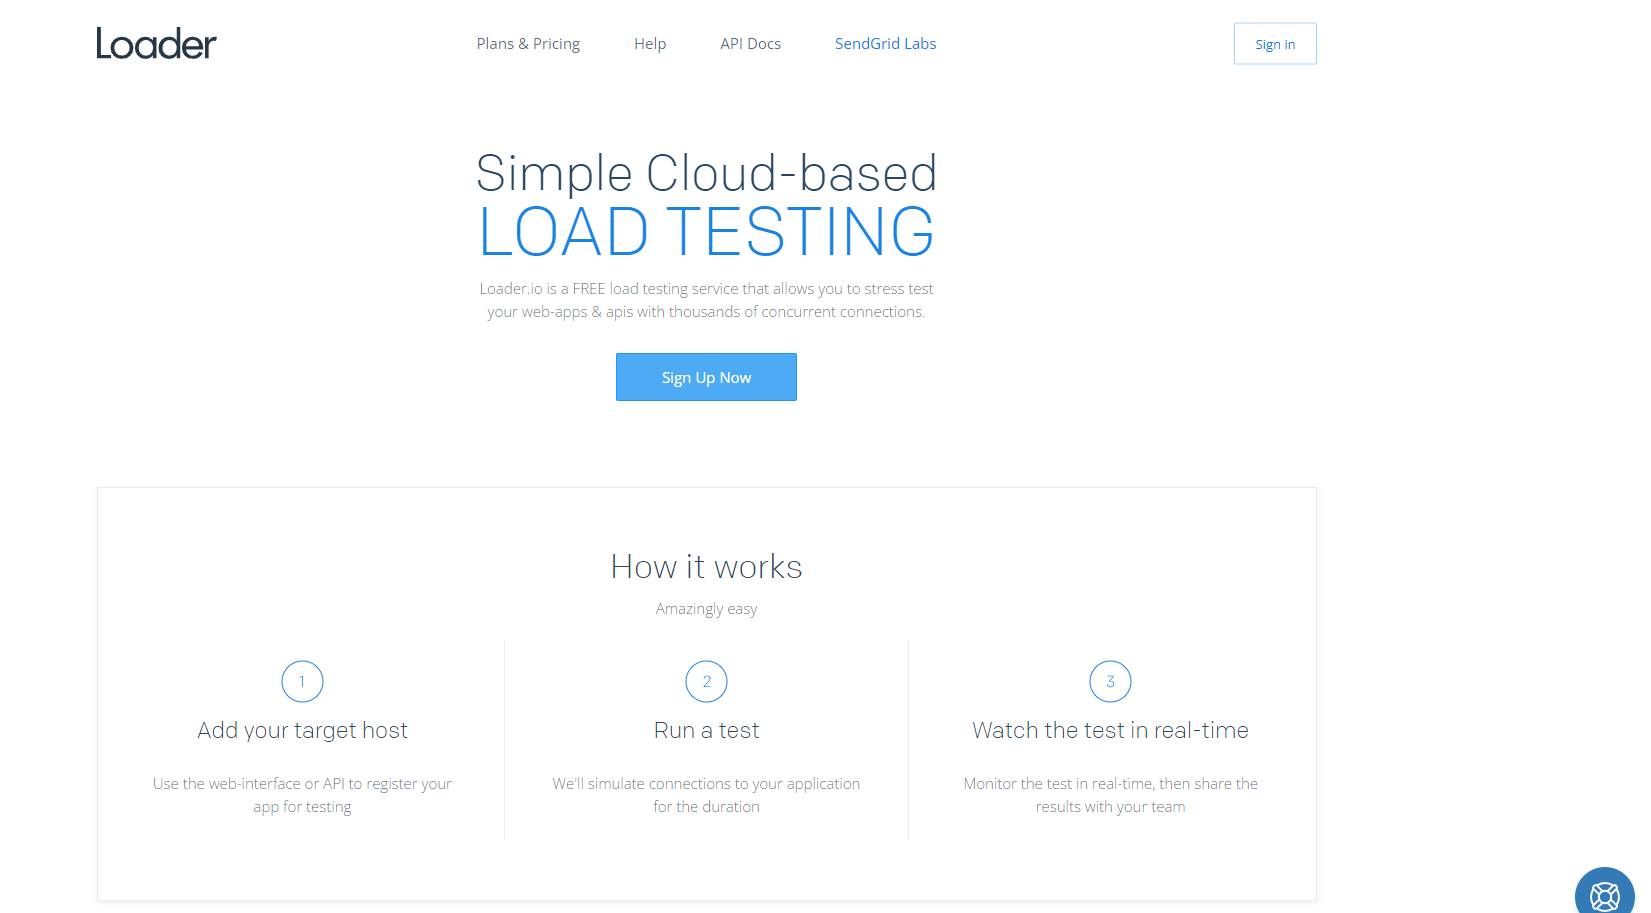
Loader.io
This is a simple, cloud-based website stress testing tool that works in 3 simple steps to provide you with detailed stats and graphs showing how your website is performing.Webserver Stress Tool
This is a powerful HTTP-client/server test application that pinpoints critical performance issues in your web server or website that may prevent visitors from experiencing an optimal experience on your site.QA Wolf
QA Wolf is an end-to-end testing solution that comes with a team of experienced QA professionals to support you during the process of creating and running tests.
Each of these tools offers scalability and an easy way to implement test use cases. You’re guaranteed 100% accurate results on your web browser.
For the purpose of this tutorial, we’ll use Loader.io.
Step #1: Sign Up on Loader.io
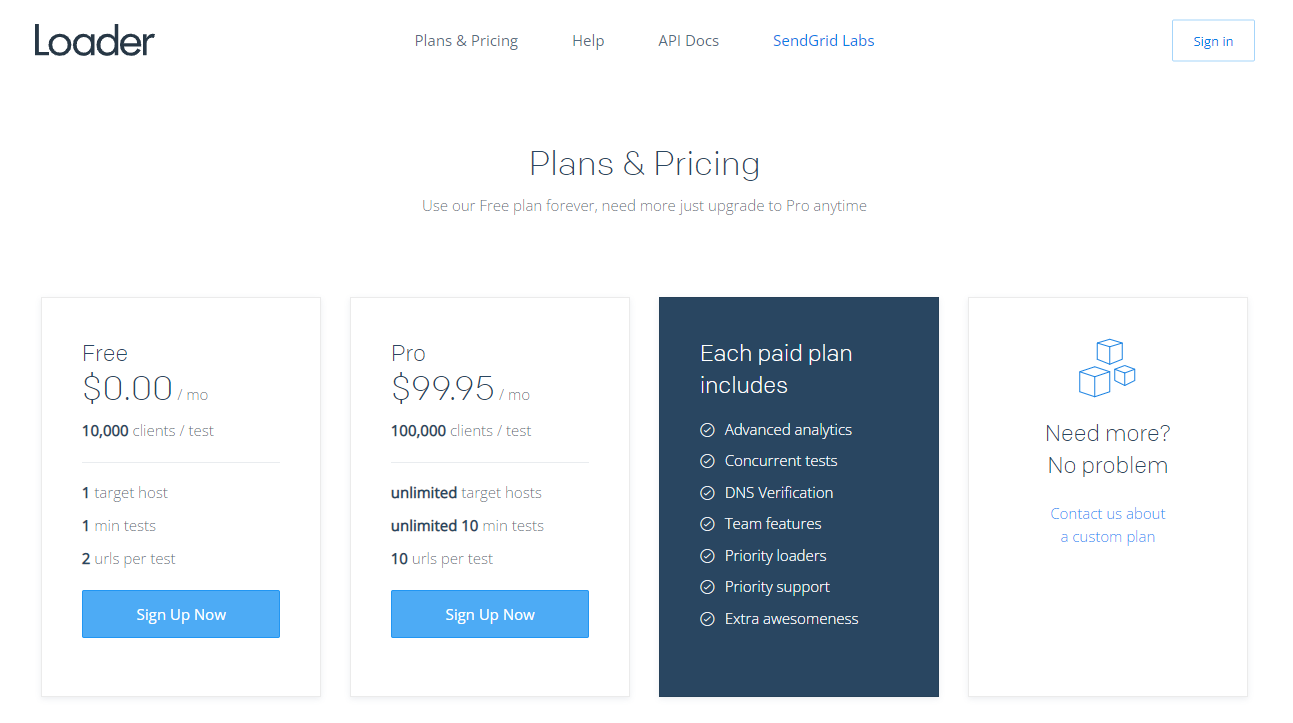
Head over to Loader.io and sign up for a free account. The platform offers a free plan that you can use to test up to 10,000 clients (website visitors) on a single target host (your website). You can use 2 URLs per test on the free plan,
This free version might be enough for smaller websites, but if you’re testing a busier site, then I suggest you opt for the premium plan so you can simulate higher amounts of traffic.
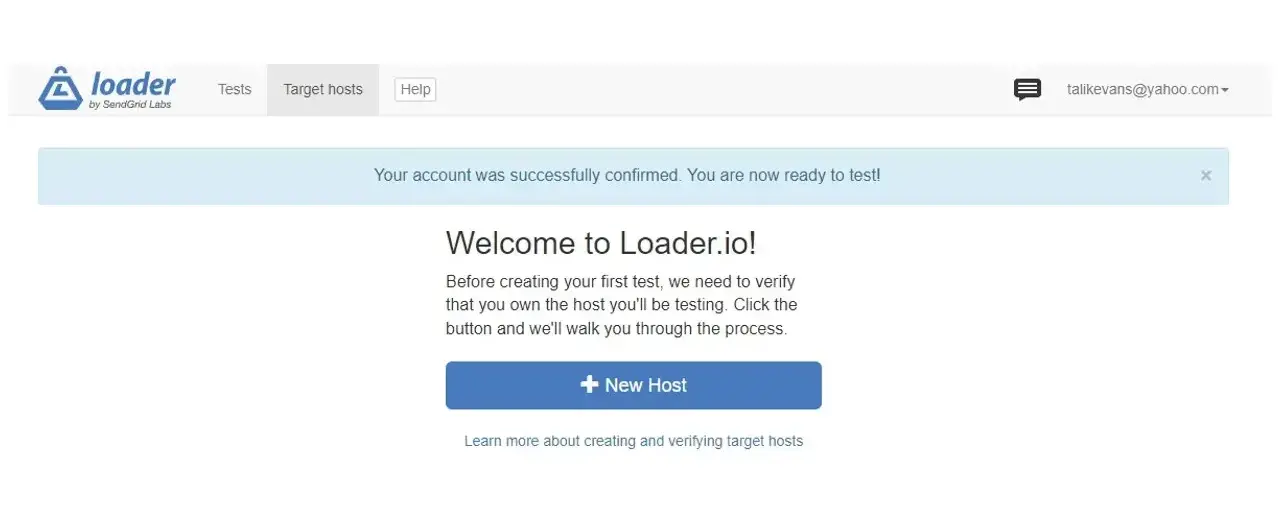
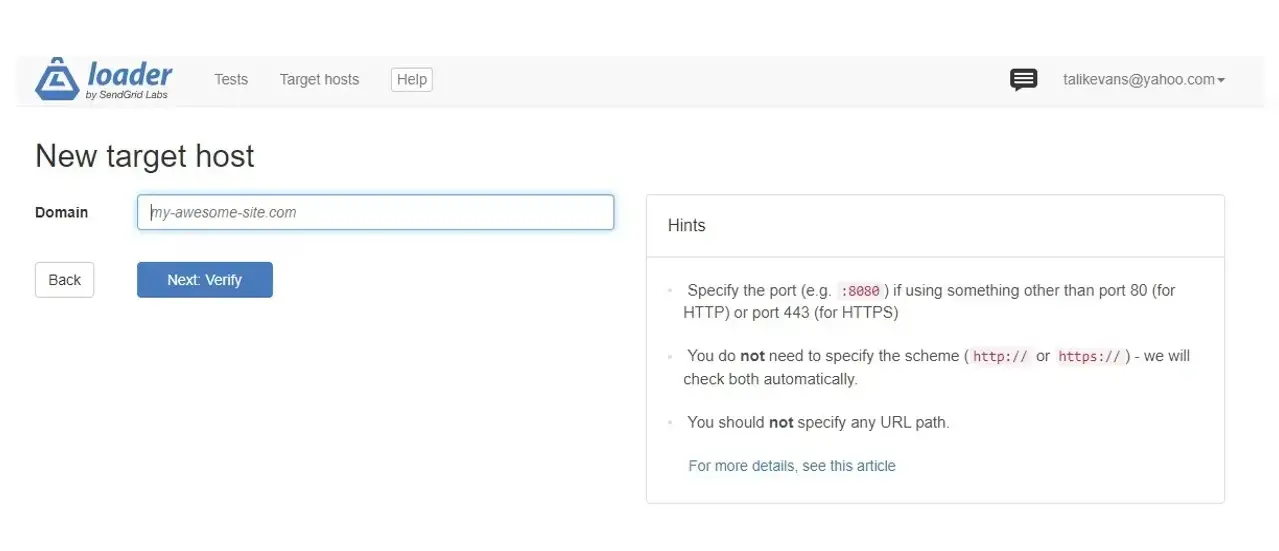
Once you’re set up, you can click the “New Host” button to add your website:
Next, add your domain and click “Verify”.
Step #2: Configure Your Test Settings
Once you’ve added your website, your next step is the test configuration. Once you click the verify button, you’ll be provided with a verification file. Alternatively, you can opt for DNS verification.
Download the verification file, as shown below:
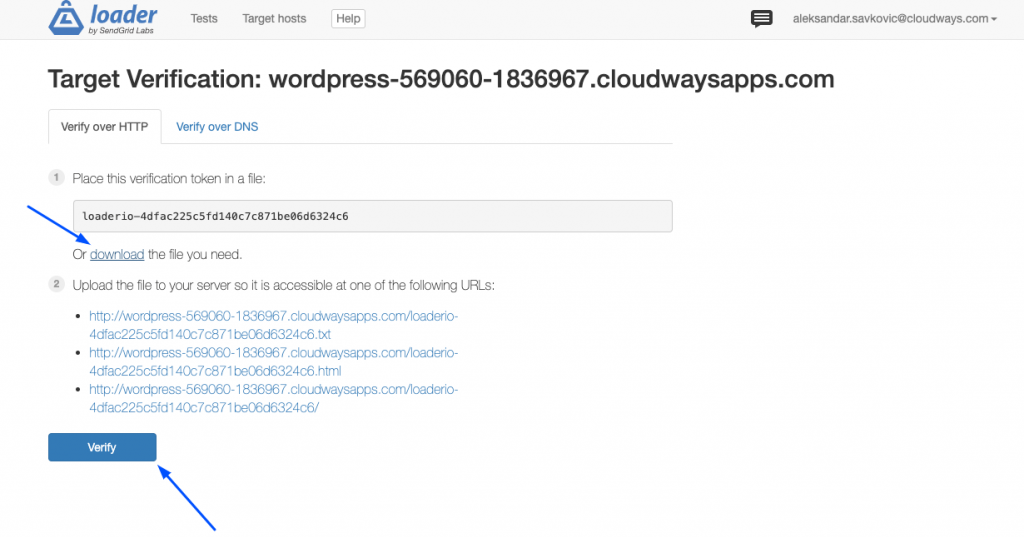
After downloading the file, create an SFTP user on your Verpex dashboard in the Access Details tab.
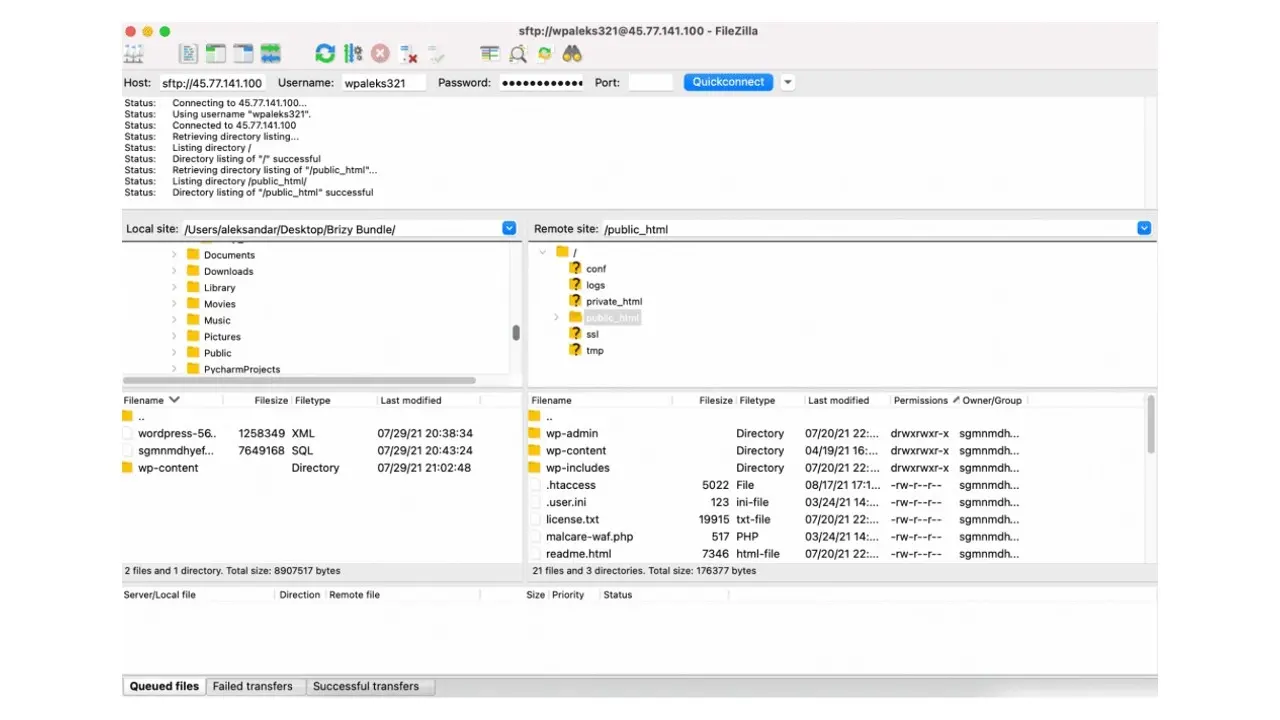
Once that’s done, your next step is to upload the Verification File. You can use FileZilla or any other SFTP client.
Use the credentials obtained during the previous steps to connect to your server and proceed to upload the verification file to public_html.
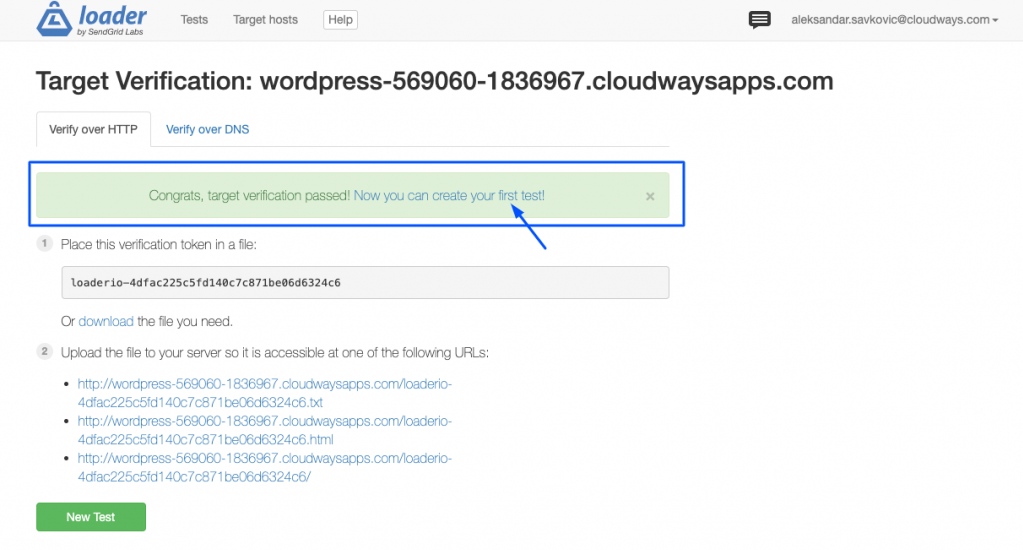
Now, you can verify the uploaded file via Loader.io. On the dashboard, click “Verify” and the software will fetch the file. If all goes well, you’ll see a confirmation message that says “Congrats, target verification passed!” You can now begin your first test.
Step #3: Create Your Test
After your verification is complete, you can create a test. You do this by naming it. Pick out the simulation type, and specify the number of visitors to simulate within a specific time period.
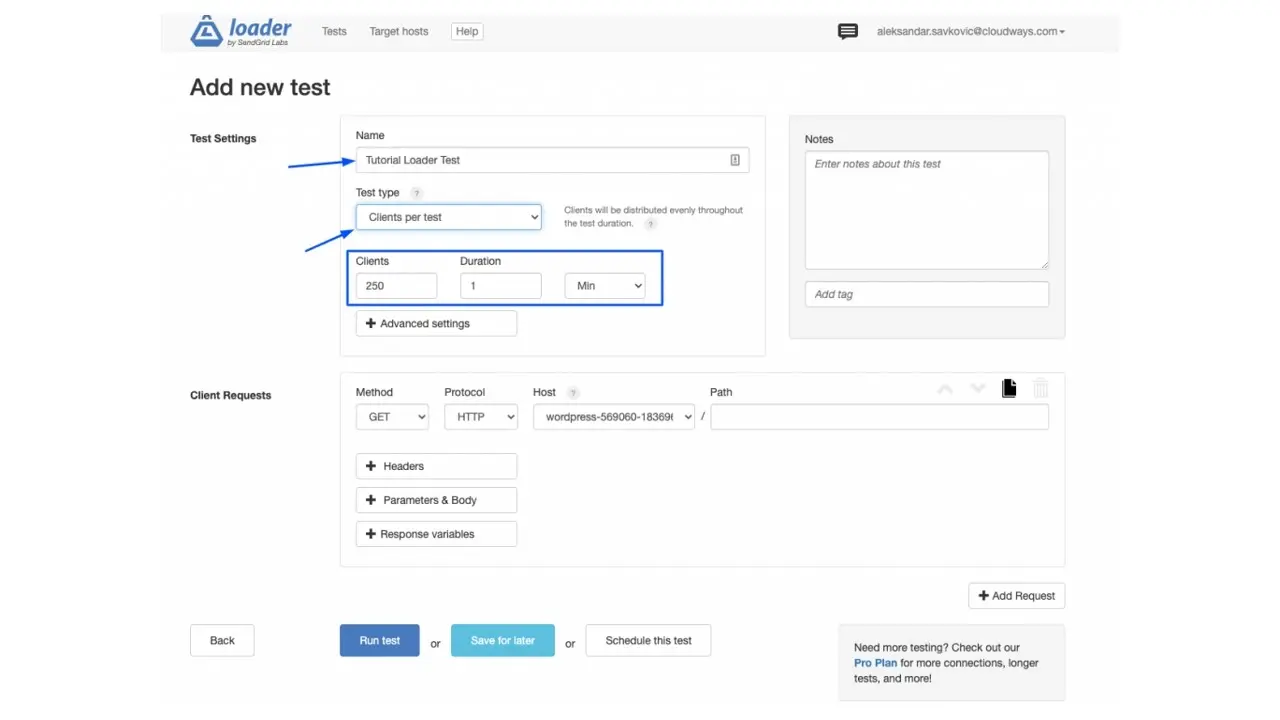
Now it’s time to run the stress test. Click “Run Test” and the software will begin stress-testing your website.
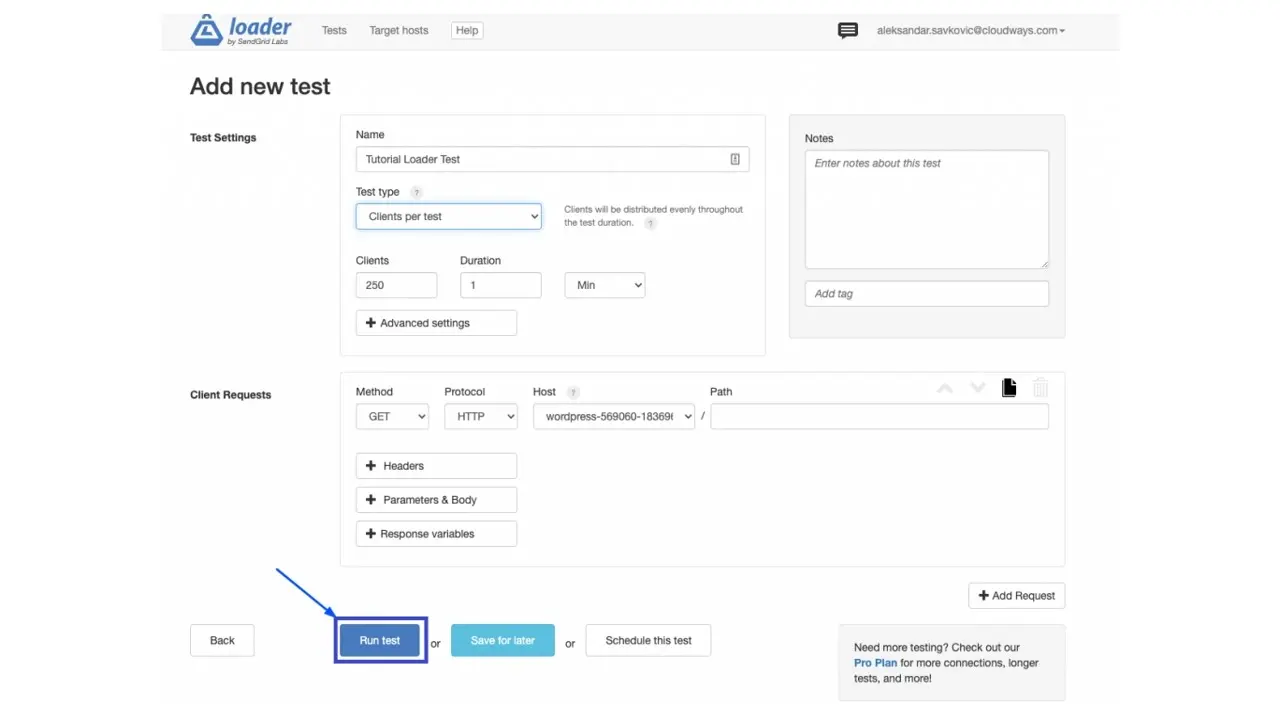
Step #4: Observe and Analyze Your Results
Observe the real-time simulation of your site to see if there are any timeouts or reduced response times.
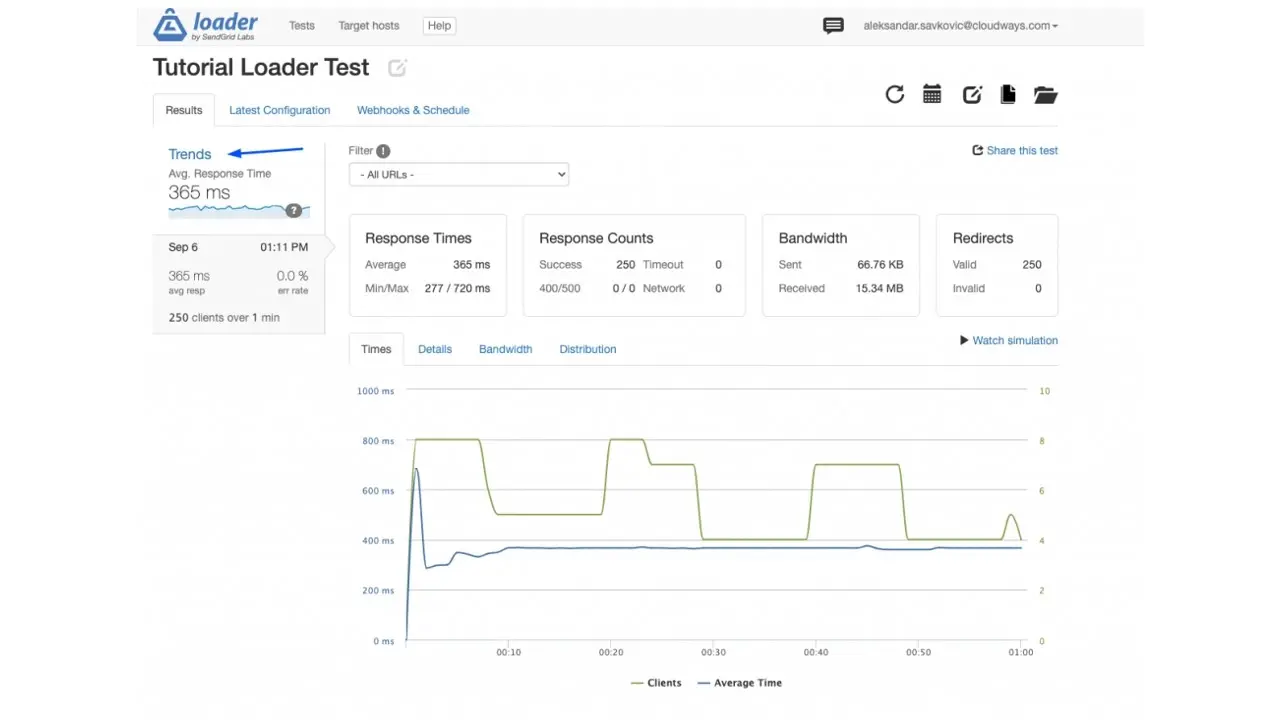
If you experience an excellent result, then there’s nothing more for you to do right now. However, if you get a less than desirable result, you can move on to the next step.
Step #5: (Optional) Make Tweaks
The good news is that whatever issues you find can be fixed quickly. For instance, your issue might be that you’re using cheap, unreliable hosting, in which case the solution is to find a more reliable host provider that offers optimized performance.
We’ll look at more ways to resolve site performance issues below.
After you’ve implemented your modifications, you can run the tests again to make sure your website is now performing up to standard. Use the same scenarios that you’ve already defined in this tutorial so you can test your latest tweak right away.
Resolving Site Performance Issues
If the result of your stress test shows that your website loads slowly when there’s high traffic, there are plenty of ways to improve its performance.
Here are some effective strategies.
Update Your Hosting Plan
Instead of choosing cheap hosting plans that come with a lot of restrictions, rather opt for the best hosting provider that allows you to handle high traffic by letting you scale up your server whenever you require more resources. Verpex is one such host that has affordable web hosting plans for businesses of all sizes.
Invest in Managed Hosting
Give yourself the best chance of success by choosing the managed hosting. Most newbies make the common mistake of choosing the cheapest hosting plan they can find.
Unfortunately, while cutting costs may work in the short term, over time, and as your website grows, cheap hosting plans won't be able to sustain the stress and load. You'll experience slow speeds and possibly a crash which will undoubtedly lead to lost sales.
Set up a Content Delivery Network (CDN)
A CDN is a server network that's located across the world. Using a CDN is different from using your WordPress host as it allows you to host your website content like JavaScript, CSS, etc. to help boost website speeds and reduce slow loading issues.
Many reliable web hosts offer their own CDN as an added service so you can avoid problems when attempting to speed up your website and improve user experience.
Use a Caching Tool
There are plenty of caching plugins to choose from, and you can use these tools to reduce the total load on your site. Once you install a caching plugin, you'll experience an increase in loading speeds since your site will view the HTML version of your content rather than PHP.
Reduce DOM Size
Document Object Model (DOM) is the structural form of HTML documents on your website. It's rendered using JavaScript, and CSS. If you've ever analyzed a website using Google PageSpeed Insights, then you may have seen an error message that says "Avoid an excessive DOM size".
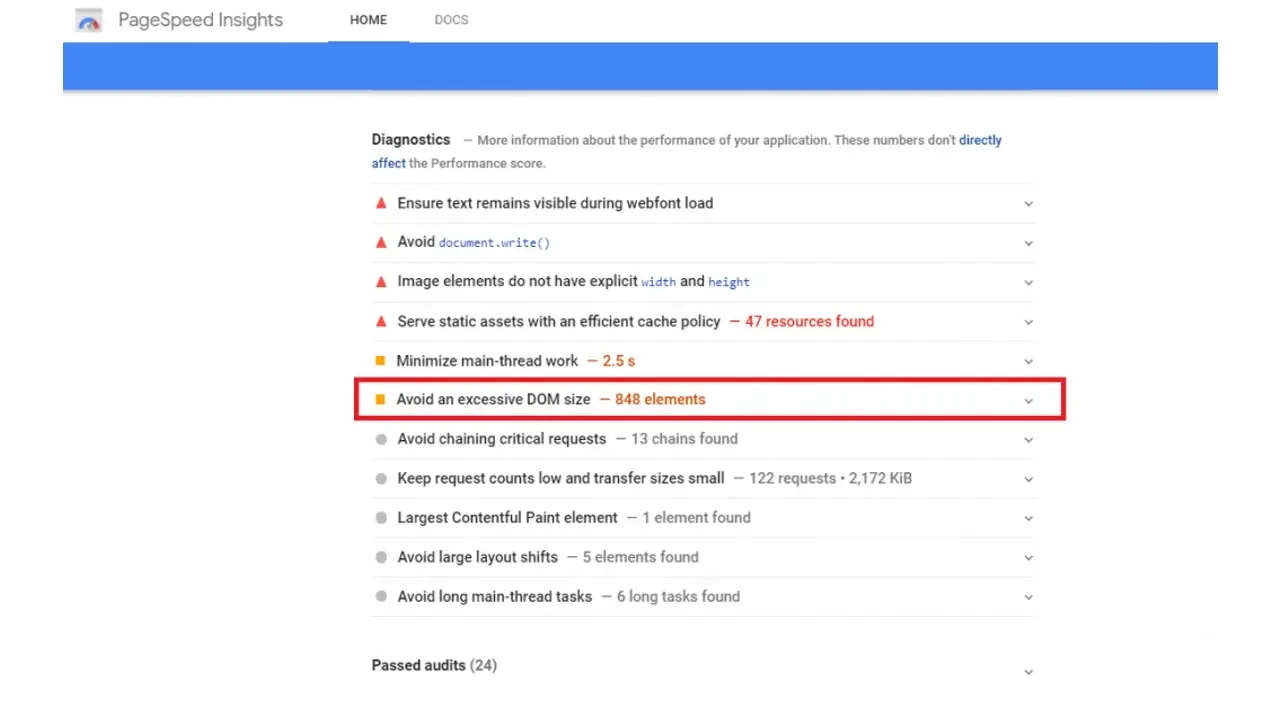
Higher DOM sizes increase memory usage and result in increased parse and render times. That's why reducing your DOM size is sure to improve your website's performance.
One of the best ways to do this is by using lazy loading plugins for your images, videos, and comments. You can also segregate the pages that have excess content and separate them into different pages.
Remove Heavy Plugins
Different websites react differently to increased loads based on their architecture. Factors like the theme, plugins, unnecessary code, and unoptimized images play a huge role in how your website performs, particularly on eCommerce sites. They can slow down your website loading time, especially during peak times.
The best thing you can do to avoid this and improve performance is to have a minimalist approach. Choose a theme that complements your brand while withstanding high traffic so you don't have to stuff up your website using countless plugins that don't add value to your site.
Conclusion
With regards to stress testing, you’re better off getting started with the basics than not starting at all. Sign up for a free trial with any of the testing tools listed in this article and follow the tutorial above to stress test your website. Your results will help you determine what you need to do to ensure your website is functioning at its peak no matter how many visitors you get.
I hope this article has answered your questions about stress testing your website. If you have further questions, leave a comment below and I’ll be happy to help.
Frequently Asked Questions
Will the data center location affect speeds?
Yes. Generally, the closer you are to where your data is hosted, the faster your website will be.
Does a website need hosting?
Yes. In order for a site to be accessed by outside users, it needs to have website hosting.
Can you migrate my existing website over?
Yes, and without issue. Regardless of how many websites you’re managing, we’ll bring all of them under the Verpex wing free of charge. Just send us the details of your websites when you’ve signed up to get started.
How do I choose a design for my website?
One of the most important things when creating a website for your art is the design. Even though your pieces of art might be amazing, people will leave if your site is hard to navigate. This is why it’s important that the site is easy on the eyes and easy to navigate.

Ron Stefanski is a website entrepreneur and marketing professor who has a passion for helping people create and market their own online business. You can learn more from him by visiting OneHourProfessor.com
View all posts by Ron Stefanski


