Dedicated job boards have become invaluable resources for both employers seeking talent and individuals searching for their next career opportunity. While numerous platforms exist, creating your own job board using WordPress offers unparalleled flexibility, control, and cost-effectiveness. In this article, you’ll learn how to create a job board using WordPress, focusing on a free, powerful plugin – WP Job Manager – to build a functional and attractive job board, along with essential layout tips to optimize user experience.
Why WordPress for Your Job Board?
WordPress, the world's most popular content management system, is an ideal choice for building a job board due to several key advantages:
Ease of Use: Even with minimal technical knowledge, WordPress's intuitive interface makes it easy to set up and manage content.
Flexibility and Scalability: A vast ecosystem of themes and plugins allows for extensive customization and the ability to scale your job board as your needs grow.
Cost-Effectiveness: While premium themes and plugins exist, many excellent free options can help you launch a fully functional job board without significant upfront investment.
SEO Friendliness: WordPress is inherently SEO-friendly, making it easier to optimize your job listings for search engines and attract relevant traffic.
Community Support: A massive global community means abundant resources, tutorials, and support available for any challenges you might encounter.
How to Create a Job Board using WordPress

Among the many free job board plugins available, WP Job Manager stands out as a lightweight, and highly customizable option developed by Automattic (the company behind WordPress.com, WooCommerce, and Jetpack). Its simplicity, coupled with the ability to add functionalities through various free and premium extensions, makes it an excellent choice for building a job board of any size.
WP Job Manager utilizes custom post types and shortcodes, ensuring compatibility with virtually any WordPress theme. This means you can maintain your website's existing design while seamlessly integrating job board functionalities.
This tutorial will walk you through the essential steps to install, configure, and manage job listings using WP Job Manager from your WordPress admin dashboard.
- Install and Activate WP Job Manager
- Create Essential Pages
- Configure WP Job Manager Settings
- Manage Job Types, Categories, and Locations
- Create Your First Job Listing (as Admin)
Step 1: Install and Activate WP Job Manager
- Log in to your WordPress Admin Dashboard.
- Navigate to Plugins > Add New from the left-hand menu.
- In the search bar, type "WP Job Manager" and press Enter.
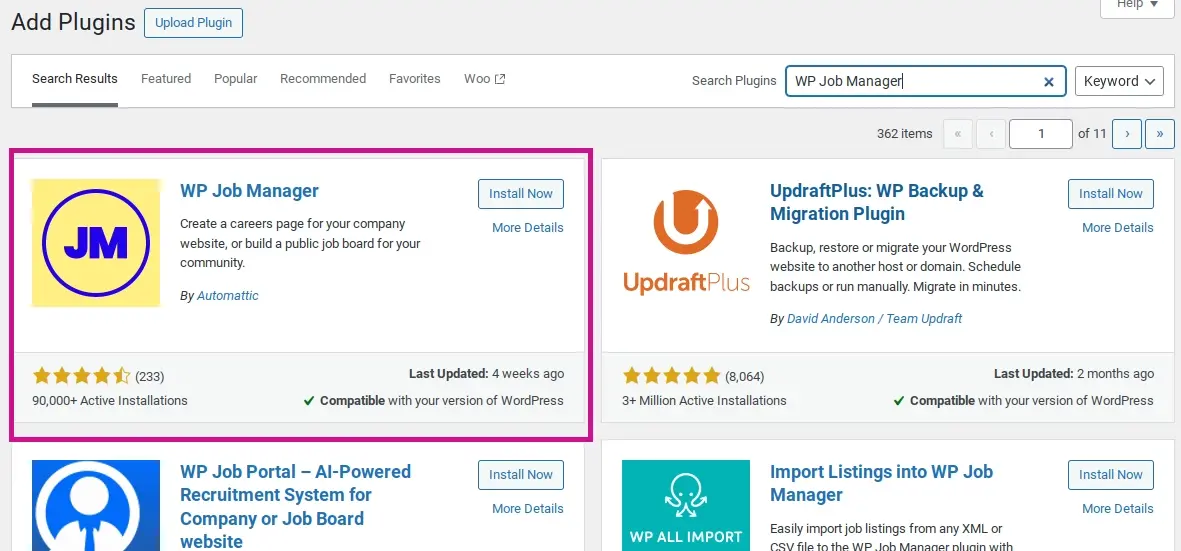
- Locate the WP Job Manager plugin by Automattic in the search results.
- Click on the "Install Now" button.
- Once installed, click on the "Activate" button.
- Managing Job Submissions (Admin)
Upon activation, WP Job Manager will typically prompt you to run a setup wizard. While the wizard automates the creation of necessary pages, we'll cover the manual setup to ensure a complete understanding of the process.
Step 2: Create Essential Pages
WP Job Manager relies on specific pages to display job listings, allow submissions, and provide a dashboard for employers.
- Navigate to Pages > Add New in your WordPress admin.
- Create the following pages and publish them:

a. Job Listings: Title this page "Job Listings" (or similar). In the content editor, add the shortcode ‘[jobs]’. This page will display all available job listings.
b. Submit a Job: Title this page "Submit a Job" (or similar). In the content editor, add the shortcode ‘[submit_job_form]’. This page will allow employers to submit new job listings.
c. Job Dashboard: Title this page "Job Dashboard" (or similar). In the content editor, add the shortcode ‘[job_dashboard]’. This page will allow logged-in employers to manage their submitted jobs.
d. Terms and Conditions: (Optional, but highly recommended) Create a page for your website's terms and conditions. While there's no specific shortcode for this in WP Job Manager, it's good practice to have one linked within your job submission process.
Note: In case you need further assistance, WP Job Boards has an installation tutorial as well.
You can also use the WP Job Board Wizard setup process.

1. Explaining the wizard process: This step just allows you to know what to expect if you don’t wish to manually setup your job board pages.
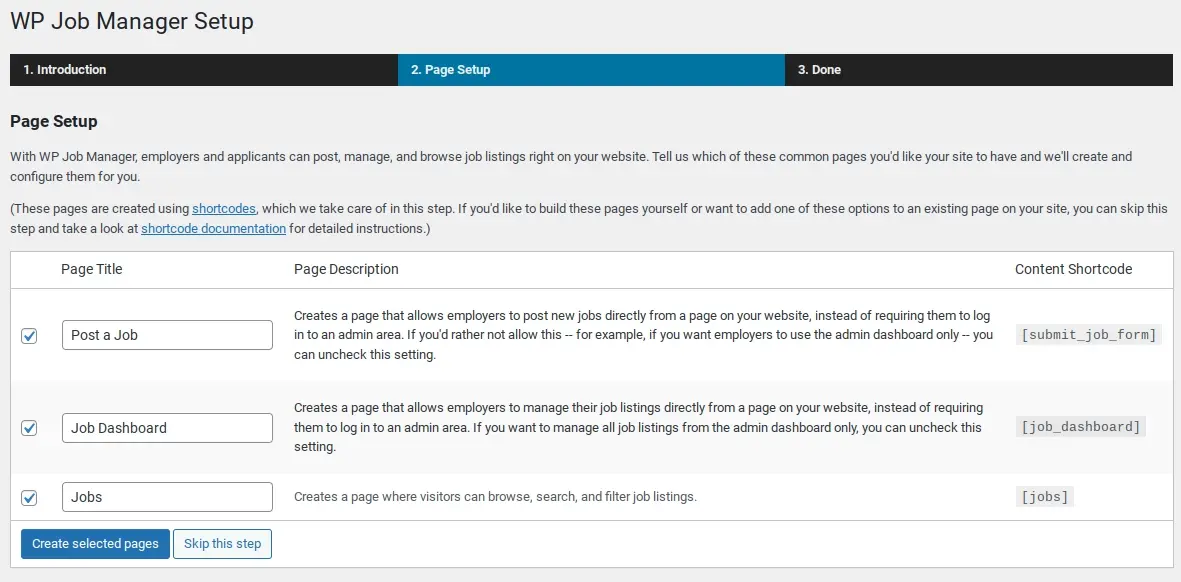
2. Page Setup: This step of the wizard lets you name the pages before the plugin will create it.

3. You’re done! You can edit your pages or see what they look like.
Step 3: Configure WP Job Manager Settings
Now, let's dive into the plugin's settings to customize its behavior.
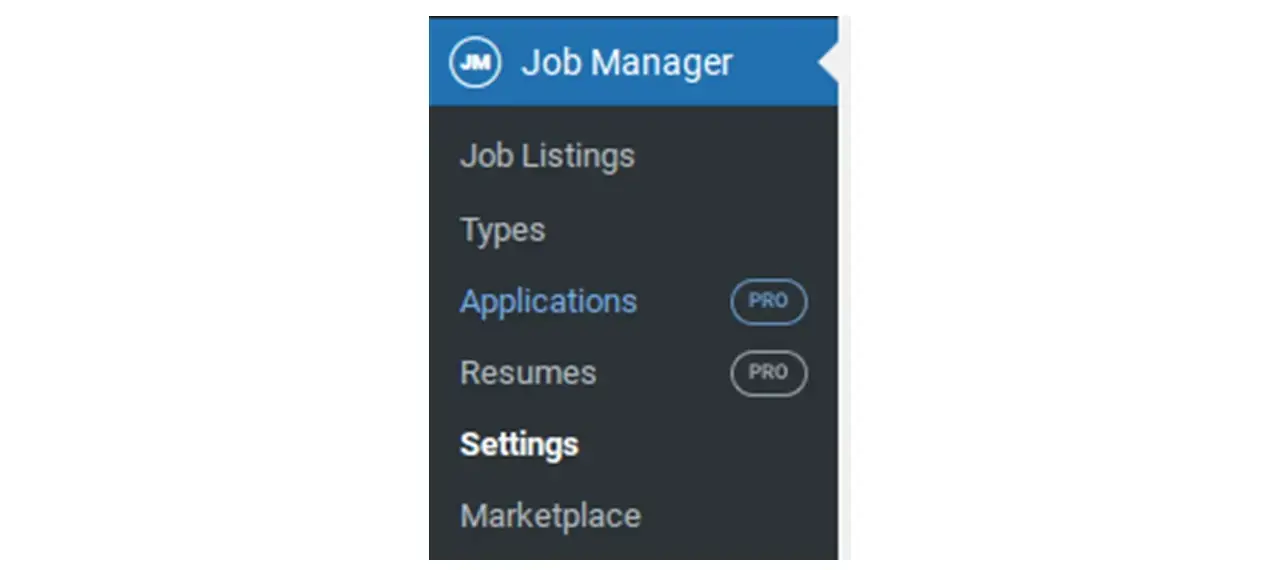
- Navigate to Job Listings > Settings in your WordPress admin. You'll find several tabs here:
General:
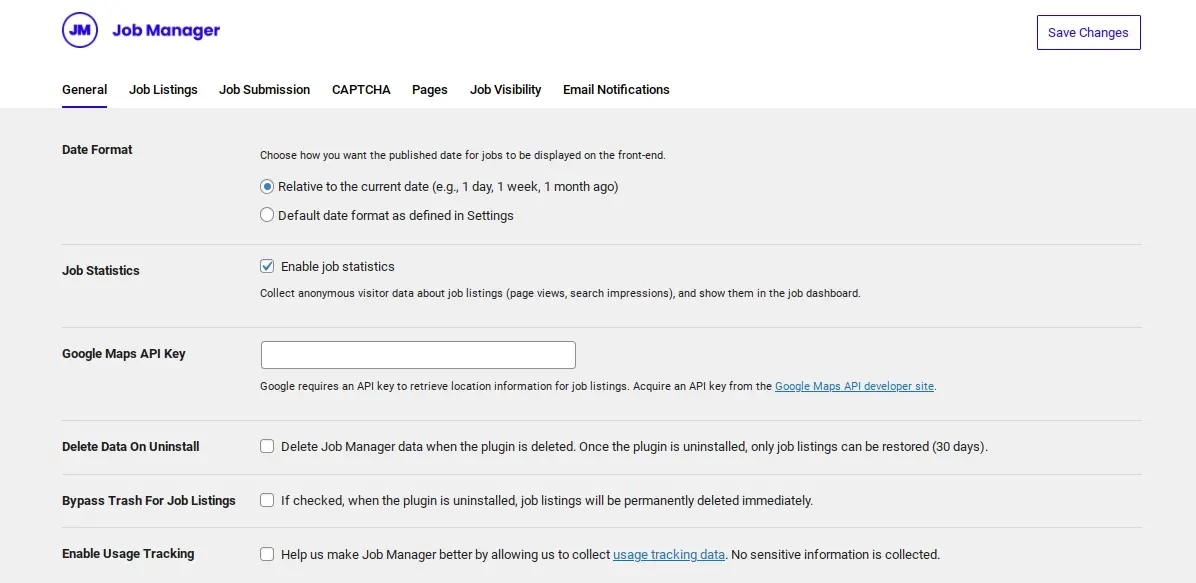
Date Format: Choose your preferred date format for job listings.
Google Maps API Key: If you want to enable location-based searching with Google Maps, you'll need to obtain a Google Maps API key and enter it here. This can enhance the user experience significantly.
Delete Data: Decide whether to keep or delete plugin data if you uninstall WP Job Manager. For now, you can leave the default.
Allow Tracking: You can opt-in or opt-out of sharing anonymous usage data with the plugin developers.
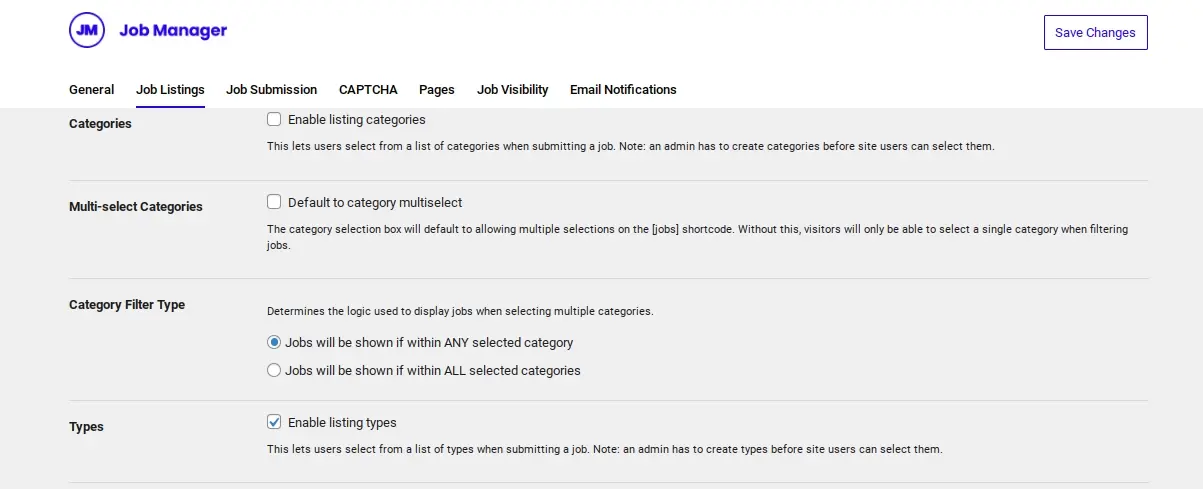
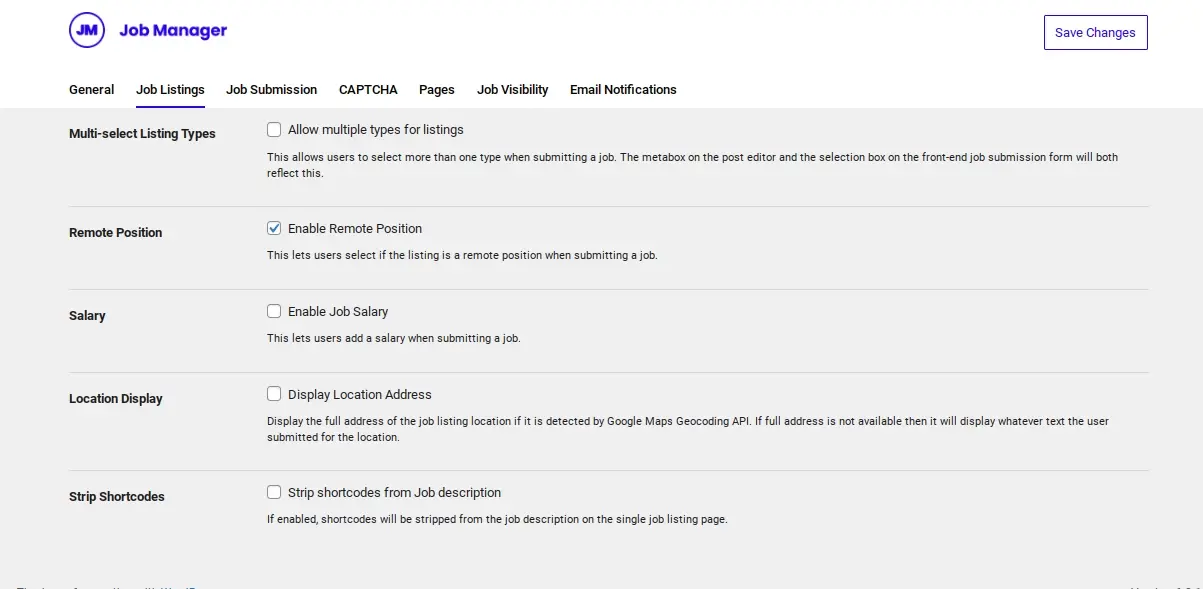
Job Listings:
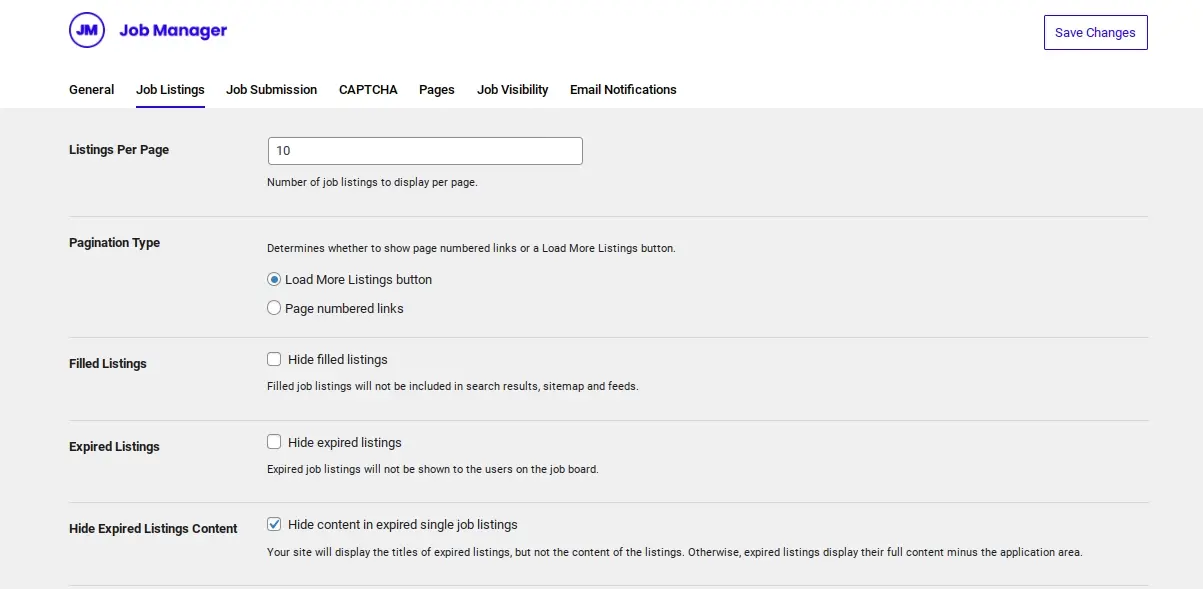
Listings per page: Set how many job listings appear on the main job board page.
Hide Filled Positions: Enable this to automatically hide job listings marked as "filled."
Filter Job Listings: You can choose to enable various filters for job seekers, such as keywords, location, job type, and category. This is crucial for a user-friendly job board.
Default Job Types: Define default job types (example: Full-Time, Part-Time, Freelance, Internship). You can manage these later under "Job Listings > Job Types."
Enable Categories: Allow job posters to categorize their listings.
Enable Tags: Allow job posters to add tags to their listings.
Multi-select for Job Types/Categories: Allow users to select multiple job types or categories when filtering.
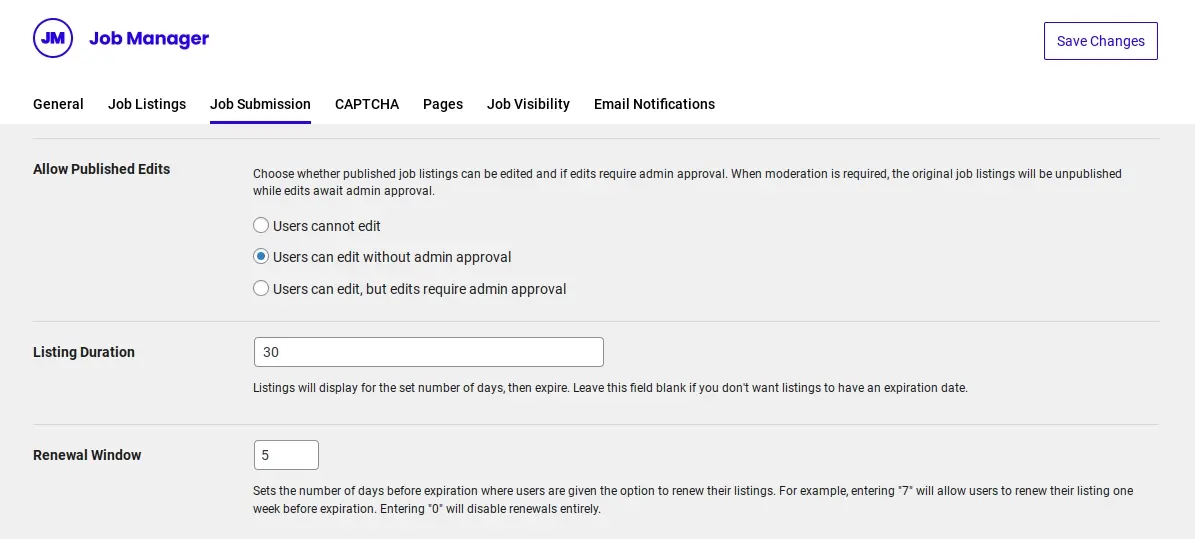
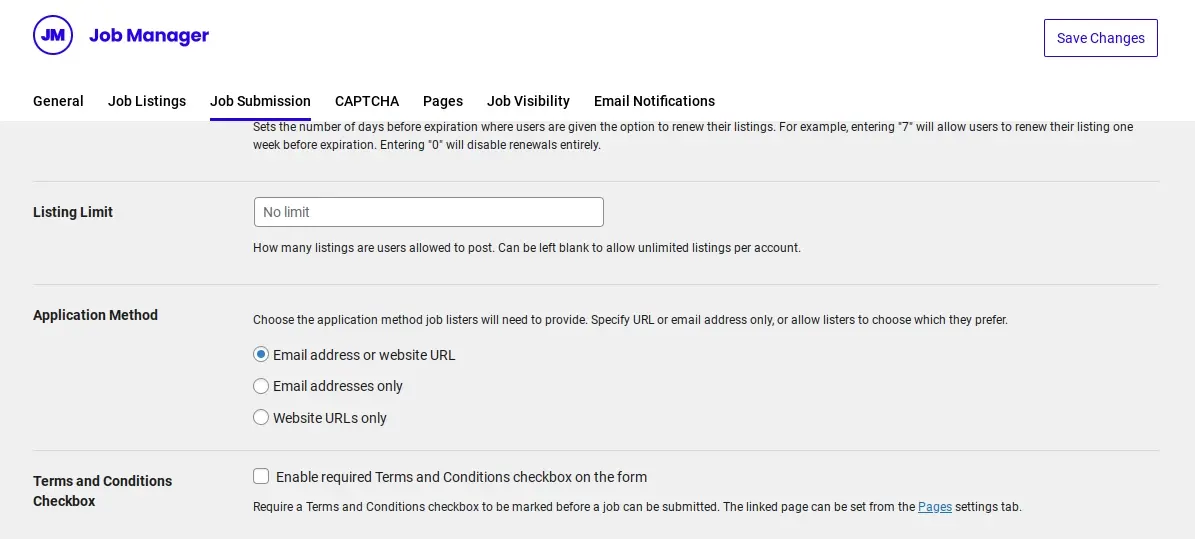
Job Submission (This tab controls how employers submit jobs.):
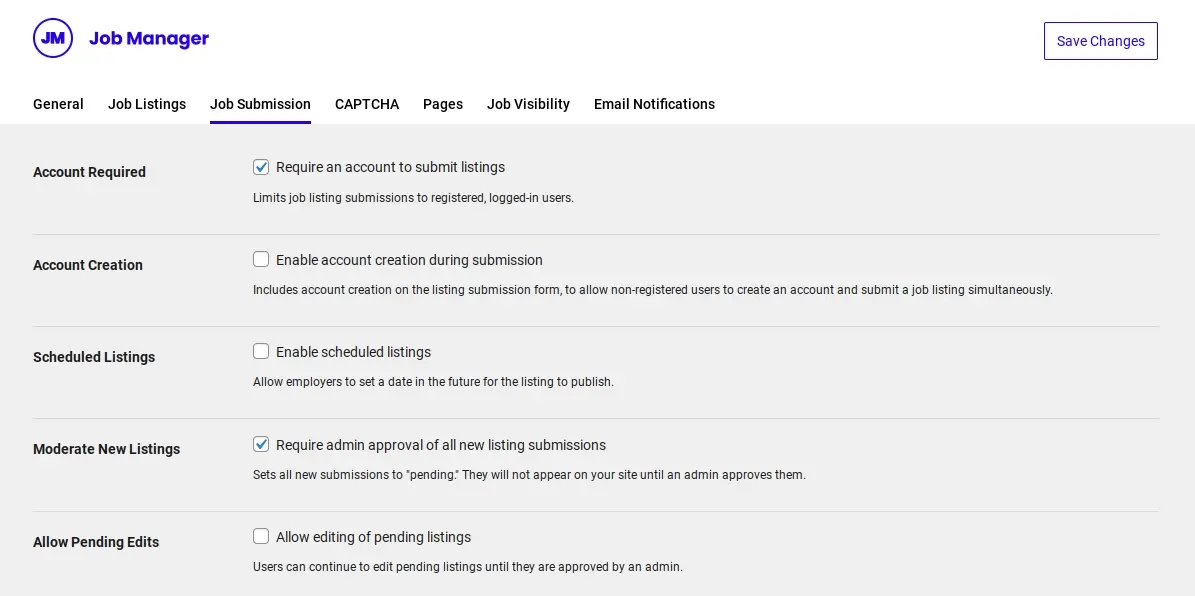
Anyone can submit listings: If unchecked, only logged-in users with specific roles can submit jobs. For a public job board, you'll likely want to enable this.
Account Required: If "Anyone can submit listings" is checked, you can still require users to create an account before submitting.
Account Creation: If "Account Required" is enabled, you can choose whether to auto-generate usernames/passwords or allow users to choose their own.
New Listing Status: Set the default status for newly submitted jobs (e.g., "Pending Review," "Published"). It's highly recommended to set this to "Pending Review" to moderate submissions.
Job Listing Expiry: Enable job listings to expire after a certain number of days.
Allow Employers to Edit Jobs: Grant employers the ability to edit their listings from the Job Dashboard.
Allow Employers to Delete Jobs: Grant employers the ability to delete their listings.
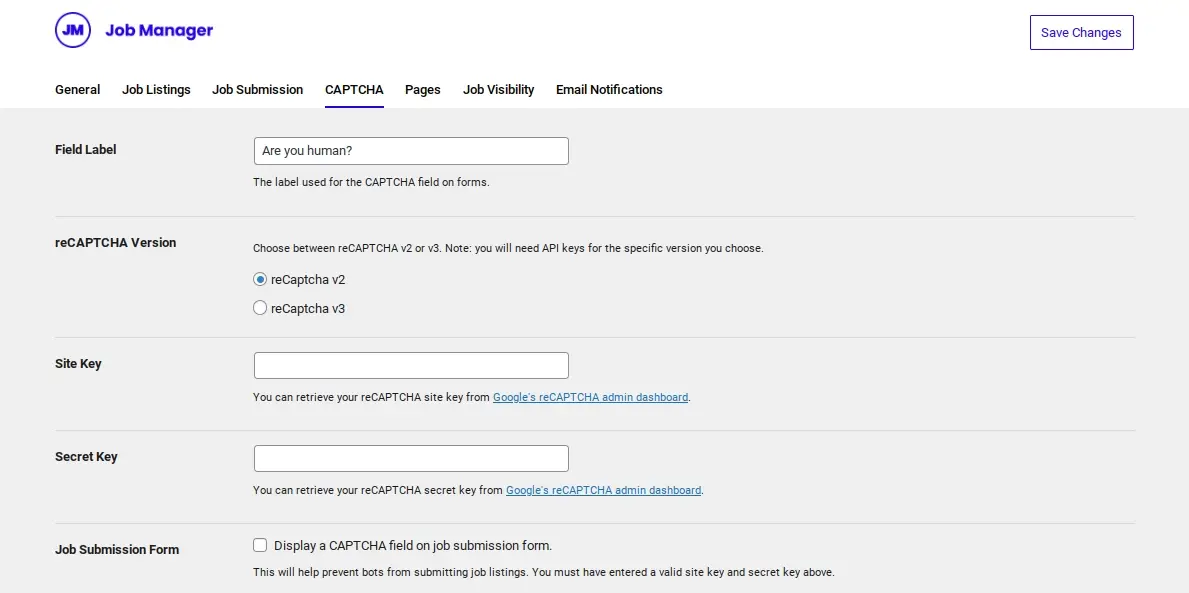
reCAPTCHA: To combat spam submissions, integrate Google reCAPTCHA. You'll need to generate reCAPTCHA keys from the Google reCAPTCHA website and paste them here. This is an important step for any public-facing form.
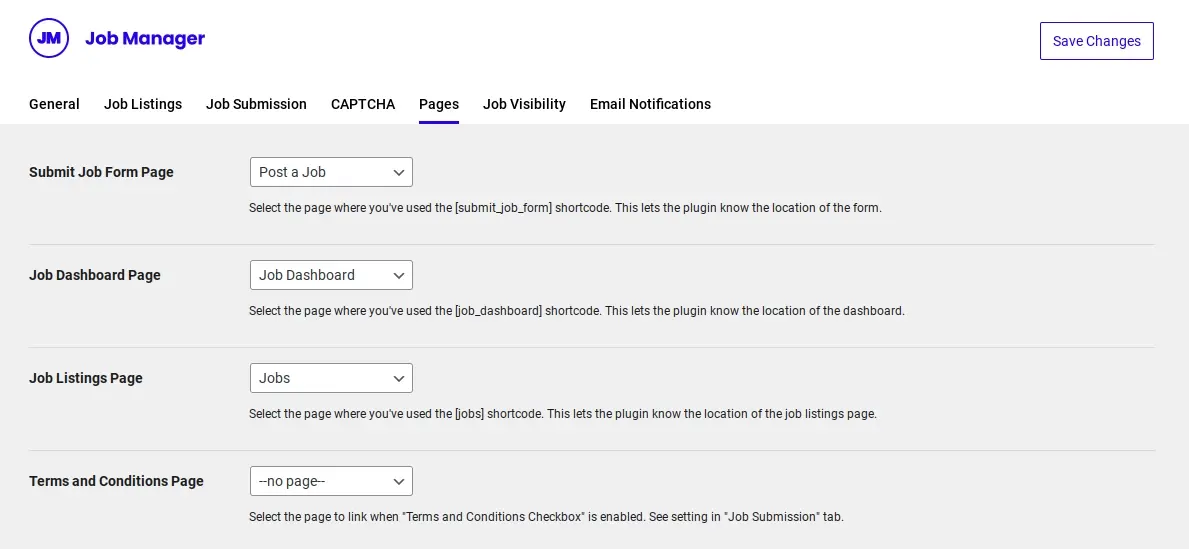
Pages (This is where you connect the pages you created in Step 2 to the plugin's functionality.):
Job listings page: Select the "Job Listings" page you created.
Submit Job Form page: Select the "Submit a Job" page.
Job Dashboard page: Select the "Job Dashboard" page.
Terms & Conditions page: Select your "Terms and Conditions" page (if you created one).

Job Visibility:
Hide expired listings from search results: Automatically hide expired listings from search results.
Hide expired listings from archives: Automatically hide expired listings from archive pages.
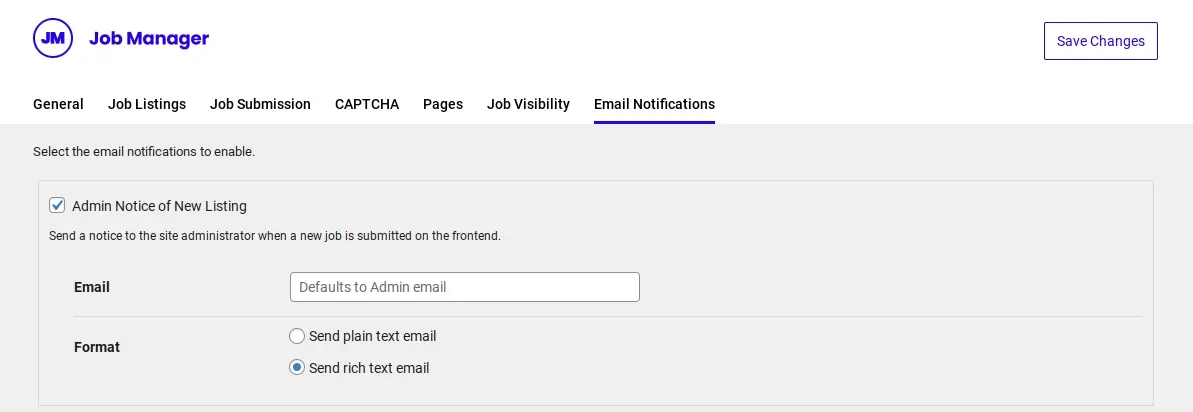
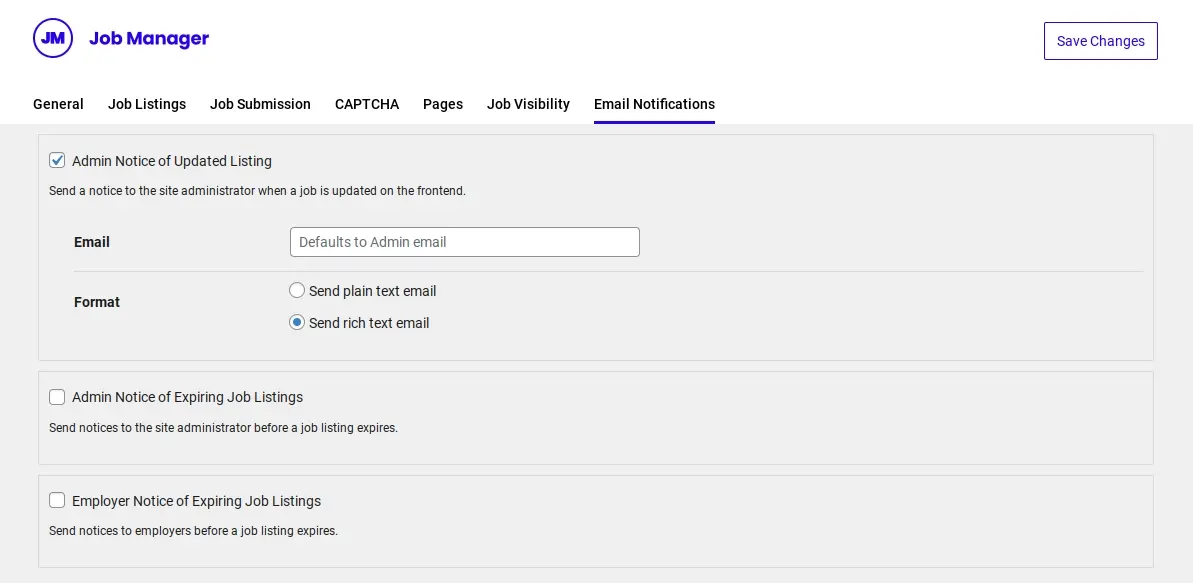
Email Notifications: Configure email notifications for various actions (example - new job submission to admin, job approved to employer, job expired).
- Click "Save Changes” after configuring each tab.
Step 4: Manage Job Types, Categories, and Locations
WP Job Manager utilizes custom taxonomies to organize jobs.
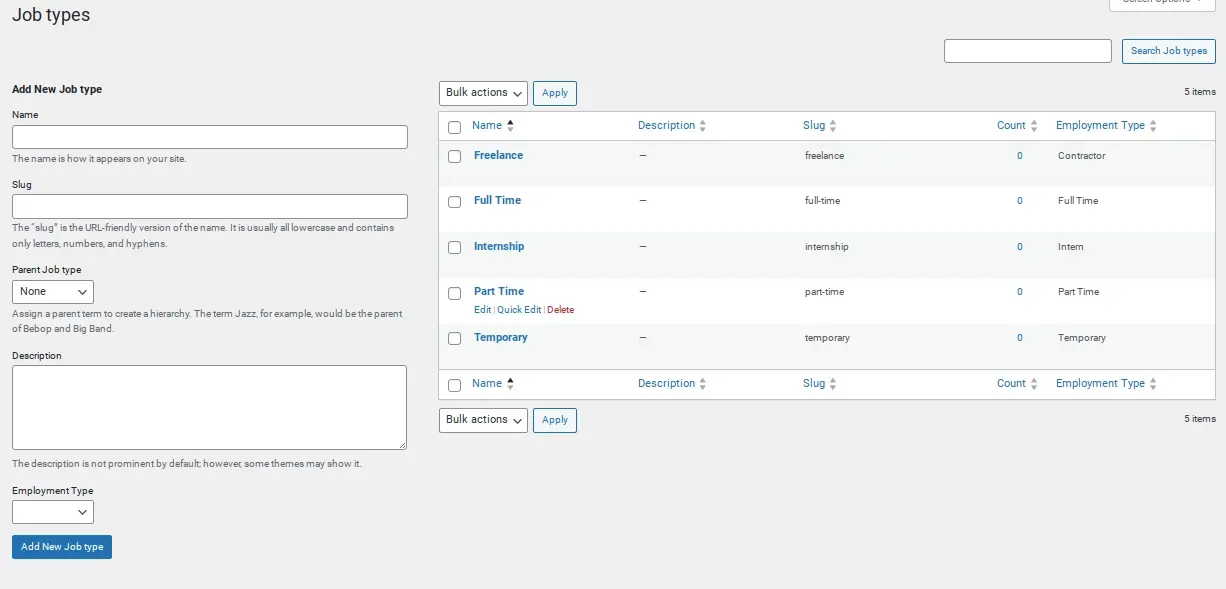
Navigate to Job Listings > Job Types (or Job Categories, Job Locations).
You'll see some default entries (example - Full-Time, Part-Time). You can edit existing ones, add new ones, or delete those you don't need.
Adding a new item is similar to adding a standard WordPress category or tag: enter the Name, optionally a Slug and Description, and click "Add New Job Type" (or category/location).
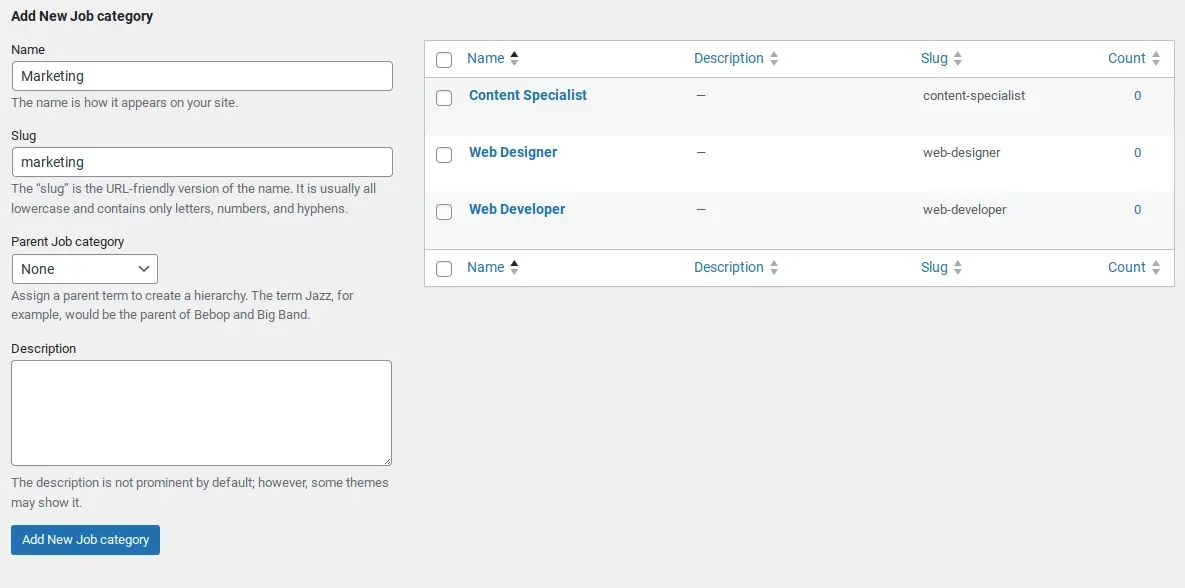
- Repeat this process for Job Listings > Job Categories and Job Listings > Job Locations as needed for your specific job board.
Step 5: Create Your First Job Listing (as Admin)
Even if you intend for employers to submit jobs, it's useful to create a few sample listings as an administrator to understand the process and populate your board.

- Navigate to Job Listings > Add New.
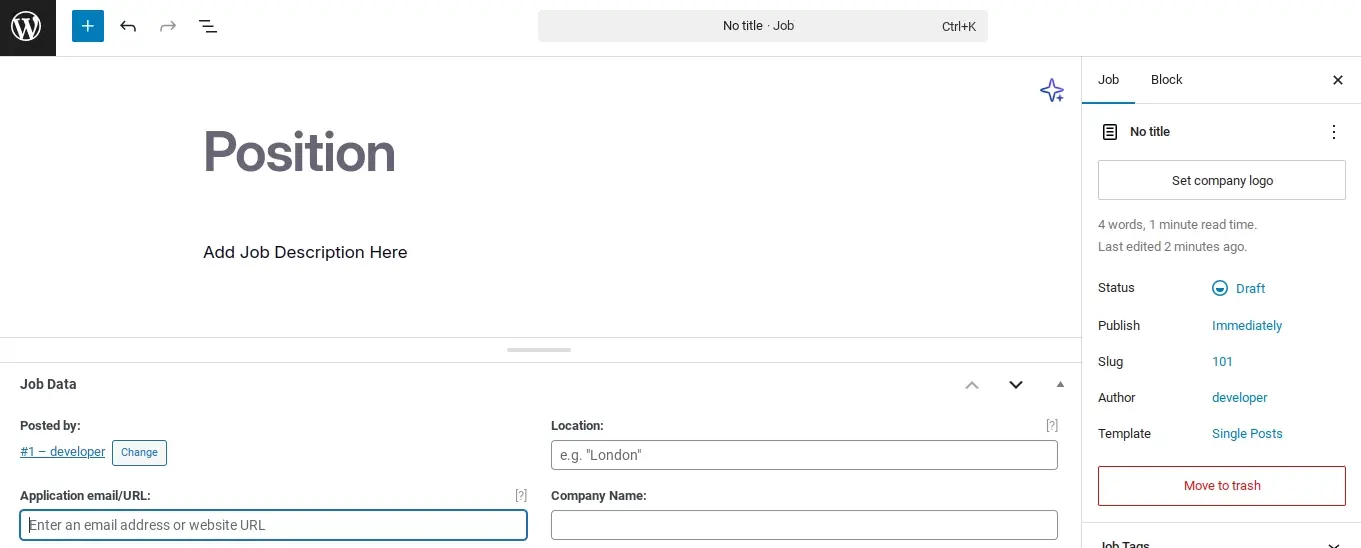
- Job Title: Enter the title of the job position (example - "Senior Web Developer").
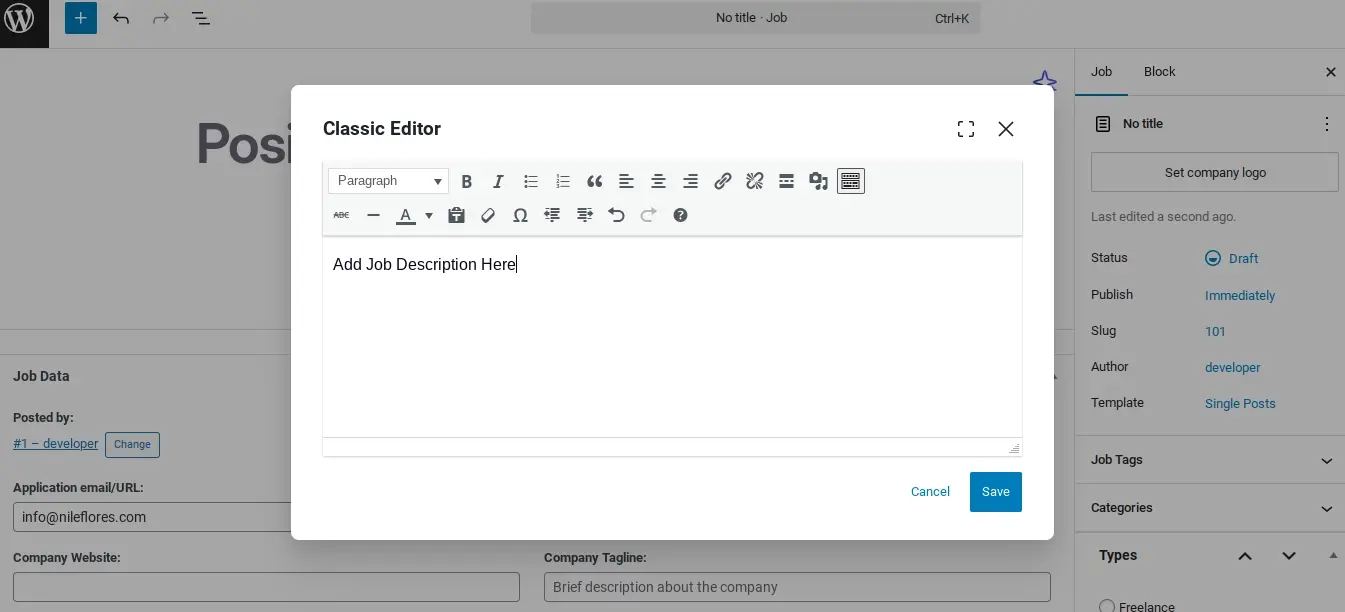
- Job Description: Use the WordPress block editor to write a detailed job description, including responsibilities, requirements, benefits, and company culture.
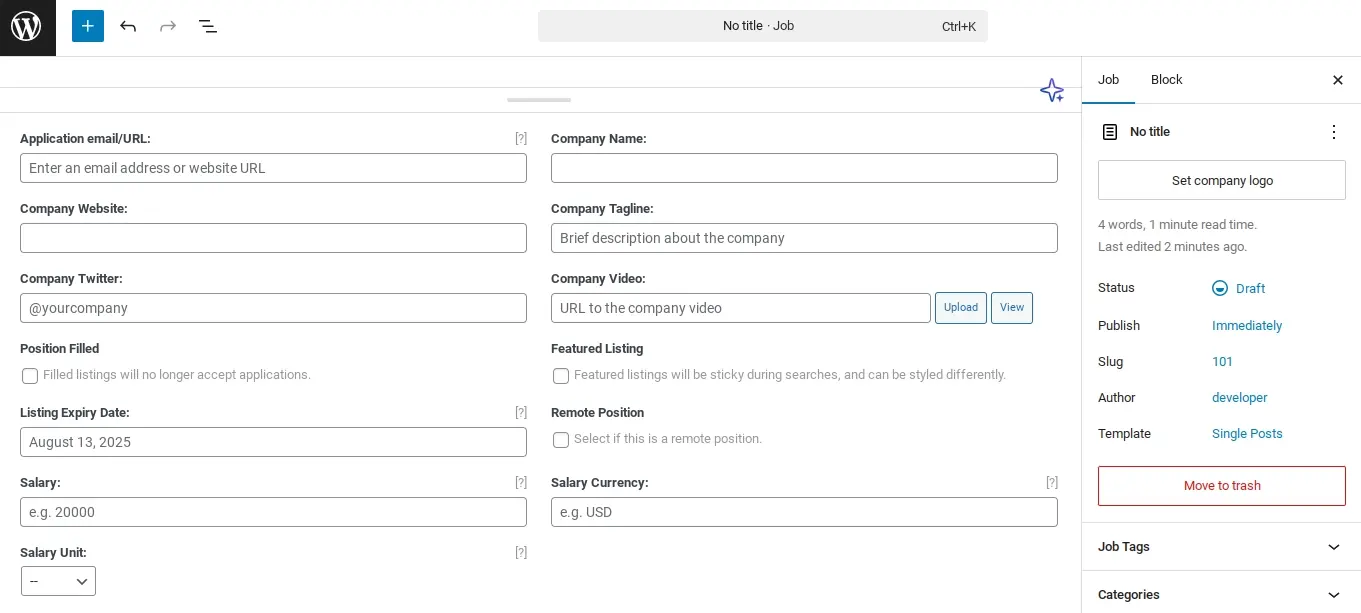
Job Data Metabox (below the editor): This section contains custom fields added by WP Job Manager.
a. Company Name: Enter the name of the hiring company.
b. Company Website: (Optional) Link to the company's website.
c. Company Tagline: (Optional) A brief tagline for the company.
d. Company Video: (Optional) Embed a video about the company or role.
e. Company Logo: Upload the company's logo (similar to setting a featured image).
f. Application Email/URL: Choose how applicants should apply (via email or a custom URL). If you select "Email," enter the email address for applications. If "URL," enter the application link.
g. Location: Enter the job's location. If you enabled Google Maps integration, this will suggest locations.
h. Job Type: Select one or more job types you defined (example - Full-Time, Remote).
i. Job Category: Select one or more job categories (example - Technology, Marketing).
j. Salary: (Optional, requires an add-on or custom field) If you have a salary field, enter it here
k. Application Deadline: Set an expiry date for the listing.
l. Filled: Check this box if the position has been filled.
m. Featured Job: Mark this to make the job listing prominent (often styled differently by themes).
- Publish the job listing.
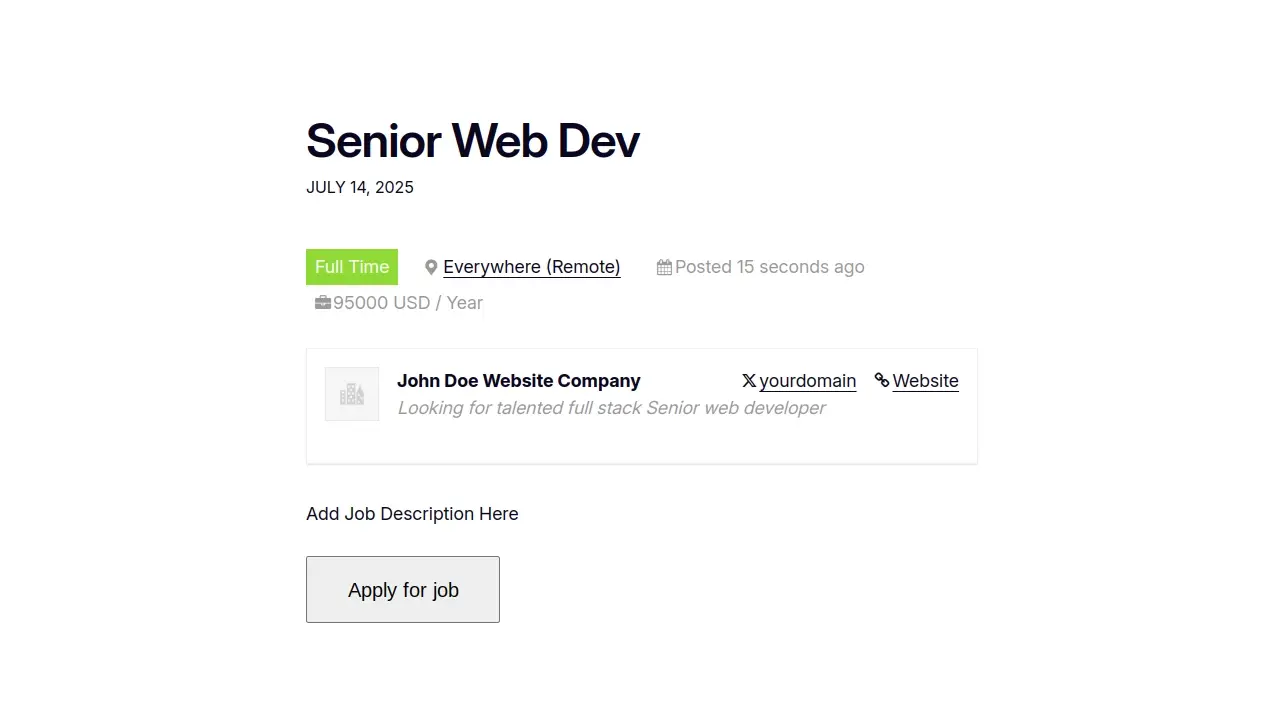
You can view your published listings by visiting the "Job Listings" page you created on your website's front end.
Step 6: Managing Job Submissions (Admin)
When employers submit jobs from the front end (if enabled), they will appear in your admin dashboard for review.

Navigate to Job Listings > All Jobs.
You'll see a list of all job postings, including those submitted by users.
If you set "New Listing Status" to "Pending Review" in the settings, new submissions will have this status.
Hover over a job listing and click "Edit".
Review the job details. If it's legitimate and meets your criteria, change the "Job Status" from "Pending Review" to "Publish" (or "Active" depending on your settings).
You can also mark a job as "Filled," "Expired," or "Draft" from this screen.
Click "Update" to save changes.
Best Layout Tips for Job Boards Using WordPress
The visual appeal and usability of your job board are crucial for attracting and retaining both job seekers and employers. Here are some best layout tips:
- Clean and Intuitive Navigation
- Compelling Homepage Layout
- Job Listing Page Design (The Main Hub)
- Single Job Listing Page Design (Detailed View)
- Mobile Responsiveness
- Visual Appeal and Branding
- SEO Optimization for Job Listings
Clean and Intuitive Navigation
Prominent Search Bar: Place a clear and easily accessible search bar at the top of your job listings page. Include filters for keywords, location, job type, and category.
Categorized Navigation: Offer a way for users to browse jobs by categories (example: "Marketing Jobs," "IT Jobs") or job types (example: "Full-Time," "Remote"). Use a sidebar or a dedicated menu for this.
"Submit Job" and "Job Dashboard" Access: Make it easy for employers to find the job submission form and their dashboard. These links should be visible in your main navigation or a dedicated "For Employers" section.
Compelling Homepage Layout
Hero Section with Search: A large hero section with an integrated search bar is highly effective. You can also add a compelling tagline or a brief explanation of your job board's purpose.
Featured Jobs: Showcase a selection of "featured" or "hot" jobs prominently. This can be a rotating carousel or a grid layout.
Popular Categories/Locations: Highlight common job categories or popular locations to guide users.
Testimonials/Success Stories: If applicable, feature testimonials from satisfied employers or job seekers to build trust.
"How It Works" Section: A concise section explaining the process for both job seekers and employers can be very helpful for new visitors.
Job Listing Page Design (The Main Hub)
Clear Listing Cards: Each job listing should be presented as a clean, concise card or row. Essential information like job title, company name, location, and job type should be immediately visible.
Consistent Formatting: Maintain a consistent layout for all job listings. This improves readability and user experience.
"Apply Now" Button: A prominent "Apply Now" or "View Details" button on each listing card is essential.
Pagination/Load More: For a large number of listings, implement clear pagination or a "Load More" button to prevent overwhelming users.
Filtering and Sorting Options: Ensure filter options are easily accessible (example - a sticky sidebar or a horizontal filter bar). Allow users to sort by date posted, relevance, or other criteria.
Job Alerts/Save Job: Offer options for users to sign up for job alerts based on their search criteria or to save jobs for later. (These might require WP Job Manager add-ons or separate plugins).
Single Job Listing Page Design (Detailed View)
Clear Job Title and Company Information: The job title, company name, and logo should be at the top.
Key Details at a Glance: Immediately present important information like location, job type, salary (if applicable), and experience level.
Well-Structured Job Description: Break down the job description into easily digestible sections with clear headings (example - "Responsibilities," "Requirements," "Benefits"). Use bullet points for readability.
Prominent Application Section: Make the "Apply Now" button or application form clearly visible and easy to use.
Company Information/About Us: Include a brief "About the Company" section to give applicants context.
Related Jobs: Suggest similar job listings to keep users engaged.
Social Sharing Buttons: Allow users to easily share job listings on social media.
Mobile Responsiveness
Prioritize Mobile-First Design: A significant portion of job searches happen on mobile devices. Ensure your job board is fully responsive and offers a seamless experience across all screen sizes.
Optimized Forms: Application forms and job submission forms should be easy to fill out on mobile.
Visual Appeal and Branding
Professional Theme: Choose a clean, professional WordPress theme that complements your brand. While WP Job Manager works with any theme, a theme specifically designed for job boards can offer better integration and aesthetics out-of-the-box. (Examples include Jobify, WorkScout, JobMonster, although many are premium).
Consistent Color Palette and Typography: Maintain a consistent visual identity throughout your job board.
High-Quality Images: Use professional company logos and, if applicable, images that represent the company culture.
SEO Optimization for Job Listings
SEO-Friendly URLs: Ensure your job listing URLs are clean and descriptive.
Keywords: Encourage employers to use relevant keywords in job titles and descriptions.
Schema Markup: While WP Job Manager handles some basic schema, consider using an SEO plugin like Yoast SEO or Rank Math to enhance your job listings with schema markup. This helps search engines understand the content better and can lead to rich snippets in search results.
Beyond the Basics: Enhancing Your Job Board
Once your basic job board is set up, consider these enhancements for a more comprehensive platform:
Premium Add-ons for WP Job Manager: While the core plugin is free, WP Job Manager offers a range of premium add-ons for features like resume management, paid listings, application tracking, and more.
User Registration and Profiles: Allow job seekers to create profiles, upload resumes, and track their applications.
Employer Accounts: Provide dedicated employer accounts where they can post, manage, and renew their listings.
Email Alerts: Enable job seekers to set up email alerts for new jobs that match their criteria.
Payment Gateways: If you plan to monetize your job board by charging for listings, integrate with payment gateways like WooCommerce.
Applicant Tracking System (ATS) Integration: For larger job boards, consider integrating with a dedicated ATS for more efficient candidate management.
Dedicated Job Board Theme: While WP Job Manager works with any theme, a specialized job board theme (like Jobify and WorkScout) can offer pre-built layouts and functionalities specifically tailored for employment websites, often saving design time.
In Summary
Creating a job board using WordPress and a free plugin like WP Job Manager is an achievable and rewarding endeavor. By following this step-by-step tutorial on how to create a job board using WordPress, you can establish a functional platform to connect job seekers and employers. Remember to prioritize user experience through intuitive navigation, a clean layout, and mobile responsiveness. With careful planning and attention to detail, your WordPress-powered job board can become a valuable resource in the competitive employment landscape.
Frequently Asked Questions
How can job seekers benefit from professional proofreaders and academic writing?
Job seekers can enhance their documents with the help of professional proofreaders and academic writing, ensuring a polished and error-free presentation to impress potential employers.
Where can I find virtual assistant jobs and start gaining experience?
Find virtual assistant jobs on job boards, through social media channels, and by joining Facebook groups dedicated to the VA world. Networking events and connecting with other businesses online can also lead to opportunities. Satisfied clients and a strong social media presence can help attract more work.
Is it necessary to have a contract for each freelance job?
Yes, a contract is advisable for each job to clearly outline the scope of work, payment terms, deadlines, and other expectations.
Do I need special qualifications for these high-paying nomad jobs?
High-paying digital nomad jobs often require specific qualifications or skills. While formal education can be beneficial, practical skills, certifications, and a strong portfolio are equally valuable. Continuous learning and staying updated in your field are essential.

Nile Flores is a long time professional blogger, as well as WordPress website designer and developer from the St. Louis Metro East. Nile blogs at NileFlores.com, where she’s passionate about helping website owners, whether they’re small business owners or bloggers. She teaches about Blogging, Social Media, Search Engine Optimization, Website Design, and WordPress. Additionally, Nile loves to speak at WordCamps (WordPress conferences) across the United States. When Nile isn’t knee-deep in coding, she’s a proud mom of a college student, and enjoys oil painting, cigar smoking, nail art design, and practicing traditional Okinawan kempo karate.
View all posts by Nile Flores


