Trying to market your website on Snapchat? You’ll need to bridge WordPress and Snapchat with a little code called a pixel. This article is a basic guide to add Snapchat Pixel to WordPress.
What is Snapchat Pixel?
The Snap Pixel or Snap Pixel, is a powerful tool for businesses that advertise on Snapchat. It's essentially a small piece of code that you install on your website or app. This code allows you to track the actions of users who have interacted with your Snapchat ads.
When a user clicks on your Snapchat ad and visits your website, the Pixel fires and sends information back to Snapchat. This information includes details about the user's actions on your website, such as which pages they visited, what products they viewed, and whether they made a purchase.
Here's a little deeper breakdown of what the Snapchat Pixel does:
- Tracks Website Activity
- Optimizes Ad Campaigns
- Understands Your Audience
Tracks Website Activity
Snapchat Pixel can track the following website activities:
Page Views: The Pixel records when a user visits any page on your website after clicking on a Snapchat ad. This helps you understand which parts of your website are most popular with your ad audience.
Conversions: You can track specific actions that you consider valuable, such as:
Purchases: When a user makes a purchase on your website after seeing your Snapchat ad.
Sign-ups: When a user signs up for your email list or creates an account on your website.
Lead Submissions: When a user submits a form, such as a contact form or a request for a quote.
Add to Cart: When a user adds a product to their shopping cart.
Optimizes Ad Campaigns
With Snapchat Pixel, you can use it to optimize your add campaigns. Here’s some of the areas you can optimize:
Audience Targeting: The Pixel helps you build custom audiences based on the actions users take on your website. For example, you can create an audience of users who have visited a specific product page or added a product to their cart. You can then target these audiences with more relevant ads.
Campaign Performance: By tracking conversions, you can see which Snapchat ads are driving the most valuable results. This allows you to optimize your ad campaigns for better performance and maximize your return on investment (ROI).
Understands Your Audience
Snap Pixel is smart enough to give you a better understanding on your audience, like:
Customer Behavior: The Pixel provides valuable insights into how users interact with your website after seeing your Snapchat ads. This information can help you understand your target audience better and tailor your marketing efforts accordingly.
Benefits of adding Snapchat Pixel to WordPress
So, why would you want to add Snapchat Pixel to WordPress? Well, here are a few reasons:
Improved Ad Targeting: Reach the right audience with more relevant ads.
Increased Conversions: Drive more valuable actions, such as purchases and sign-ups.
Better ROI: Optimize your ad campaigns for maximum return on investment.
Deeper Audience Insights: Gain a better understanding of your target audience.
How to add Snapchat Pixel to WordPress
Here are the steps to add Snapchat Pixel to WordPress:
Step 1. Login into Snapchat Ads Manager
Log in to your Snapchat Ads Manager in Snapchat for Business. You’ll need to do this in desktop mode and you’ll need to make sure you have a Business account. You can either create a new account or convert your personal Snapchat profile to a business account.
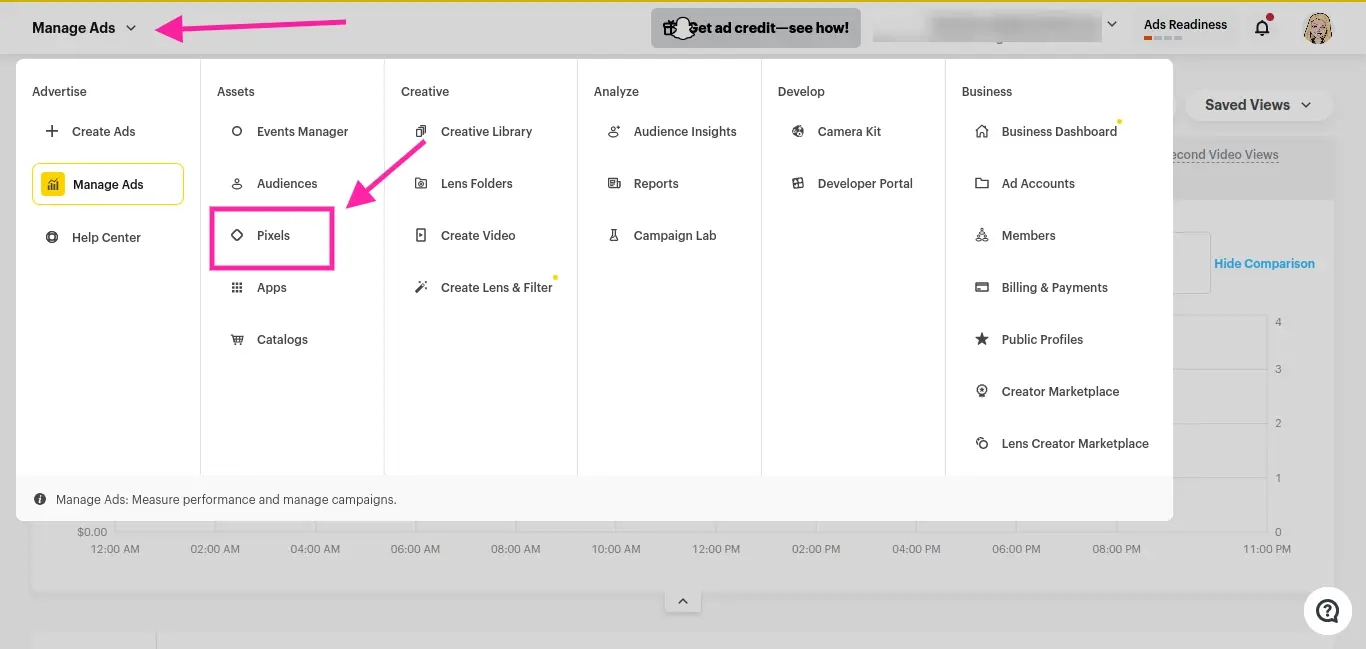
Step 2. Find the Pixels section. You might need to click on the top left corner for a drop down mega-menu. Go to Pixels.
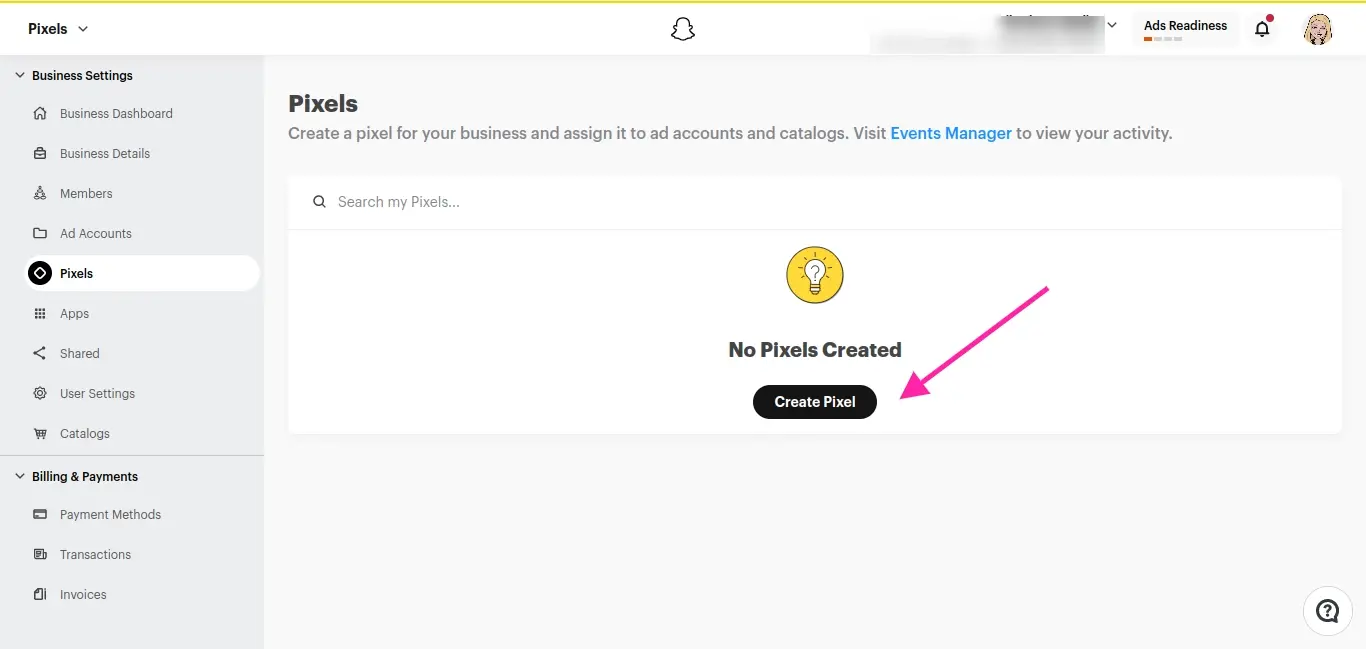
Step 3. Click the black Create Pixel button.
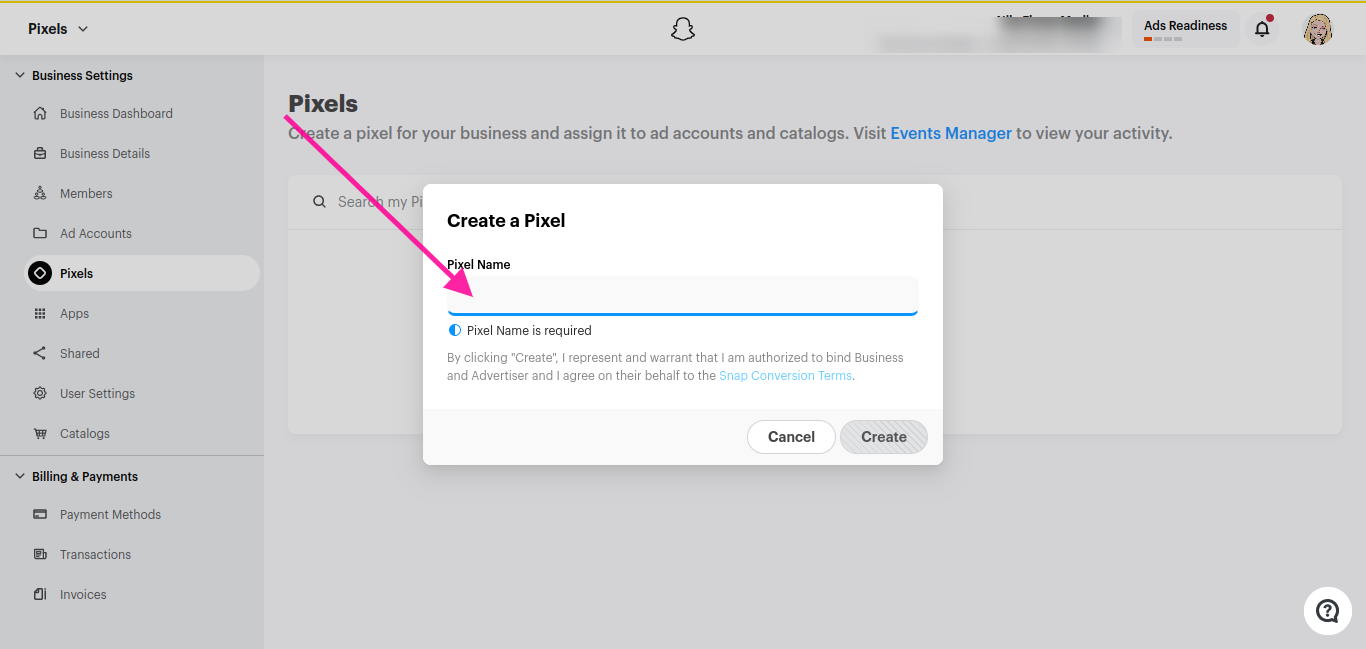
Step 4. Give your Pixel a name.
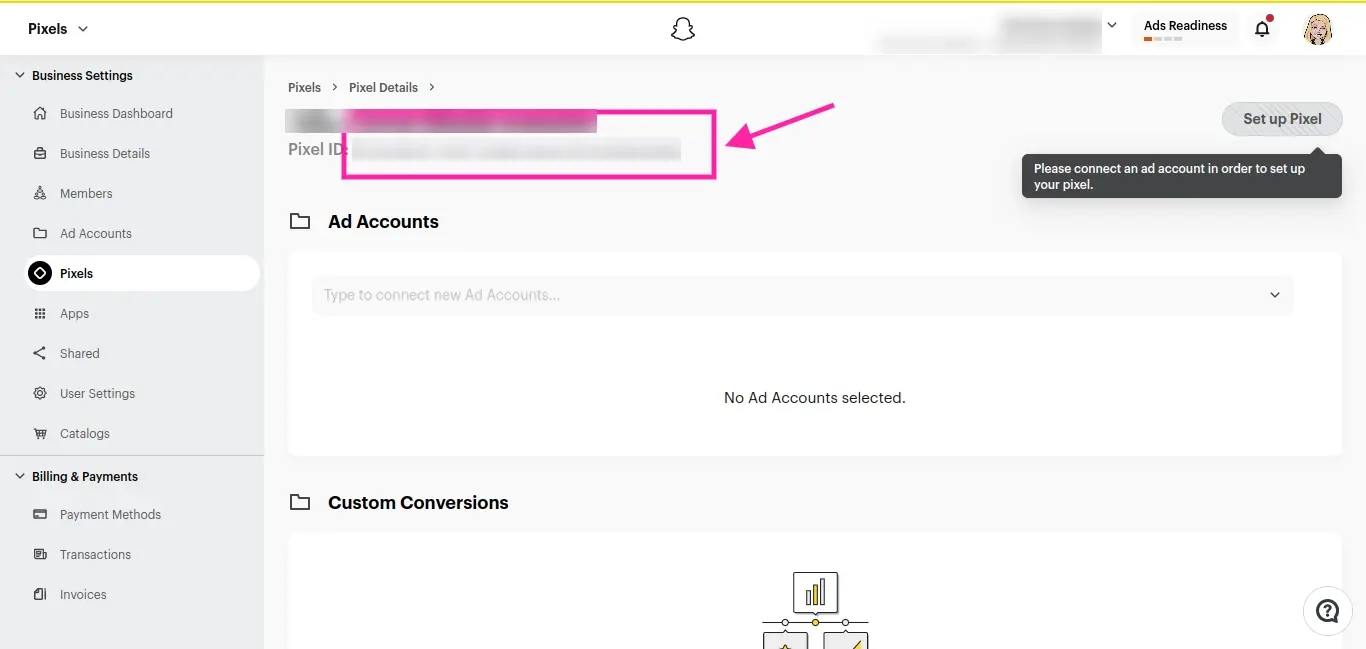
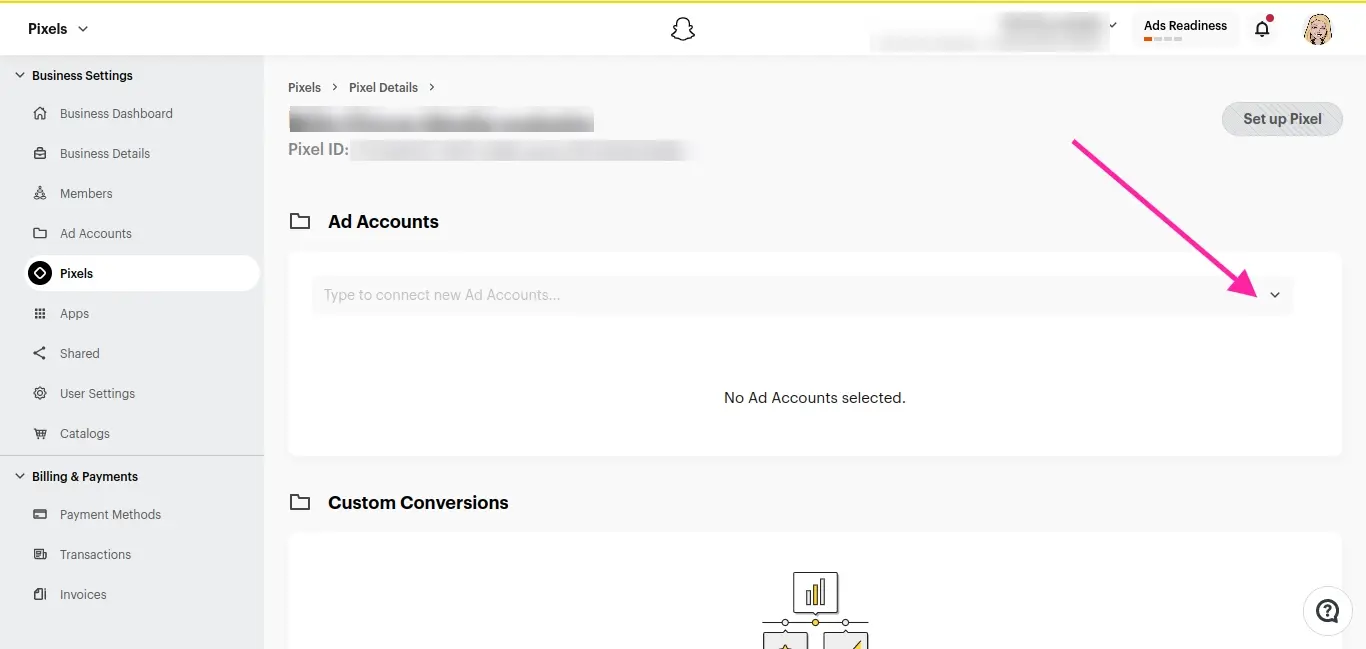
Step 5. Once you’ve created the Pixel ID, you’ll need to select your Ad account that you want to connect the pixel too. You must do this before the next step.
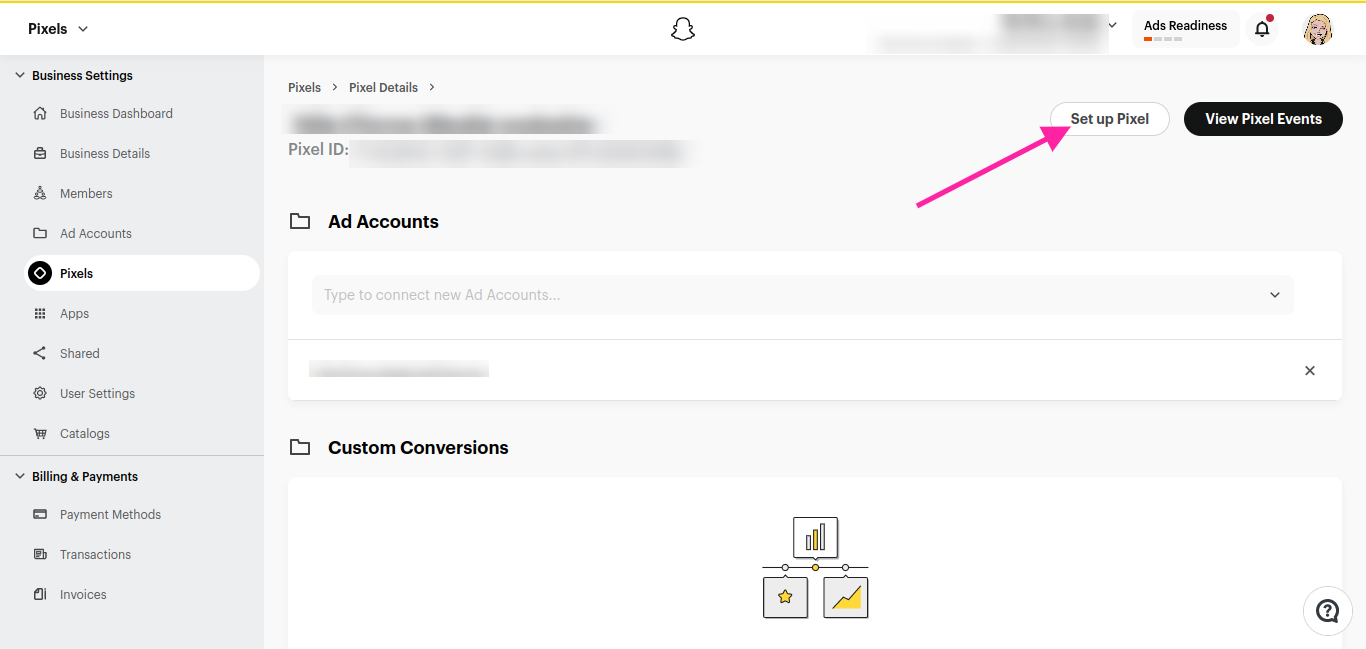
Step 6. Click the Setup Pixel button. Although you do have a Pixel ID, you need to do the next couple steps to set up what you want to track.
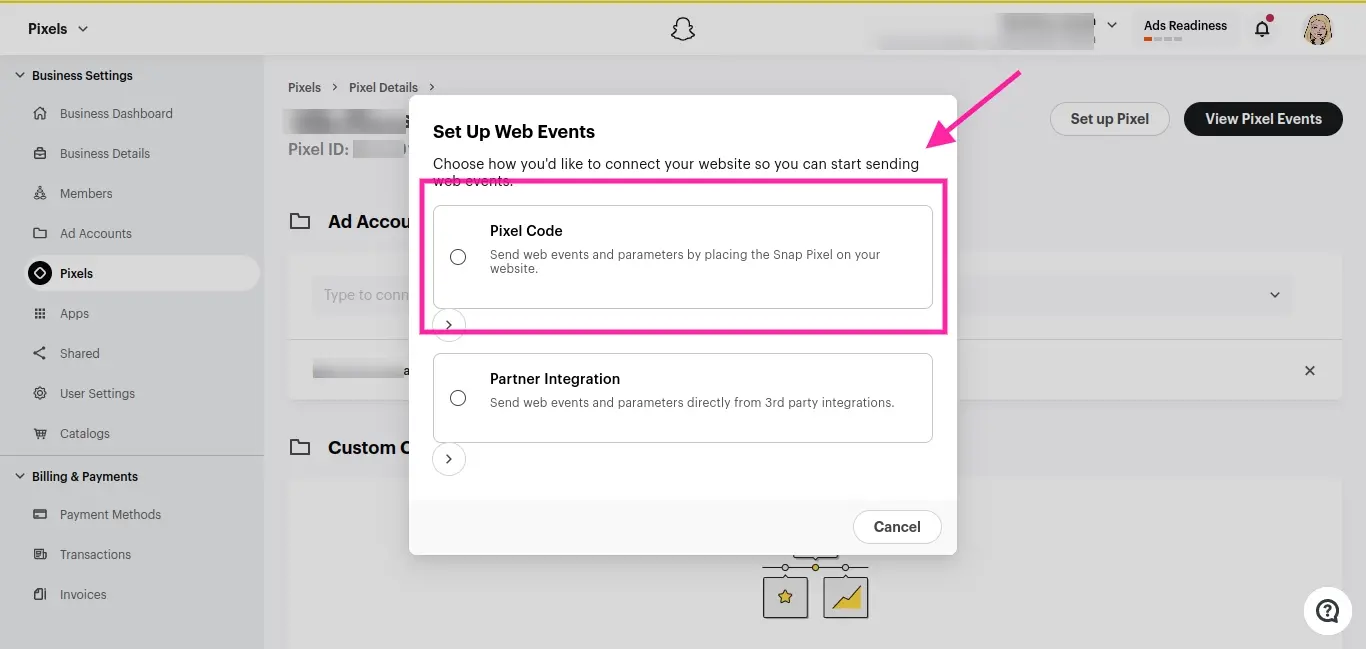
Step 7. In the popup prompt, you’ll need to select Pixel Code.
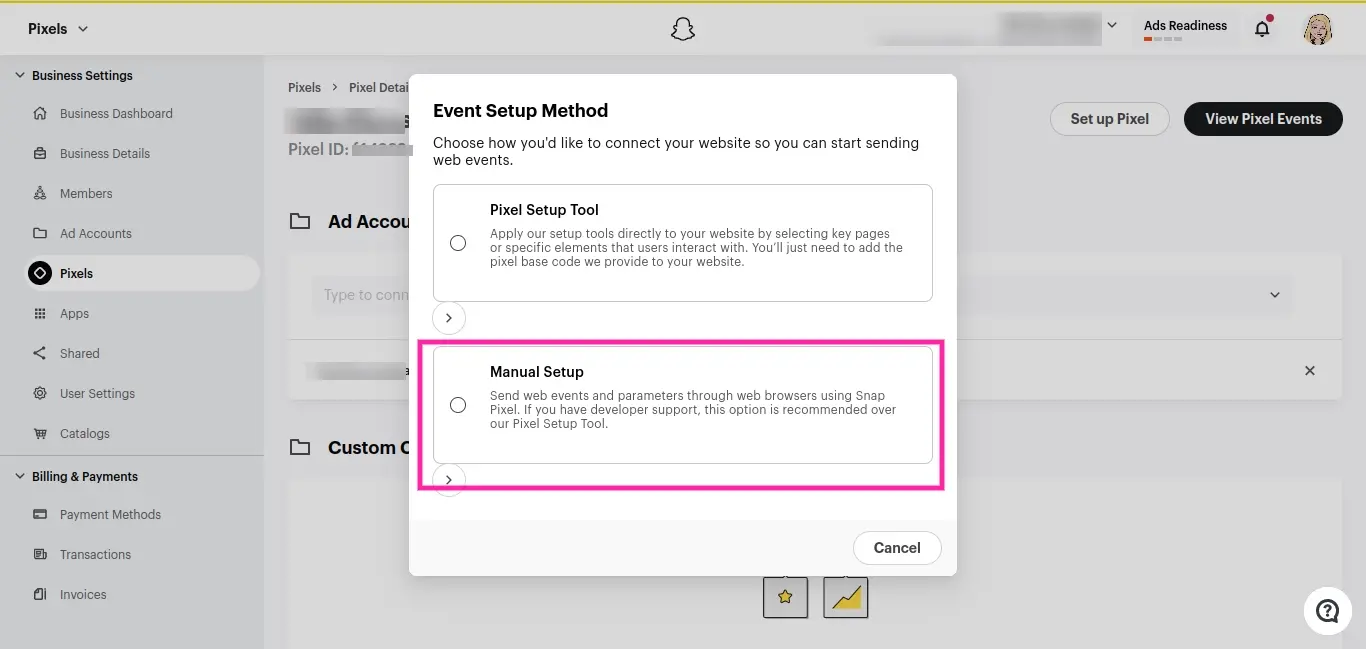
Step 8. Select the Manual Setup option.
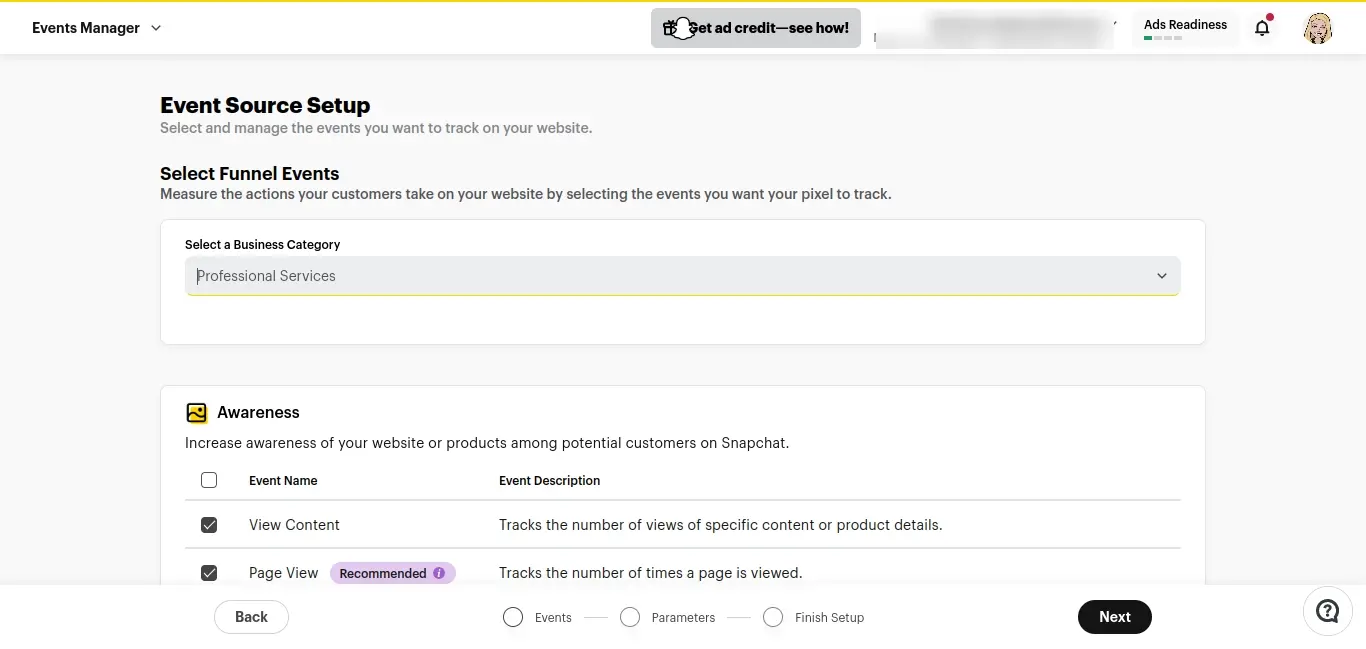
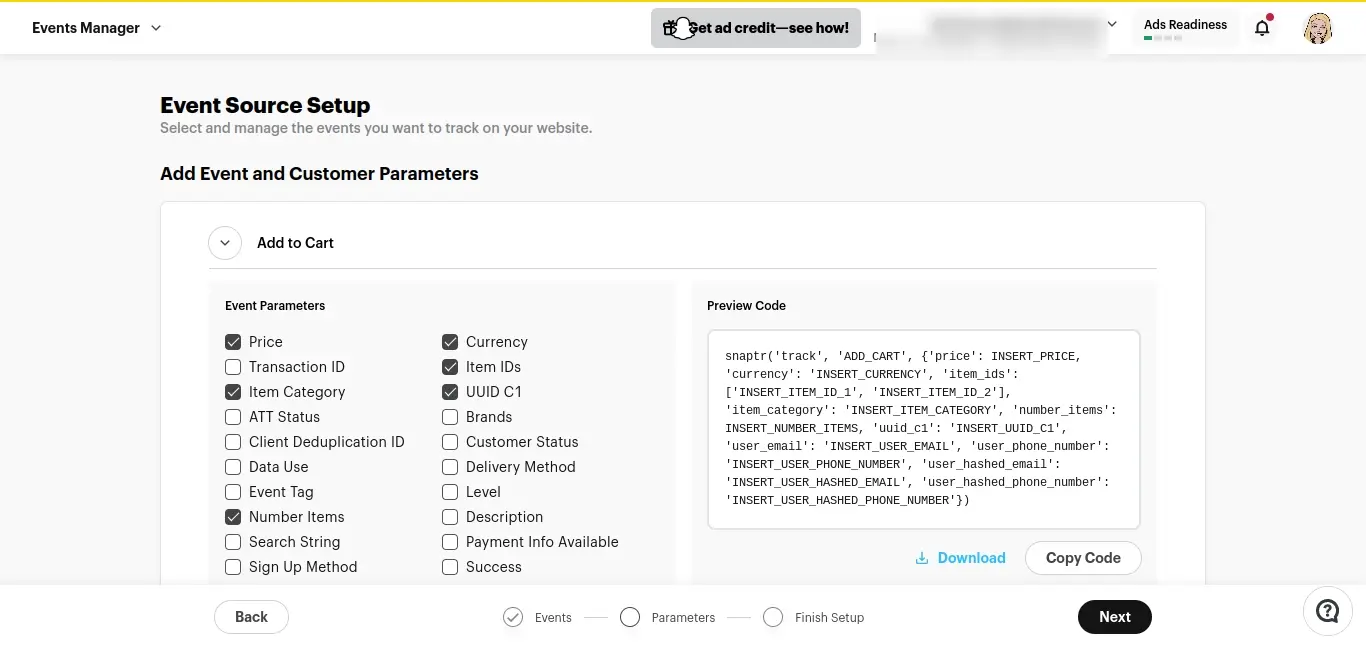
Step 9. Select in the Event Source Setup all the areas you want tracked. It might seem a lot, so you may want to leave the already default selections and come back later to adjust all of them to suit your needs.
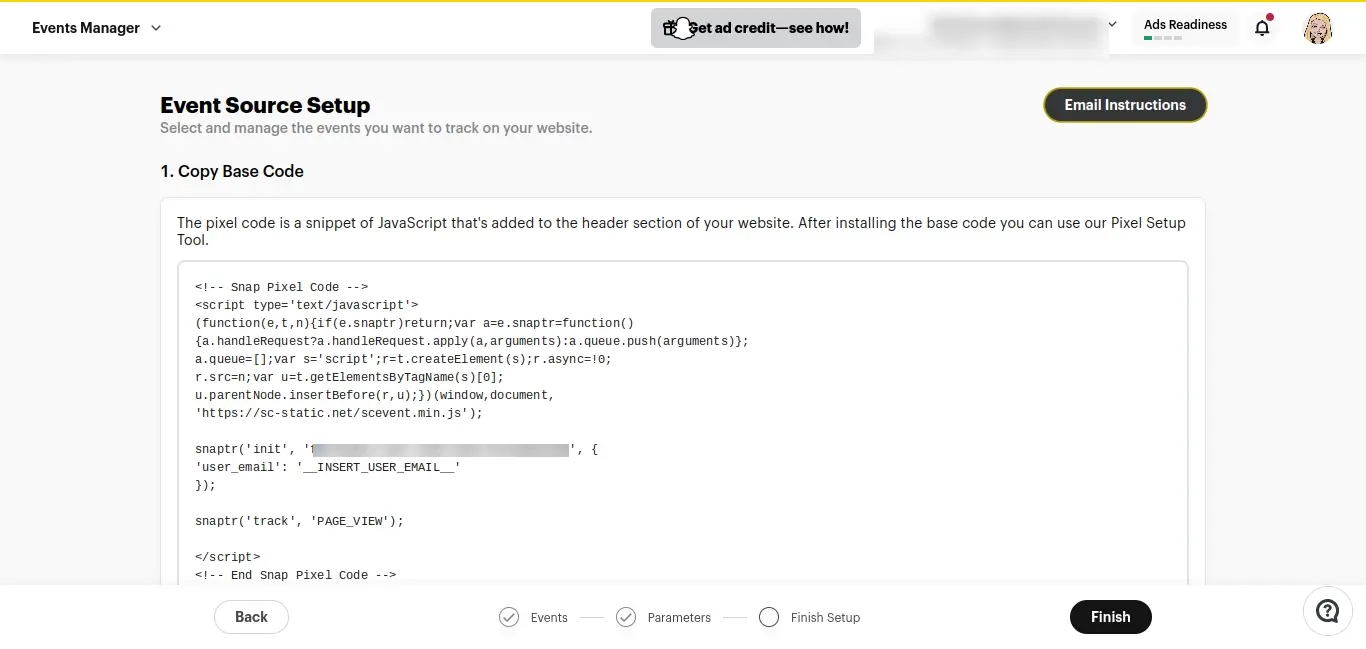
Step 10. Copy the generated Snap Pixel code.
Step 11. Add the Snapchat Pixel to WordPress
You can either add the code to your theme’s settings that allow you to paste in code to the header, or you can install a plugin like WPCode and paste it into the Header under Header & Footer settings.
While you could also add the Snap Pixel code to your theme’s header.php file, it’s not exactly a best practice. Additionally, if you’re already a bit shaky about handling code, this isn’t an ideal solution.
If WPCode is too much or conflicts with any of your other installed WordPress plugins, you may want to use any of the following:
Step 12. Verify Pixel Installation
Use the Snapchat Pixel Helper Chrome extension to test if the pixel is firing correctly on your website.
Additional Tips to Consider:
For more advanced tracking, consider using a dedicated conversion tracking plugin or platform.
Regularly test and monitor your pixel's performance to ensure it's working correctly.
Always refer to the official Snapchat documentation or Snap for Developers for the most up-to-date information and best practices.
In Summary
By following these steps, you can successfully add Snapchat Pixel to WordPress and start tracking conversions from your Snapchat ad campaigns. Just make sure that as Snapchat Pixel is tracking user behavior, make sure to adjust your Event Source setup to get more accurate data. Hopefully this basic guide has helped you on your way to marketing your website on Snapchat.
Frequently Asked Questions
Are WordPress plugins free?
WordPress has loads of plugins you can install, some of them are free, but some of them you will need to pay for. You can learn how to use WordPress Plugins on our blog.
Can gamification improve website loyalty?
Yes, gamification can contribute to improved website loyalty. By creating engaging and rewarding experiences, gamification encourages users to return to the website, participate in activities, and build a sense of loyalty. Loyalty programs, rewards, and achievements enhance the overall user experience and foster lasting connections.
Can ad blockers protect me from all types of online tracking?
No, ad blockers primarily focus on blocking ads and may not block all forms of online tracking or surveillance. Some advanced trackers can bypass ad blockers, so additional privacy tools might be needed for comprehensive protection.

Nile Flores is a long time professional blogger, as well as WordPress website designer and developer from the St. Louis Metro East. Nile blogs at NileFlores.com, where she’s passionate about helping website owners, whether they’re small business owners or bloggers. She teaches about Blogging, Social Media, Search Engine Optimization, Website Design, and WordPress. Additionally, Nile loves to speak at WordCamps (WordPress conferences) across the United States. When Nile isn’t knee-deep in coding, she’s a proud mom of a college student, and enjoys oil painting, cigar smoking, nail art design, and practicing traditional Okinawan kempo karate.
View all posts by Nile Flores


