In the world of e-commerce, capturing customer attention and building trust are key. One highly effective strategy is implementing live sales notifications on your WooCommerce store. These subtle, real-time pop-ups showcase recent purchases, creating a sense of urgency, social proof, and ultimately, boosting conversions.
Imagine a customer browsing your products. Suddenly, a small notification appears: "Someone just bought X product from Y location!" This simple message can help influence their purchasing decision. It tells them your store is active, your products are desirable, and others are buying them. In this article learn how to create a live sales notification for WooCommerce, as well as some best practices.
Why Live Sales Notifications Matter
Before getting into the "how," let's understand the "why." Live sales notifications leverage powerful psychological triggers that drive consumer behavior:
Social Proof: Humans are inherently social creatures. We tend to follow the actions of others, especially when we're uncertain. Seeing that other people are purchasing from your store validates your products and builds confidence in potential buyers.
Urgency and FOMO (Fear of Missing Out): When customers see products being bought, it creates a subtle sense of urgency. They might think, "If I don't buy now, it might sell out or I'll miss out on a good deal." This is particularly effective for limited stock items or trending products.
Increased Trust and Credibility: Active sales notifications demonstrate that your store is legitimate and popular. This transparency builds trust with new visitors who might be hesitant to purchase from an unfamiliar online store.
Highlighting Popular Products: These notifications naturally draw attention to your best-selling items, encouraging more people to explore and potentially purchase them.
Reducing Cart Abandonment: For customers on the fence, a live sales notification can be the nudge they need to complete their purchase, especially if they see others buying the same or similar items.
Enhanced User Experience: When implemented tastefully, these notifications add a dynamic and engaging element to your store, making the Browse experience more interactive.
How-to Guide: Create A Live Sales Notification for WooCommerce
There are several ways to add live sales notifications to your WooCommerce store, ranging from dedicated plugins to custom coding. We'll explore the most popular and effective methods.
Method 1: Using a Dedicated WooCommerce Plugin (Recommended for Most Users)
This is by far the easiest and most efficient method for most WooCommerce store owners, especially those without coding experience. Numerous plugins are designed specifically for this purpose, offering a wide range of features and customization options.
Popular Plugin Options:
NotificationX (Freemium): A highly popular and feature-rich plugin that goes beyond just sales notifications. It allows you to display various types of social proof, including sales alerts, product reviews, email subscriptions, and more. It offers excellent customization options for appearance, timing, and display rules.
TrustPulse (Premium): Another excellent premium option known for its ease of use and powerful conversion-boosting features. TrustPulse focuses specifically on social proof and offers real-time tracking, smart targeting, and a variety of notification types.
Sales Notification for WooCommerce (Free): A simpler, free plugin that provides basic live sales notification functionality. While it may not offer the extensive features of premium options, it's a great starting point for those on a budget.
WP Social Proof (Freemium): This plugin offers a comprehensive suite of social proof features, including live sales notifications, visitor counts, and product reviews. It provides a good balance of features in its free and premium versions.
Step-by-Step Guide Using NotificationX (Example):
For this guide, we'll use NotificationX as a representative example, as its functionalities are common across many similar plugins.
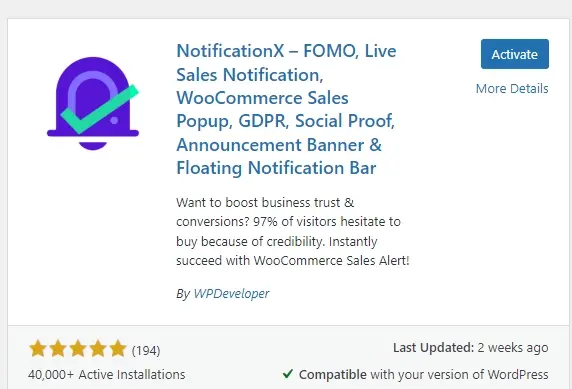
Installation and Activation:
a. From your WordPress dashboard, navigate to Plugins > Add New.
b. Search for "NotificationX."
c. Click Install Now and then Activate.
Creating Your First Sales Notification:
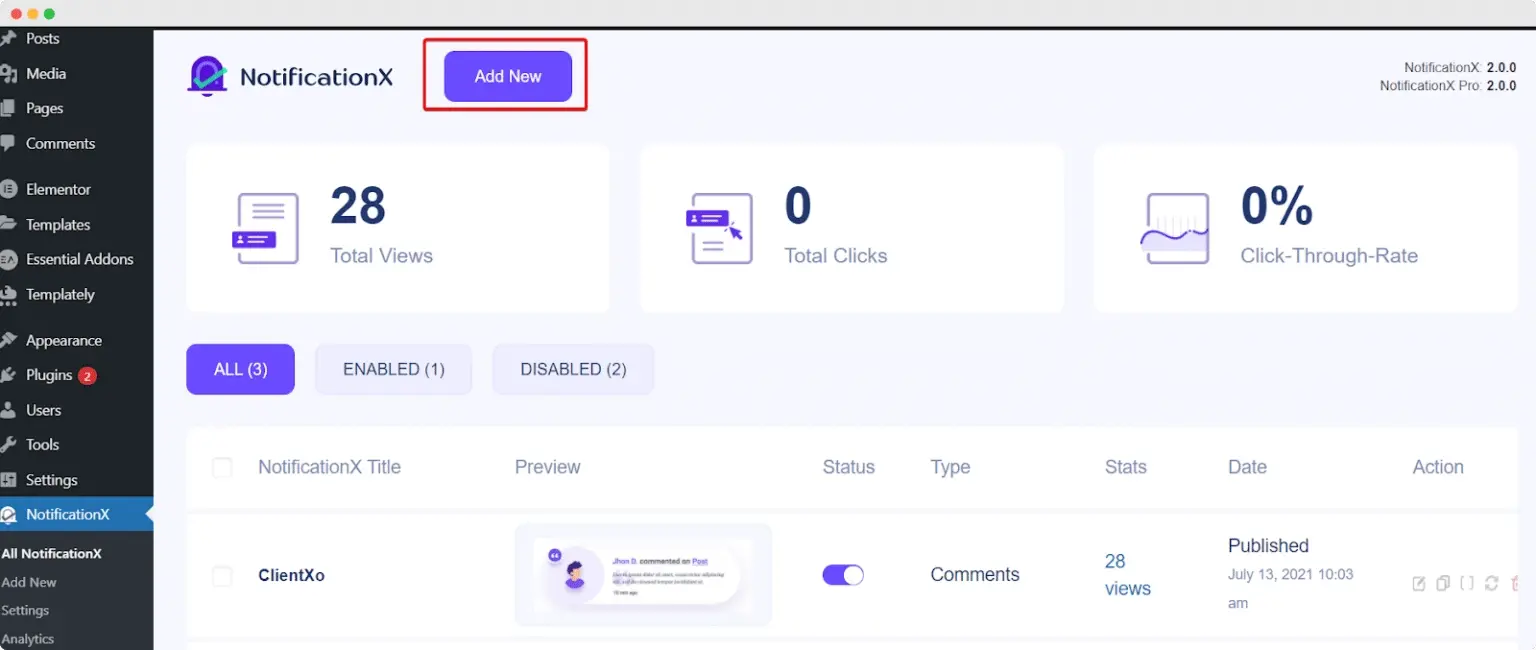
a. Once activated, you'll see a new menu item, NotificationX, in your WordPress dashboard. Click on it.
b. Click Add New.
c. You'll be presented with various "Notification Types." Select Sales Notification.
d. Click Next.
- Source Selection:
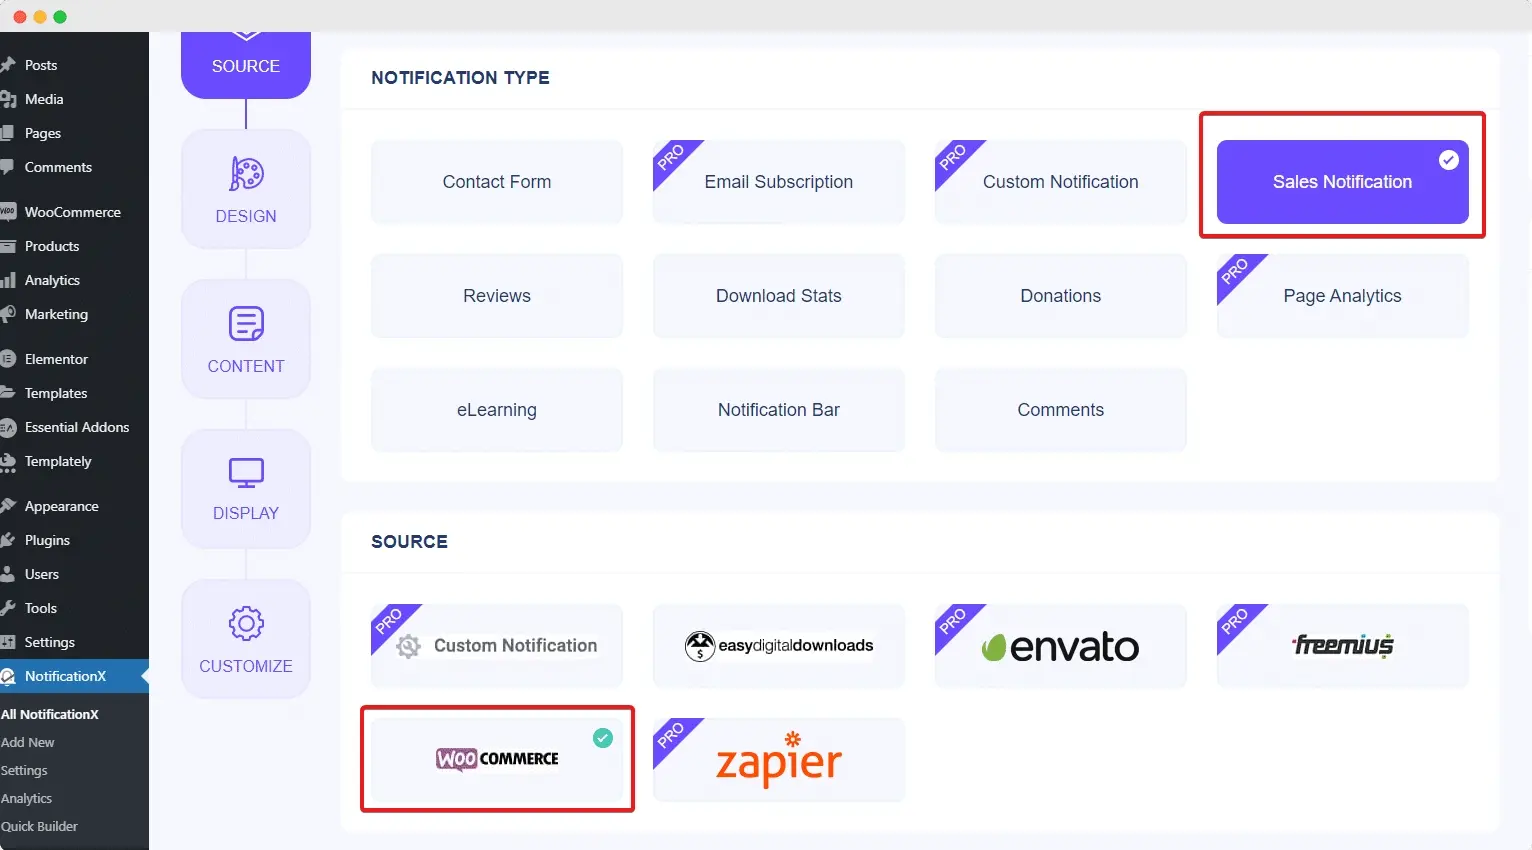
a. Under "Source," select WooCommerce.
b. You can choose to display notifications for "All Products" or specific products. For live sales notifications, "All Products" is usually the desired setting.
c. Click Next.
- Design and Content:
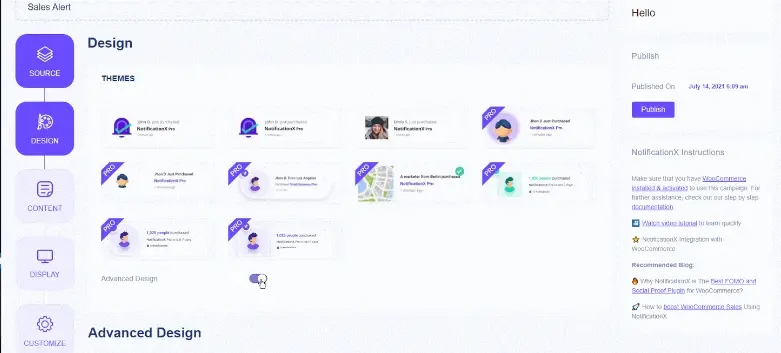
a. Themes: NotificationX offers several pre-designed themes. Choose one that best suits your store's aesthetic. You can preview them as you select.
b. Content:
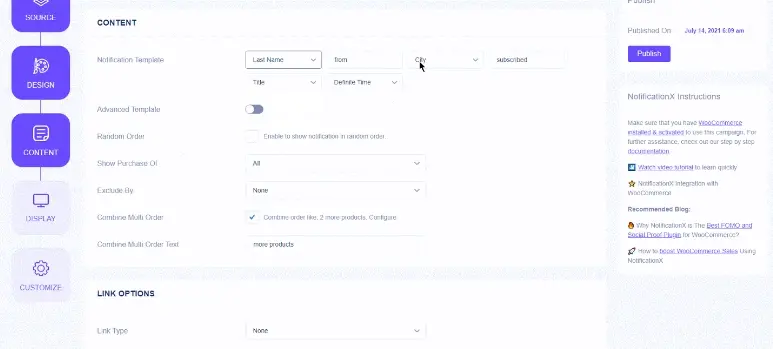
i. Notification Title: This is the main text displayed in the notification (example - "Someone just purchased {product_title}"). The {product_title} is a dynamic tag that will be replaced with the actual product name.
  ii. Order Status: Choose the order statuses you want to trigger notifications for (example - "Processing," "Completed"). For live sales, "Processing" and "Completed" are usually the most relevant.

  iii. Product Image: You can choose to display the product image or a default image.

  iv. "Time Ago" Text: This shows how long ago the purchase was made (example - "2 minutes ago").

  v. "X" Text: The default text for the number of purchases (example - "Someone").

  vi. "From" Text: The default [text](https://verpex.com/blog/wordpress-hosting/how-to-highlight-text-in-wordpress) for the location (example - "from").

  vii. Purchase Quantity: You can display the quantity purchased.

  viii."Dynamic Location": Enable this to show the buyer's location (example -  "Someone from New York"). This adds a powerful layer of social proof.

  ix. "Approximate Location": If you're concerned about privacy, this option displays a less specific location (example - "Someone from the United States").

  x. Click Next.
- Display Options:
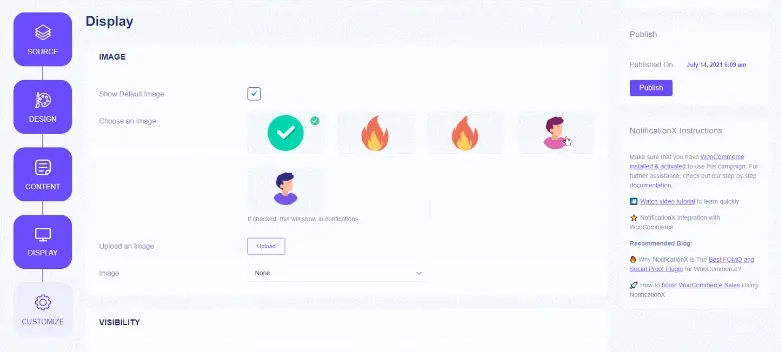
a. Display On: Choose where you want the notifications to appear (example - "Everywhere," "Specific Pages"). For most use cases, "Everywhere" is appropriate to maximize visibility.
b. Show On: Decide whether to show notifications on "Desktop" or "Mobile" devices. It's generally recommended to show them on both.
c. Display For: Configure how long the notifications should be visible and how often they should reappear.
d. Initial Delay: The time before the first notification appears.
e. Display For: How long each notification stays on screen.
f. Delay Between: The pause between subsequent notifications.
g. Display From/To: Set a specific time range for notifications to appear.
h. Loop Notification: Whether to loop the notifications continuously.
i. Click Next.
- Customize and Advanced Settings:
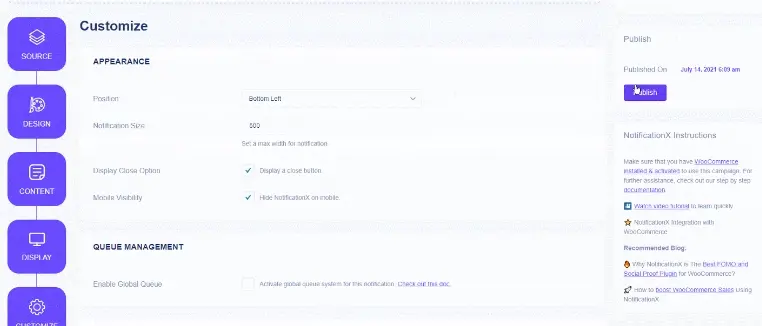
a. Appearance: This section allows you to fine-tune the notification's look:
b. Position: Top-left, top-right, bottom-left, bottom-right. Bottom-left or bottom-right are common and less intrusive.
c. Entrance/Exit Animation: Choose animations for how the notification appears and disappears.
d. Close Button: Whether to show a close button. (Note: For accessibility, you should have this option turned on.)
e. Mobile Visibility: Control visibility on mobile.
f. Link Options: Open link in new tab.
g. Border Radius: Make the corners rounded.
h. Background Color, Text Color, Image Color: Customize the colors to match your brand.
i. Padding, Margin: Adjust spacing.
j. Typography: Change font size, weight, and line height.
k. Queuing (Premium feature): If you have a high volume of sales, this feature allows you to queue notifications to prevent overwhelming visitors.
i. Sound (Premium feature): Add a subtle sound effect when a notification.
m. Hide on Scroll (Premium feature): Hide the notification when the user scrolls down.
n. Advanced: This section may include settings for:
  i. Randomized Orders: Display recent orders in a random order to create more variety.

  ii. Exclude Products/Categories: Prevent notifications from appearing for specific products or categories.

  iii. Custom CSS: For advanced users to add custom styling.
- Publish: Once you're satisfied with your settings, click the Publish button. Your live sales notifications should now be active on your WooCommerce store!
As a note, NotificationX has a lot of great documentation articles for different setups that work with plugins like Elementor too!
Example of NotificationX live sales notification (GIF Credit - Notification X):
Best Practices for Live Sales Notifications for WooCommerce
To maximize the effectiveness of your live sales notifications, follow these best practices:
Keep it Subtle and Non-Intrusive: The goal is to inform and encourage, not to annoy.
a. Position: Bottom-left or bottom-right corners are generally less disruptive than top or center positions.
b. Size: Keep the notification compact and easily digestible.
c. Sound: Avoid loud or jarring sounds. If using sound, make it subtle and optional.
d. Frequency: Don't overwhelm users with too many notifications. Set a reasonable delay between them (example - 5-10 seconds).
e. Closing Option: Provide a clear "X" button so users can close the notification if they wish.
Display Real Data: Authenticity is key. Use actual customer purchases, not fake ones. Customers can often spot fake notifications, which will erode trust.
Vary the Content: If you have a high volume of sales, rotate through different recent purchases to keep the notifications fresh and prevent repetition. Plugins like NotificationX automatically handle this.
Leverage Geographic Information: Displaying the buyer's location (example - "Someone from Los Angeles just bought...") adds a powerful layer of social proof and relatability. Ensure you comply with privacy regulations (GDPR, CCPA) when displaying location data. Many plugins offer "approximate location" options.
Highlight Key Information: Clearly show the product name, image, and the "time ago" stamp.
Match Your Brand's Aesthetic: Customize the notification's colors, fonts, and overall design to seamlessly integrate with your store's branding. It shouldn't look like an intrusive third-party ad.
Target Specific Pages (Optional): While often displayed everywhere, you might choose to show notifications only on product pages, category pages, or the cart page to focus their impact.
Exclude Certain Products (Optional): You might not want to display notifications for very low-value items or sensitive products. Most plugins allow you to exclude products or categories.
Mobile Responsiveness: Ensure your notifications look good and function correctly on all devices, especially mobile phones, where screen real estate is limited.
A/B Test and Optimize: If your plugin allows, experiment with different notification designs, timings, and content to see what resonates best with your audience and drives the most conversions. Monitor your analytics to track the impact.
Consider "Visitor Count" Notifications: Beyond sales, some plugins allow you to display "X number of people are currently viewing this product" or "X people have viewed this product in the last hour." This creates another form of social proof and urgency.
In Summary
Hopefully this how-to guide on how to create a live sales notification in WooCommerce will help you with your conversion optimization plans. By leveraging social proof and urgency, they can greatly influence customer behavior and drive more sales. Whether you choose a feature-packed plugin like NotificationX for ease of use or opt for a custom-coded solution for ultimate control, implementing this strategy can give your e-commerce store a competitive edge.
Frequently Asked Questions
Is WooCommerce 100% free?
No, WooCommerce itself is free, but many extensions and themes are paid. While you can build a basic store for free, advanced features often require purchasing add-ons.
Is WooCommerce safe for beginners?
Despite being more complex than other platforms, WooCommerce is still safe for beginners. Using the right plugins and security measures will improve your safety even further.
Can I customize shortcodes in WooCommerce?
You can customize some WooCommerce shortcodes, such as the “Add to Cart” button for your products. However, some are not customizable.
How does WooCommerce VPS Hosting handle multiple online stores?
VPS hosting can support multiple WooCommerce installations, providing isolated environments for each store, which is ideal for managing multiple businesses or market segments.

Nile Flores is a long time professional blogger, as well as WordPress website designer and developer from the St. Louis Metro East. Nile blogs at NileFlores.com, where she’s passionate about helping website owners, whether they’re small business owners or bloggers. She teaches about Blogging, Social Media, Search Engine Optimization, Website Design, and WordPress. Additionally, Nile loves to speak at WordCamps (WordPress conferences) across the United States. When Nile isn’t knee-deep in coding, she’s a proud mom of a college student, and enjoys oil painting, cigar smoking, nail art design, and practicing traditional Okinawan kempo karate.
View all posts by Nile Flores


