No one likes spam. When you’ve launched your website, you’ll probably encounter it. However, with a contact form, you can greatly reduce a spam problem. In this article you’ll find out why you need a contact form and why you need one, as well as how to use Ninja Forms in WordPress.
What is Ninja Forms?

Ninja Forms is a WordPress contact form plugin that includes a drag and drop builder to make it easy to create a way for your website visitors to reach out to you. The great thing is that you don’t need to know any coding, and you can build unlimited forms for as many types of tasks you wish.
The bonus about this plugin, is that when you install and activate it, Ninja Forms provides a simple and generic contact form to get you going. For those that just need a basic contact form, you might not need to build any extra forms. Neat, right?
With Ninja Forms, you can build surveys, accept payments, and more.
Overview of Ninja Forms features
- Drag and drop builder
- Plugin complies with data privacy laws
- Pre-built templates
- Forms are mobile responsive
- SEO-friendly
- Spam protection
- Ability to export form submissions
Ninja forms offers a lot of Hello, world!x on their website. Some of the add-ons are for user management, styling, analytics, payment gateway integrations, file uploading, email newsletter integration, and more.
Why do you need a contact form?
A contact form serves a few purposes:
- Reduce spam
- Emails through your contact form are more focused on what your business needs to know.
- Easier for visitors to reach out to you.
- You can keep track of clients and new inquiries.
- Build your email marketing list.
- Provide customer support
Reduce spam
In July 2021, over 283 billion spam emails were sent. When you leave your email address in plain daylight on your website, you open up to bots crawling your site. They will collect your email address and send you all sorts of things that have nothing to do with your business. A contact form helps mask your email so bots or even people can’t exploit your inbox, and waste your time.
Emails through your contact form are more focused on what your business needs to know.
When you have a contact form that is focused on specific services or products for your business, you can streamline your customer’s needs.
Easier for visitors to reach out to you.
Honestly, no one really wants to click on a link to your email and wait for their default email provider to fire up. A contact form makes it easy for people to reach out to you without all of the extra steps.
You can keep track of clients and new inquiries.
With a contact form, you can keep track of each customer, whether they are current or new, and follow-up with each of them. You can even provide customer support! Some contact forms like Ninja Forms will even allow you to collect the submissions from your WordPress admin area, so you have a copy.
Build your email marketing list.
When you set up a contact form, you should try to integrate a subscribe method to your email newsletter provider, in order to build your marketing list.
Why use Ninja forms over other contact form plugins?
The reason why you should use Ninja forms over other WordPress contact form plugins, is because it’s super simple to use. You can create your form in a couple minutes. While there are other contact forms out there in the WordPress community, Ninja forms has a super slick interface that makes it easy to get around.
If the default contact form that Ninja Forms provides as soon as you install the plugin isn’t enough, here’s how to create your first form with that plugin.
How to create your first Ninja form in 12 Steps
- Install and activate Ninja Forms
- Under Ninja Forms, click Add New.
- Select a form template
- Rename Contact form
- Add form field
- Edit form field
- Save and Publish form
- Exit form builder
- Create a contact page.
- Add the Ninja Forms block
- Select the Ninja Forms contact form that you wish to display
- Save page
1. Install and activate Ninja Forms
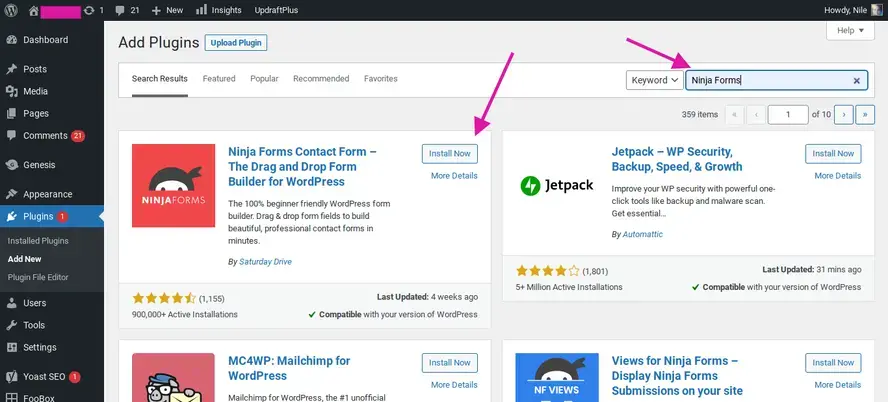
Go to your Plugins section of your WordPress admin area, and type in Ninja forms into the Keyword field. Ninja forms should appear first. Click the button to install, and then again when the blue Activate button appears.
2. Under Ninja Forms and click Add New
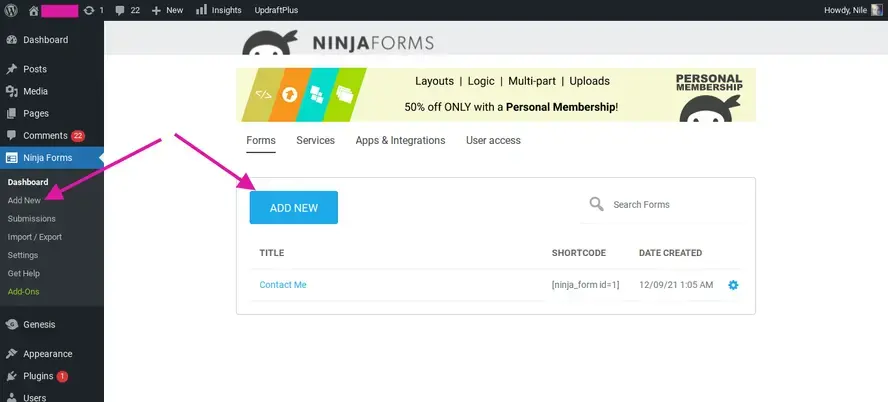
Go to Ninja Forms in your WordPress admin, and click on Add new.
3. Select a form template
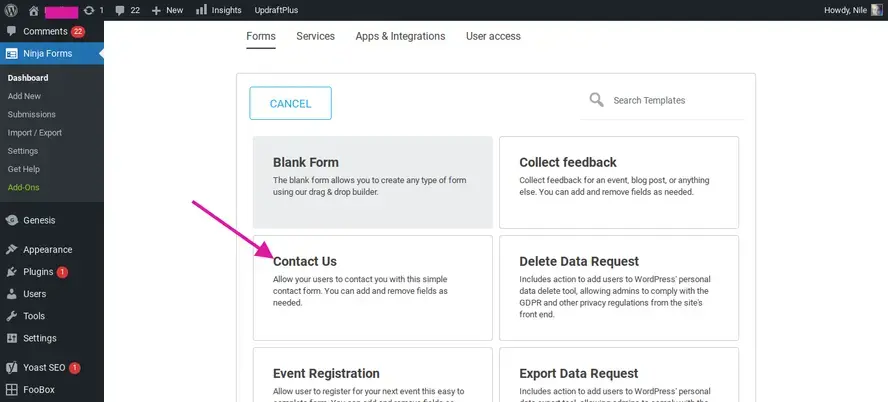
Once you’ve clicked Add new, you’ll be sent to a template list of the types of contact forms that Ninja forms has set up. For this tutorial, you’ll be adding and editing your own contact form. Click on the Contact Us template.
4. Rename Contact form
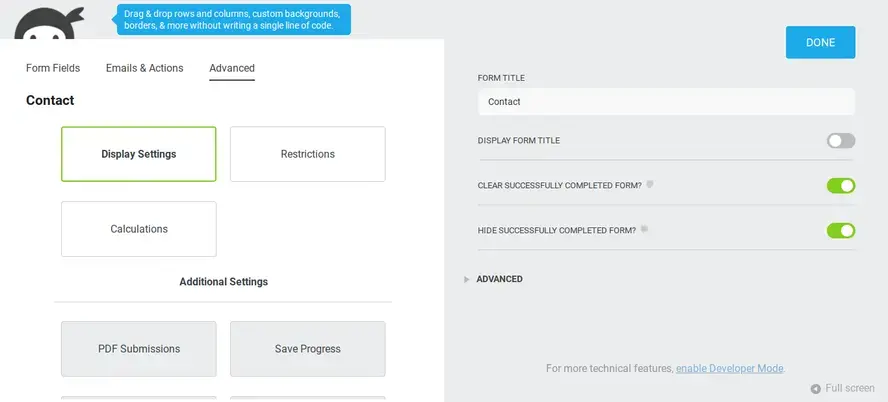
Since there’s an existing contact form named Contact Us, that Ninja Forms automatically created when you installed the plugin, you’ll want to rename your own contact form. Go to the Advanced tab, and click on Display settings.
A gray section to the right will open up, and you can rename your form by editing the Form Title field. Click the big blue button that says Done.
5. Add form field
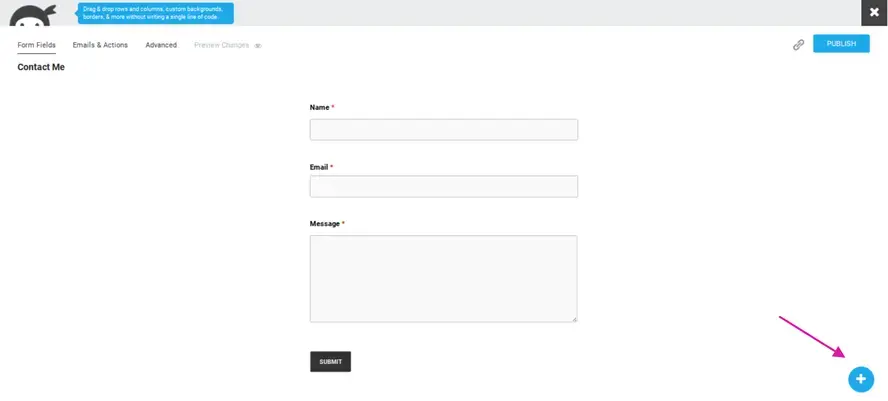
For this contact form, you’ll be learning how to at least add one field. In this case, you’ll be adding a select field. The select field gives your website visitors the ability to choose an option. Click on the blue circle that has a plus sign.
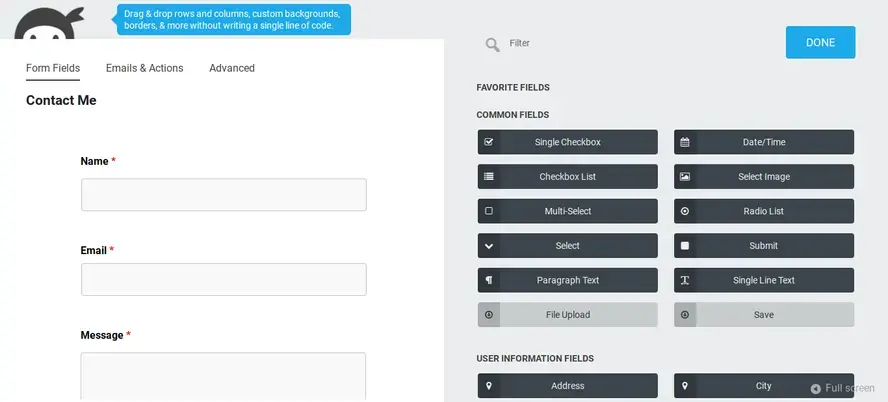
After you’ve clicked the plus sign, a gray section will open up and you’ll see a bunch of different fields that you can use for your form. Click on the option that says “Select”. This will add the Select form field to the bottom of the form, that is to the left. You can drag that field up to where you want it.
6. Edit form field
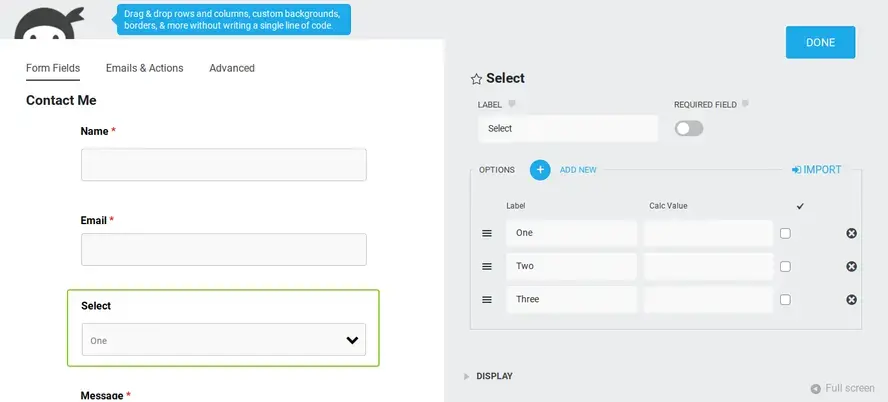
Click on the Select field area on the left, and it will open a gray area to the right that you can edit your fields.
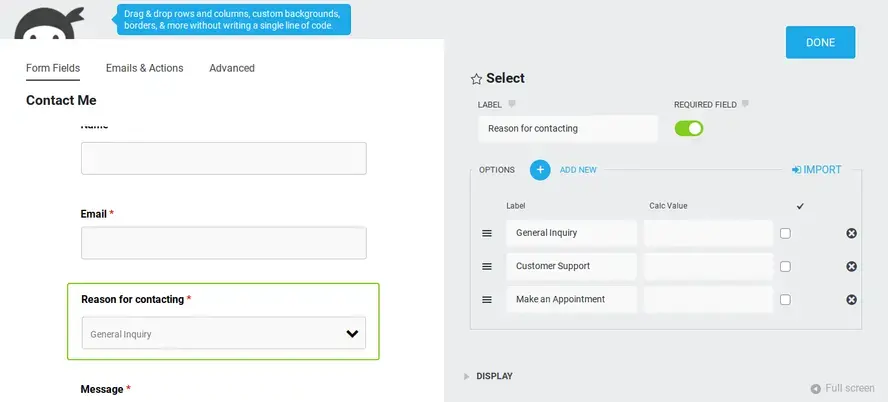
Add a name for the field in the Label area, and then edit each option for what you wish to be available for your website visitors to select.
7. Save and Publish form
Click done, and then that gray area will close. It will reveal a Publish button. Click the Publish button.
8, Exit form builder
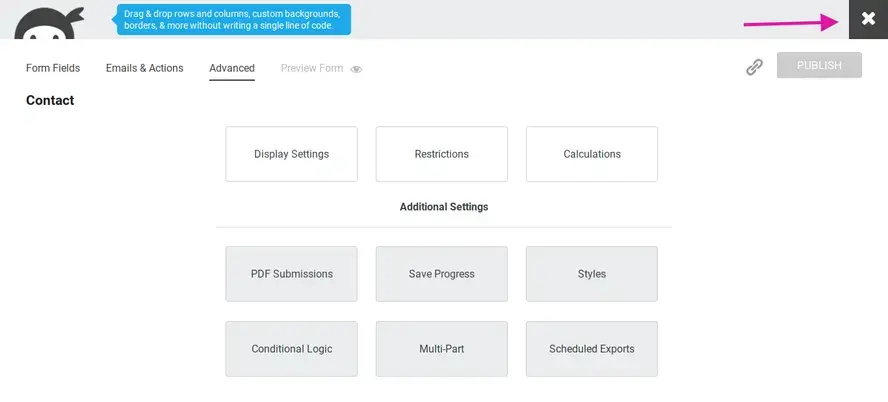
Now that you’ve built your simple contact form, click the X in the top right corner to exit out of the contact form builder.
9. Create a contact page.
Go to Pages, in your WordPress admin, and click Add New. Add some intro text before your contact form. You can even add your social handles or business address.
10. Add the Ninja Forms block
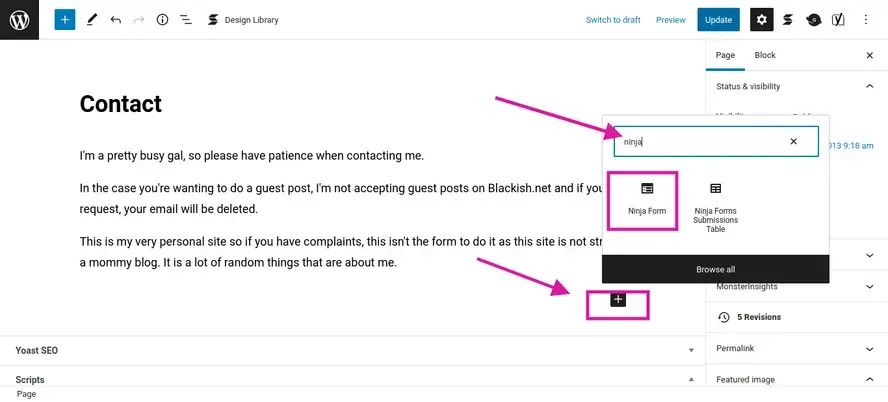
Click on the plus sign to add a new block under your introduction paragraph. It will bring up a small window of the available content blocks. Type in “Ninja” in the search field, and it should offer you a Ninja form content block.
11. Select the Ninja Forms contact form that you wish to display
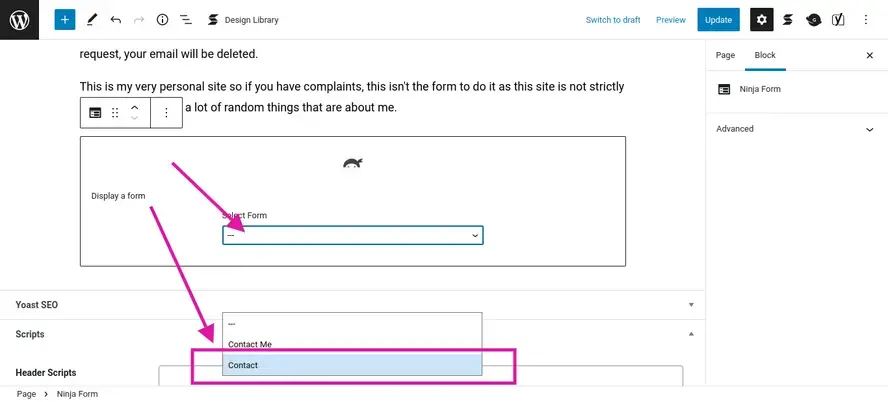
Once you’ve added the block, you need to select which form from the field under Contact form.
12. Save page
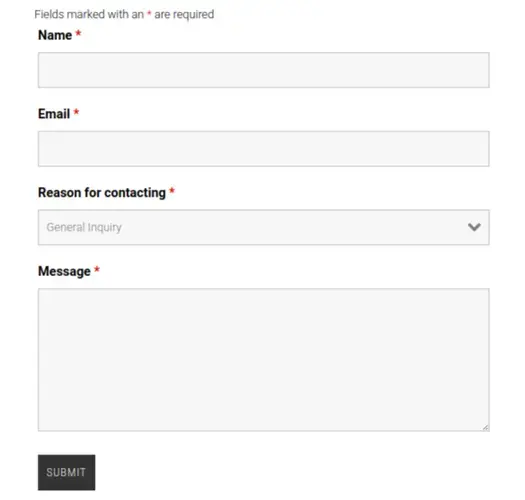
Save your page. When you check out your page, the form area should look similar to the image below.
In Summary
If you don’t have a contact form plugin, you should get one installed as soon as possible. Hopefully the information provided in this article, as well as how to use Ninja Forms in WordPress, can get you set in the right direction. Your website visitors and customers will appreciate it.
Frequently Asked Questions
Is WordPress free?
All you need to do to use WordPress is to invest in a web hosting plan since the software itself is free.
Are WordPress plugins free?
WordPress has loads of plugins you can install, some of them are free, but some of them you will need to pay for. You can learn how to use WordPress Plugins on our blog.
Is a website on WordPress safe?
Websites on WordPress are safe, however to avoid hacking keep your website up to date.
Is WordPress good for musicians?
WordPress is the perfect choice when it comes to building a website for a musician. WordPress allows you to create a professional-looking website without any technical requirements.

Nile Flores is a long time professional blogger, as well as WordPress website designer and developer from the St. Louis Metro East. Nile blogs at NileFlores.com, where she’s passionate about helping website owners, whether they’re small business owners or bloggers. She teaches about Blogging, Social Media, Search Engine Optimization, Website Design, and WordPress. Additionally, Nile loves to speak at WordCamps (WordPress conferences) across the United States. When Nile isn’t knee-deep in coding, she’s a proud mom of a college student, and enjoys oil painting, cigar smoking, nail art design, and practicing traditional Okinawan kempo karate.
View all posts by Nile Flores


