APIs have been a means for developers to integrate certain features/services into their websites. There are APIs for nearly anything, from health fitness, entertainment, payment, weather, etc.
Companies create their APIs to create new features, or functionalities to enhance user experience or allow others to integrate with their services, including other reasons that benefit their business.
Here’s an article that explains APIs in more depth, let's also understand what APIs are briefly and then create a CRUD API with Node.Js, Express, and MongoDB and also test the API using Postman(Postman is an API platform for building and testing APIs).
What are APIs?
APIs (Application Programming Interfaces) are rules and protocols that allow software applications to connect - they allow web servers to interact with client-side applications.
Let's assume you want to build your backend for an e-commerce website, where you need to display products on the page.
API can enable you to create and display a list of products users or customers can interact with allowing them to perform actions like; listing all products in a particular category, adding or removing products from the shopping cart, etc.
What is Node.js?
Node.Js is a JavaScript run-time environment that allows developers to run JavaScript on the server side.
JavaScript is a scripting language for the web, originally designed to run in web browsers as JavaScript was meant to make web pages interactive and dynamic by manipulating the Dom and handling events like (click, etc.) to enhance user experience.
The engine that compiles JavaScript to native machine code (V8 engine) was built for the Google Chrome browser. Due to its high performance, the V8 engine was leveraged to create a standalone run-time environment to execute JavaScript on the server side.
Now, we use NodeJs to build APIs that allow us to create efficient and scalable server-side applications.

Let’s build an API with Node.js
We’ll be creating a CRUD API, and if you're not familiar with the term CRUD, CRUD means to create, read, update, and delete, and it is a set of HTTP routes also known as endpoints that allow clients to perform operations on data stored on a server.
Before we proceed, you’ll need the following
- Download and Install Node.js
- Text Editor or IDE (In this case, we’ll be working with VScode )
- Register on Postman (for testing API)
- Create a MongoDB free account(step-by-step instructions below)
Let’s get started!
Step One: After installing node.js check to confirm that it is installed. In your IDE terminal, type node -v to check the version of Node.js on your computer.
Step Two: Create an empty folder for your project and open it with VS Code
Step Three: Create a package.Json file by typing npm init -y, Package.Json manages the project dependencies, configuration, meta-data, etc., and is essential for JavaScript projects.
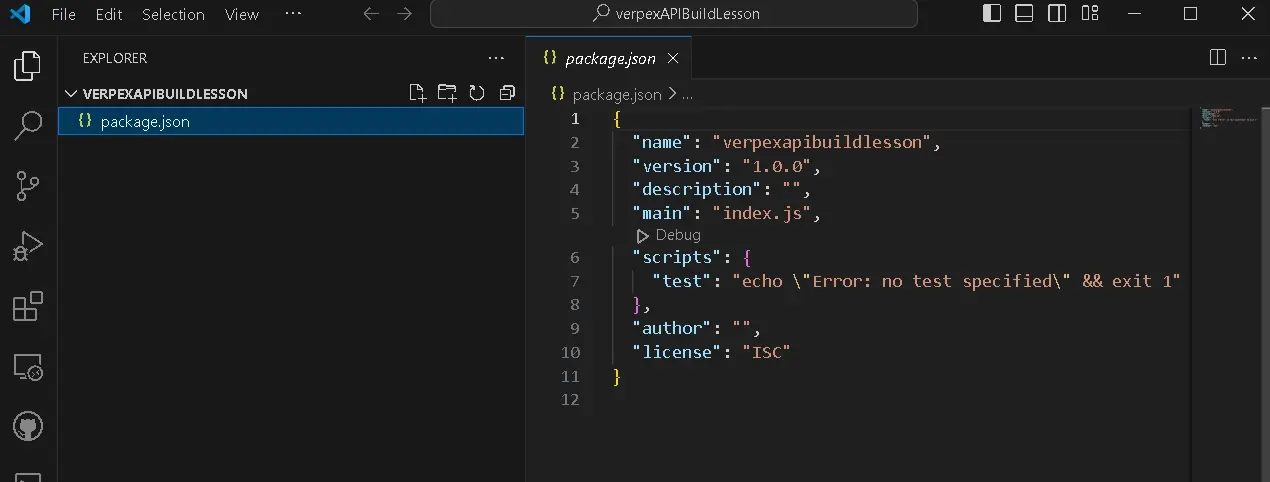
Your package.json file should look like so; in the package.json file, we have the project name, the current version of the project, the section to describe the project that is currently empty, the entry point of the project, etc.
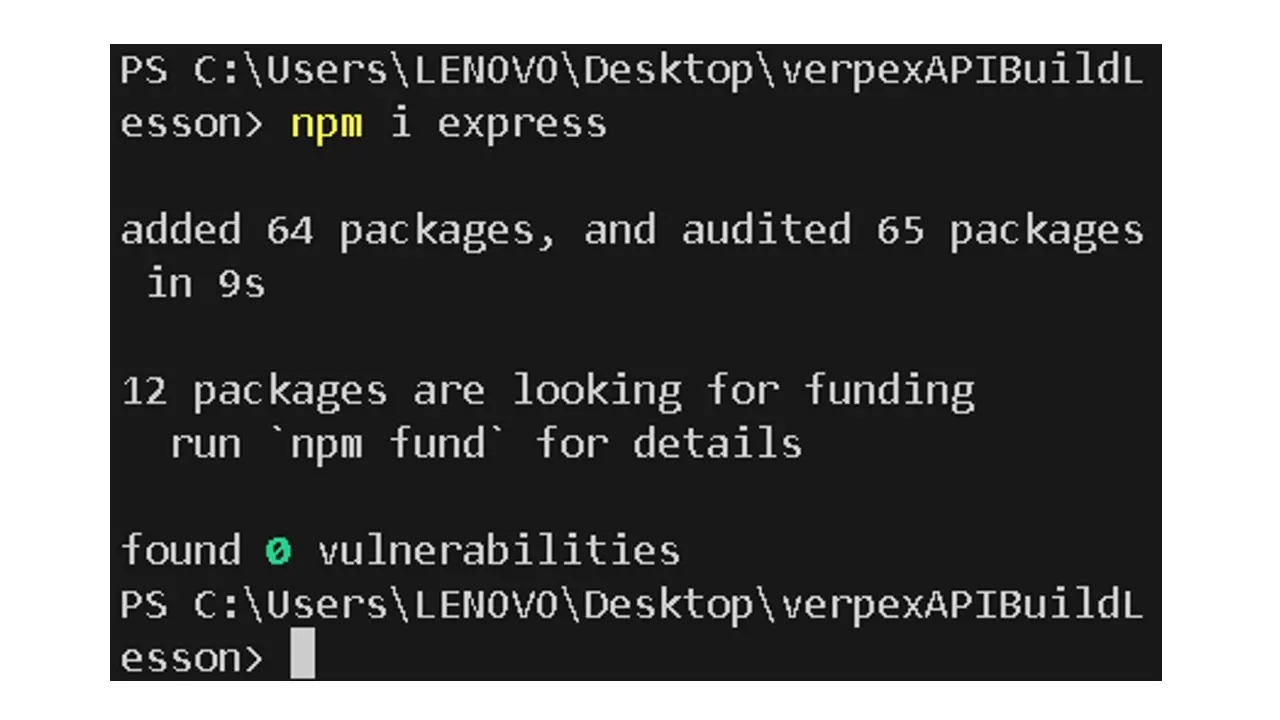
Step Four: Create an index.js file, then, Install Express by typing the following command, npm i express in your terminal. Express is a web framework for Node.js that allows developers to create node applications easily.
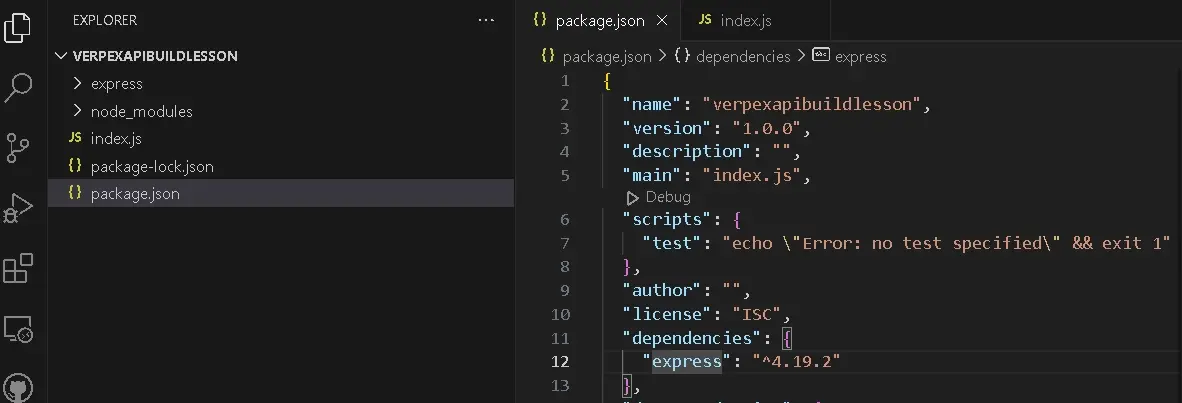
After installing, you’ll see a folder named node_modules directory, node modules provide the necessary package files to ensure that express works and other dependencies work properly in our project.
You can also confirm in package.json where it says dependencies - the dependencies section was empty but after a successful installation of express, you’ll notice express has been included.
Step Five: Create an express application. In the index.js section, type the following;
Create an express variable and require the express package
const express = require("express");
// requiring express module
Step Six: Create an app variable and call the express function - this function contains methods required to configure the web server.
const app = express();
Step Seven: Type the function call in your index.js file to start the express server and listen on port 4000. We’ll log out the text “listening on port 4000 to ensure our app is running.
// where the message will be shown to us
app.listen(4000, () => {
  console.log("listening to port 4000");
});
app. listen - This tells the express application to start a server and listen for incoming requests on port 4000. The port is simply a server's endpoint to listen to incoming requests.
To start the express server we have to type the following command in our terminal “node index.js”

To access the application via the web browser, we have to create a route. Let’s create a GET request to the server's root URL ("/") to send a response to the client.
app.get("/", (req, res) => {
  //pass callback function
  res.send("Hello client"); });
This is what will be displayed on the web page;

Code Breakdown
app.get("/") - is a route handler for HTTP GET requests to the root URL("/") - This executes the callback function when a GET request is made to the URL.
(req, res) =>{...} -This serves as the callback function that takes the request and response object or parameters. The request is what clients send and the response is what the server sends back in response to the client's request.
res.send ("welcome client") sends a response to the client that made a request. In this case, the response is a message that says "Welcome Client".
A GET request is made by the client to the root URL (“/”) after which the server responds with the message “Welcome Client”.
For instance, typing the localhost:4000 in the web browser is the request and the response is what we've provided our callback function in the express server(our node application)
Step Eight: Install Nodemon to restart the Node Application
When changes are made to the application, the server has to be re-started using the command “node index.js”. We can use a package called Nodemon to restart our node application.
In the terminal type the following command “npm i nodemon -D”, and check the JSON file to see that it’s been added as a devDependencie.
Step Nine: Create a script as a placeholder for nodemon
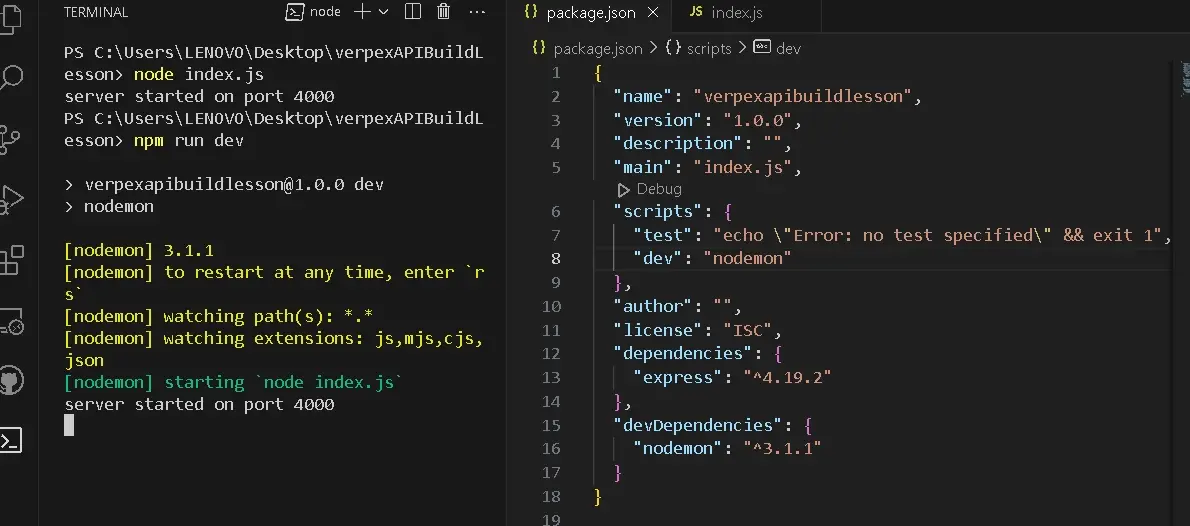
Create a custom script named "dev", assign it the nodemon command “nodemon” -and then type npm run dev. It allows us to run nodemon in our application, now we won’t type node index.js when we want to start our application, instead, we’ll use npm run dev.
Now that we’ve set up our express server, let's connect the application to a database.
Connect Application to a Database using MongoDB
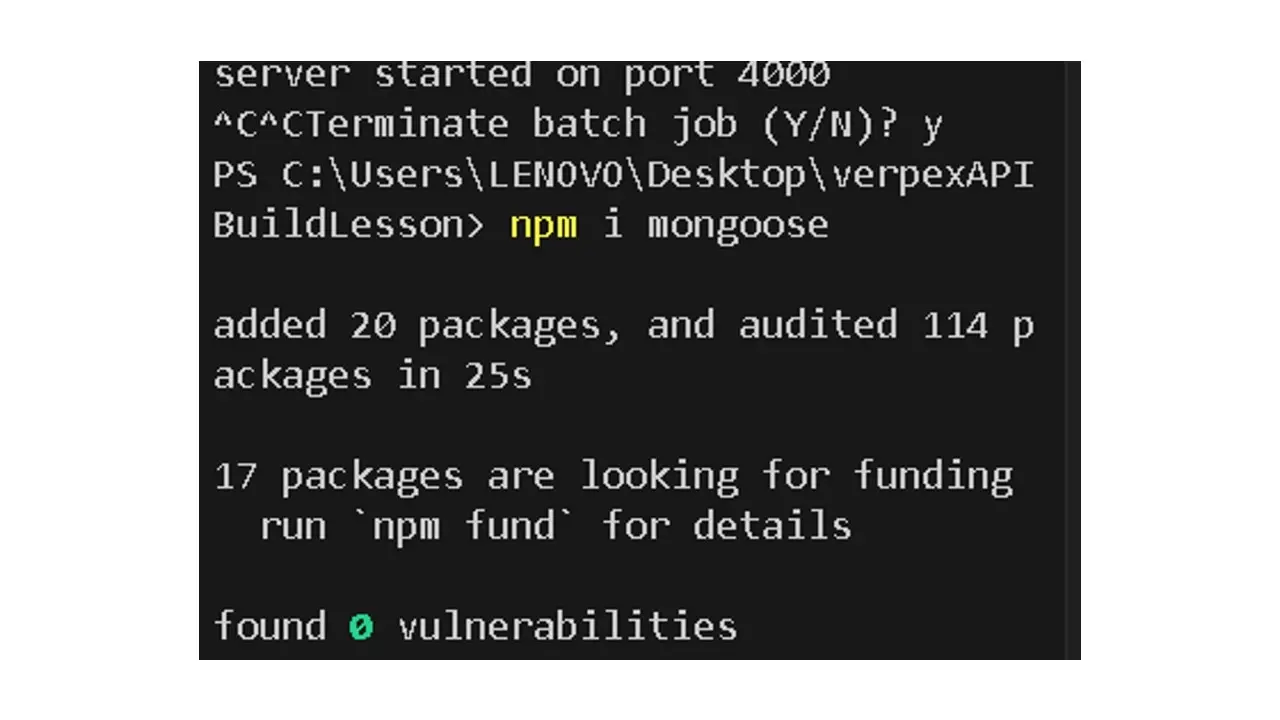
Step 10: Create a database using MongoDB - MongoDB database program that allows us to store, retrieve and manage data. To connect the node.js application to MongoDB, install the Mongoose package.
To install Mongoose, stop your server and type the command npm i mongoose in your terminal. After the installation, start the server again (npm run dev).
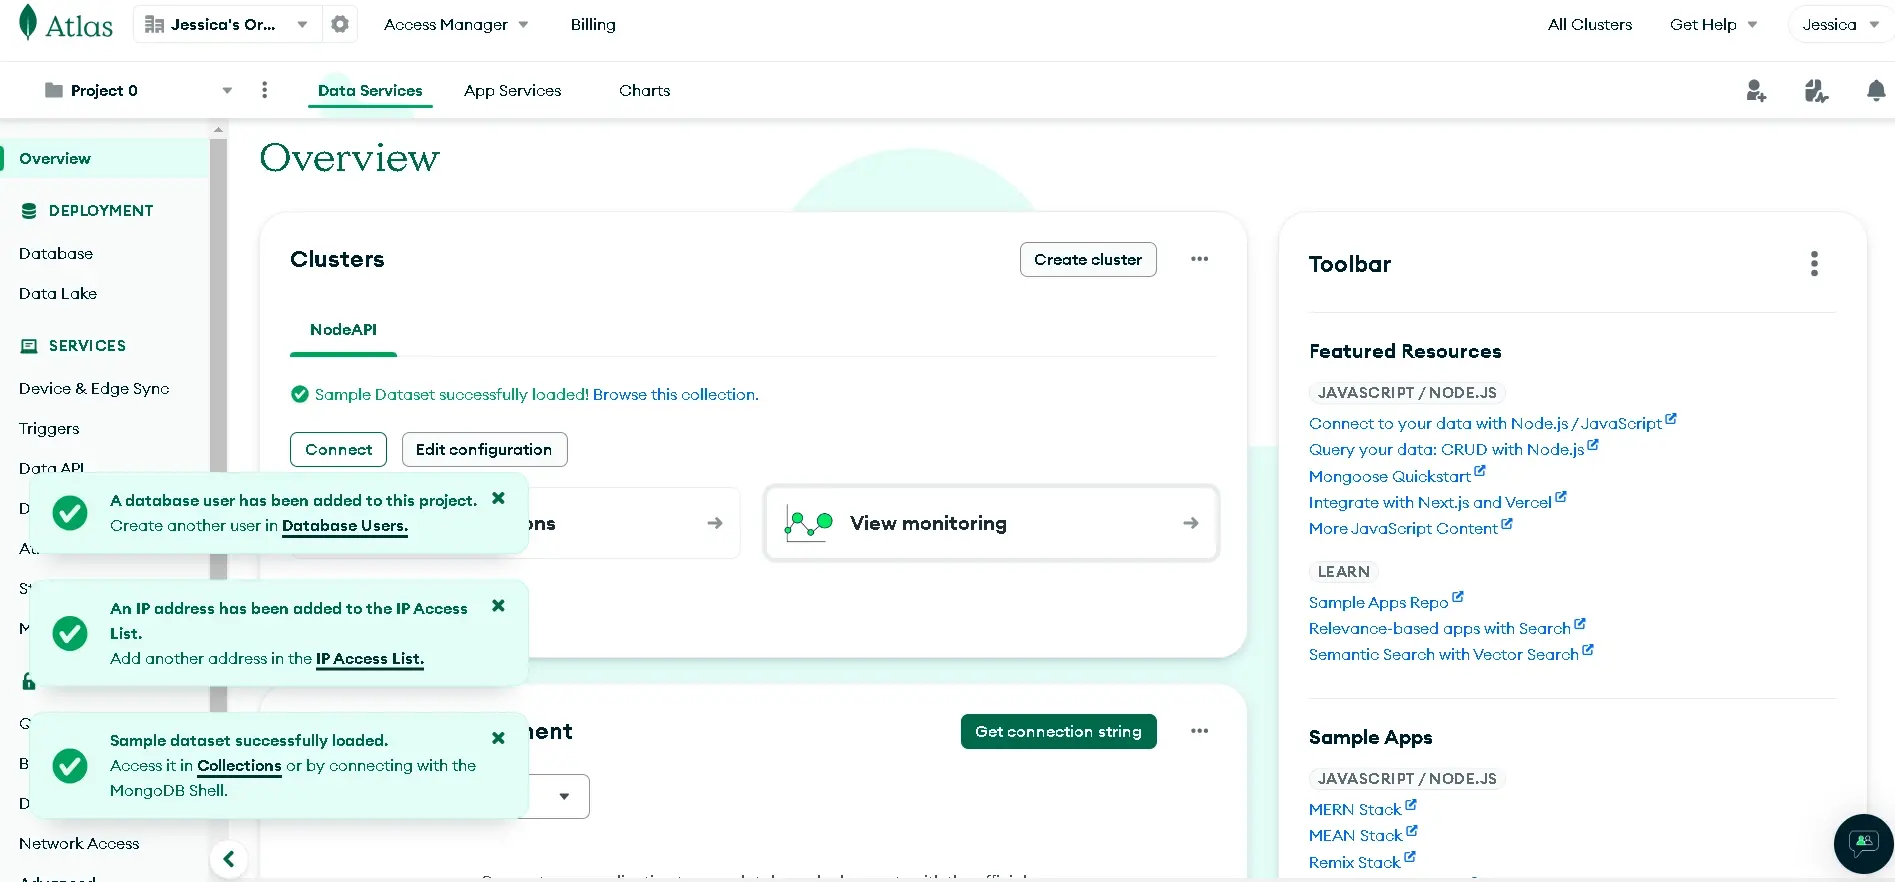
Step 11: Go to the MongoDB website and select the free option. Follow the steps provided.
Step 12: After clicking on Try Free, a new window with options will be provided to you, and it’ll look like so;
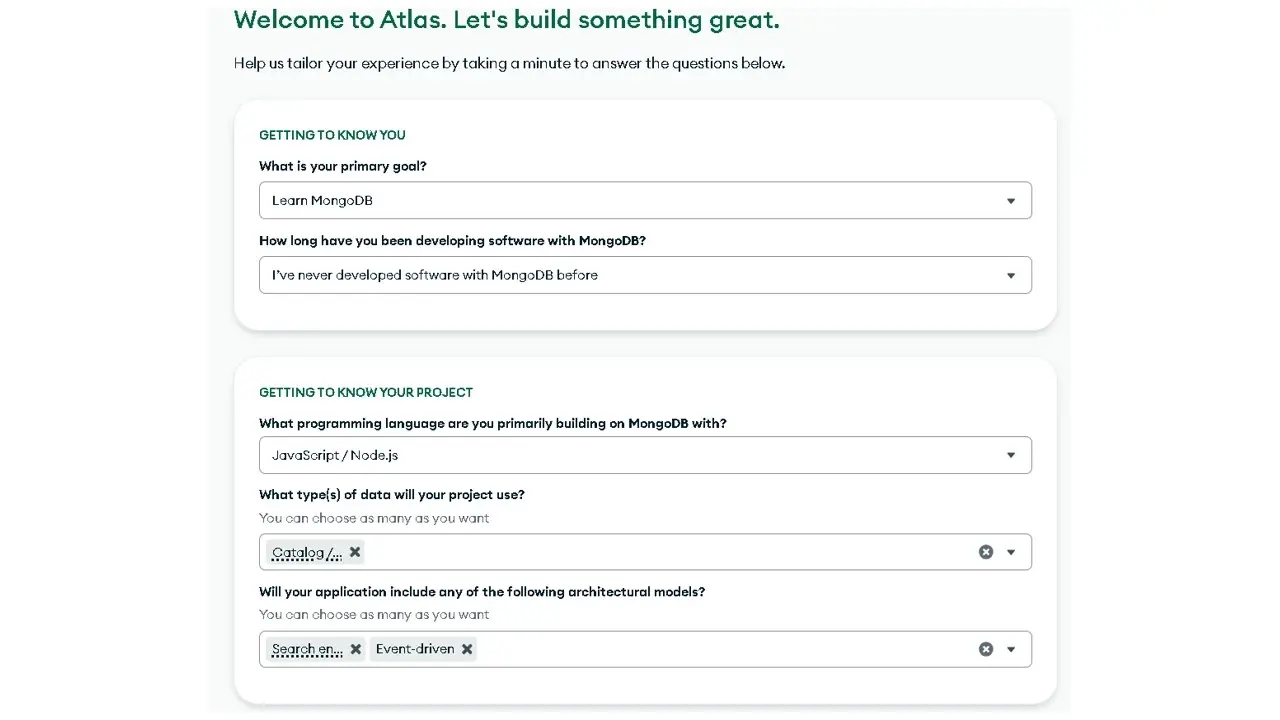
Step 13: The options are to help MongoDB suggest best practices and configurations for your type of project. After you click on finish, you’ll be directed to the overview page. Click on the Create button,
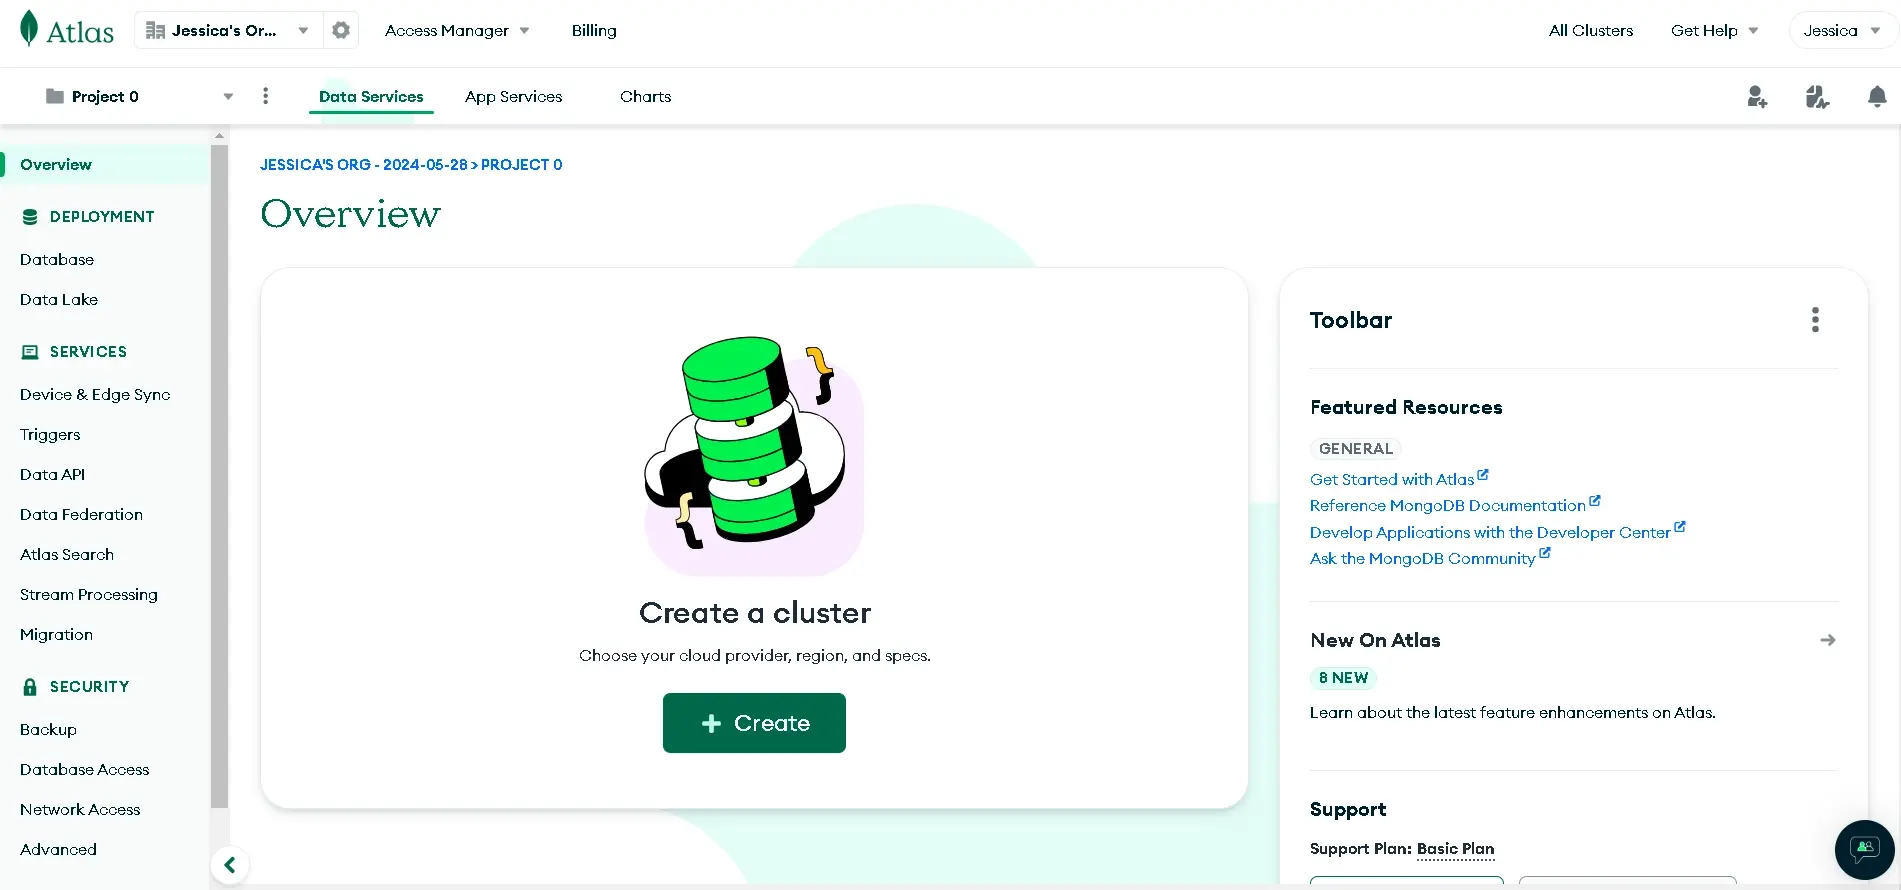
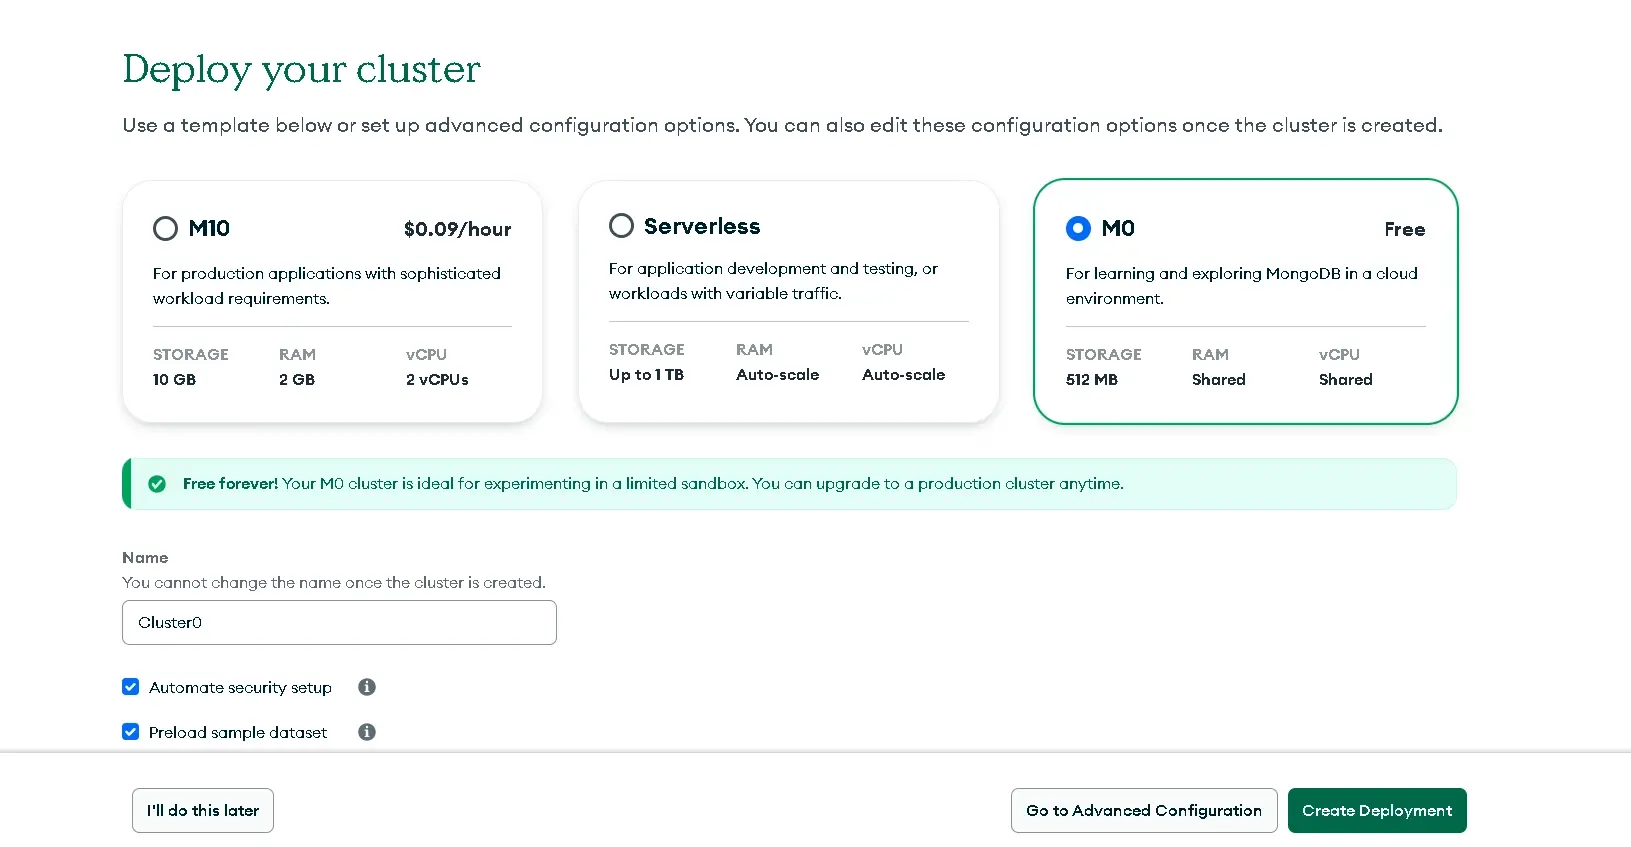
Step14: Deploy a Cluster
Choose the free version, and click *“create deployment”**.
Step 15: The next option is to connect to NodeAPI -
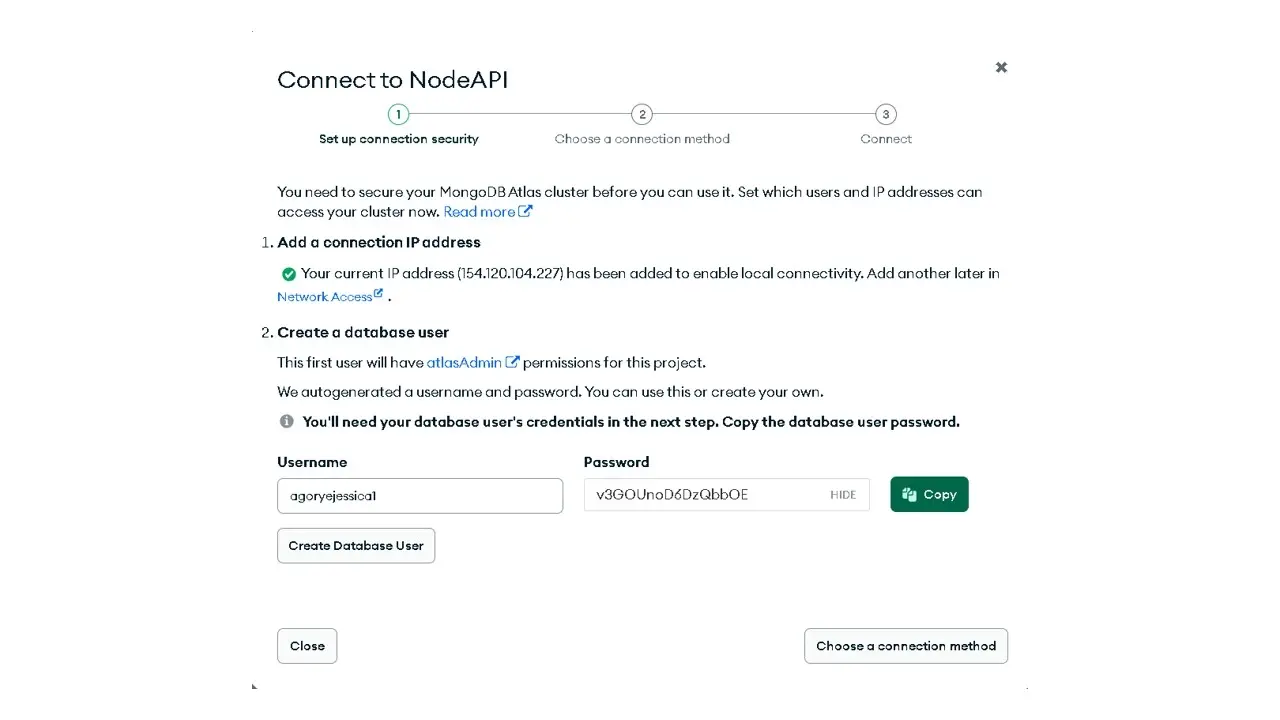
you can change the password to something you’ll remember, then click on the connection method.
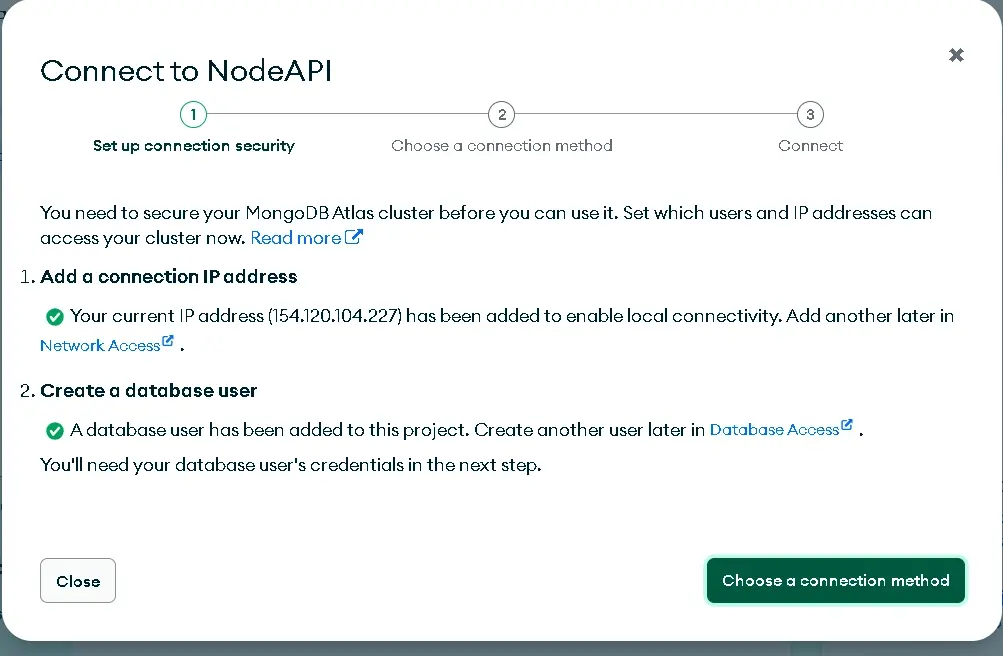
Step16: Click “Choose a connection method”
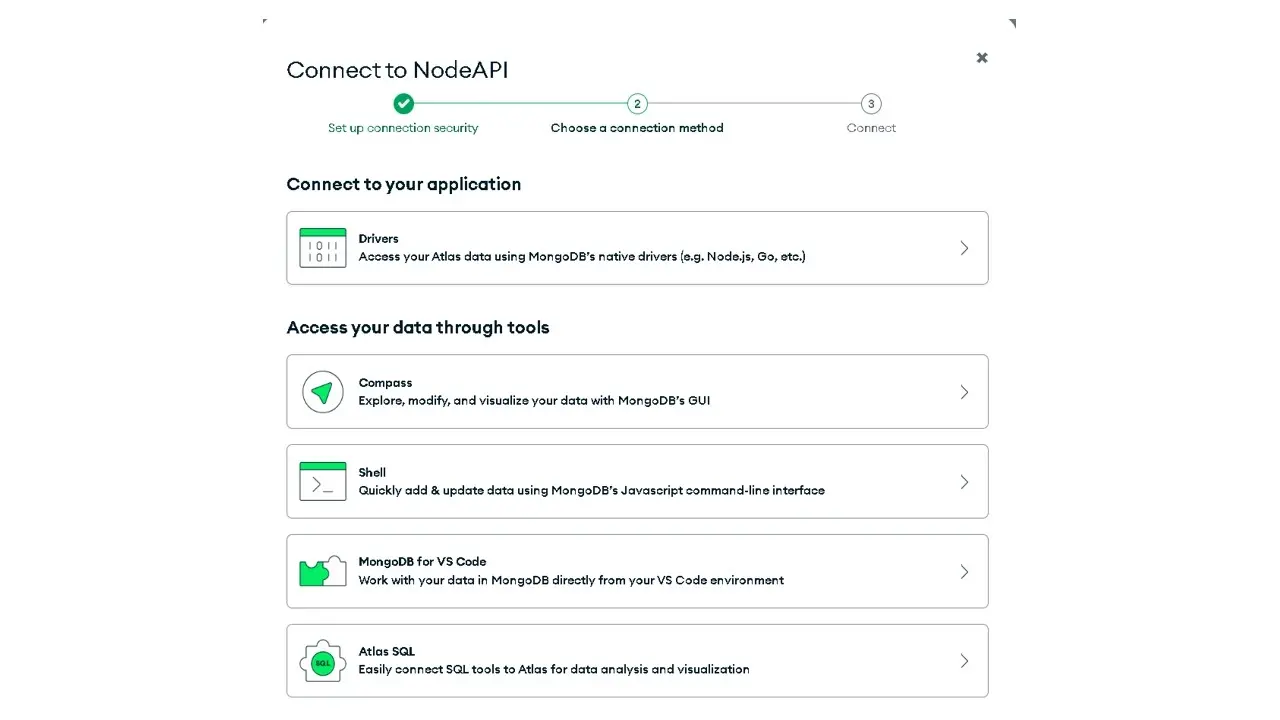
Step 17: Select the “Drivers” option
Step 18: To connect with the MongoDB driver, copy the connection string and add it to the application in VSCode.
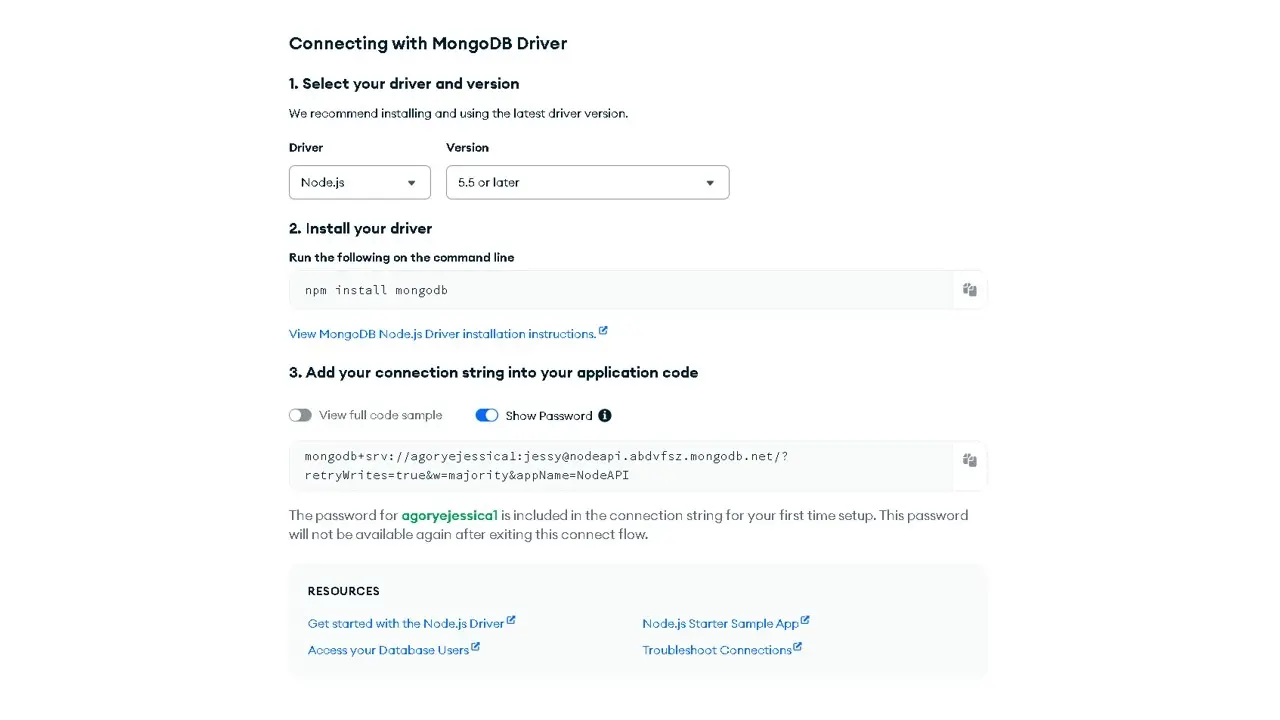
This is the view of the created cluster.
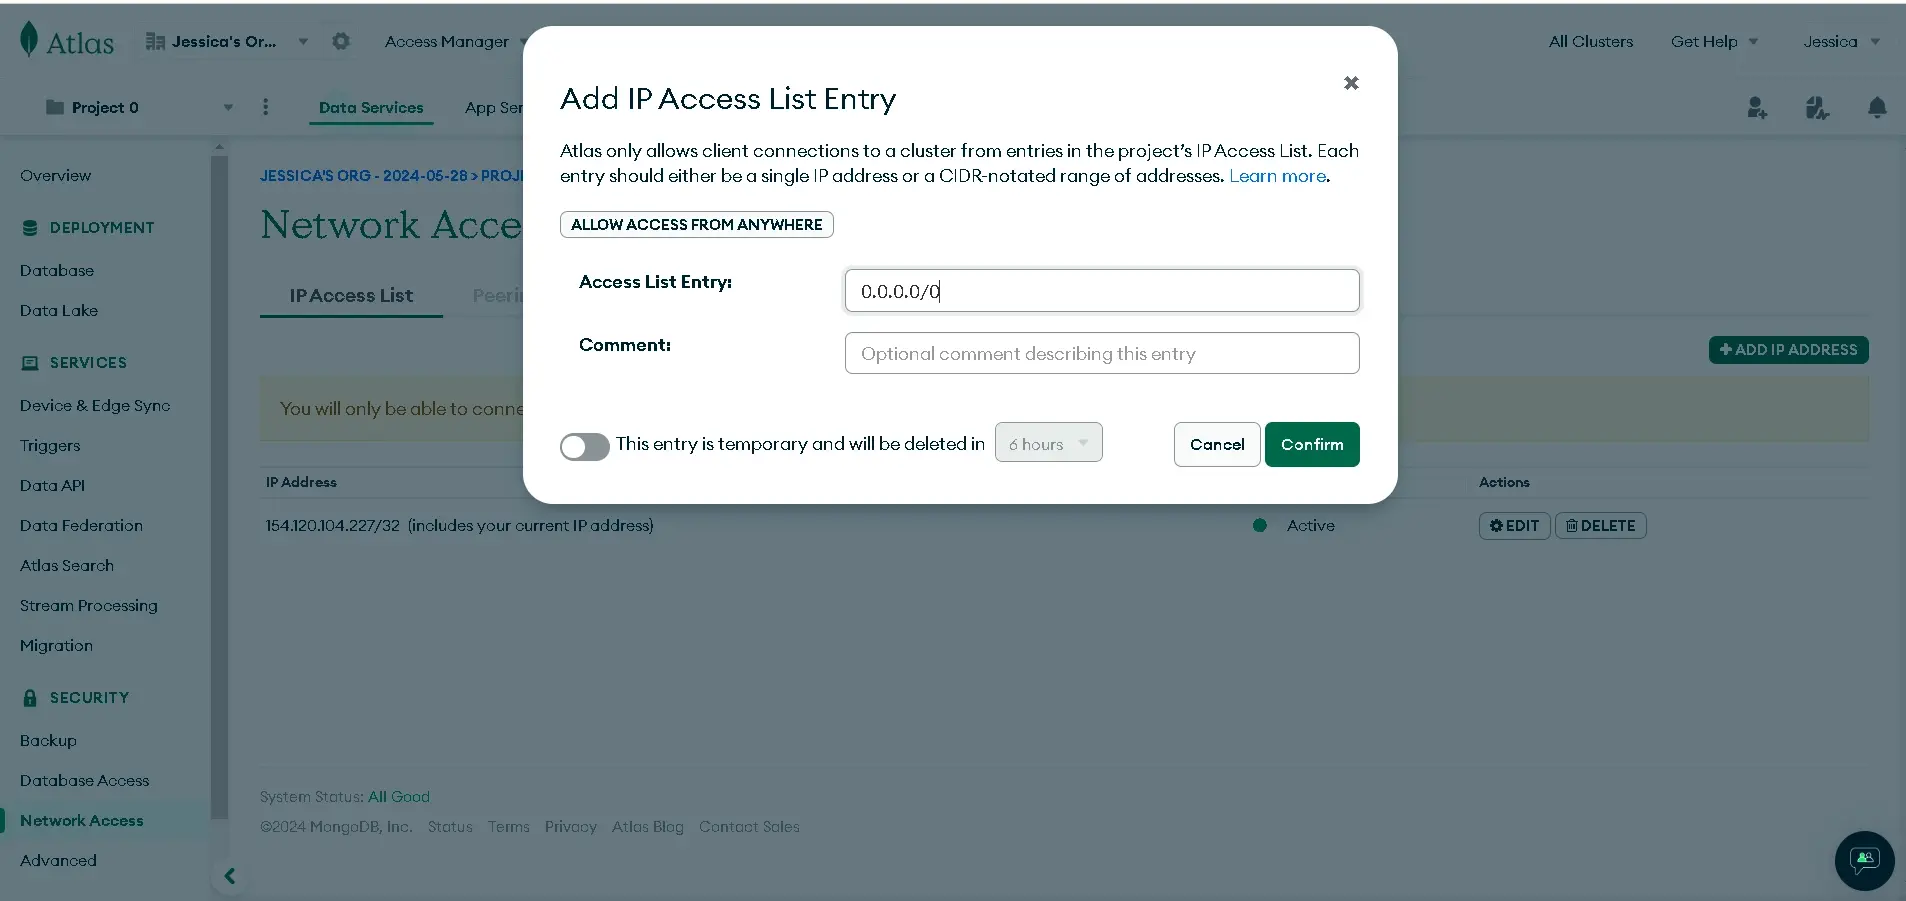
Step 20: Before adding the application code to the project, in the bottom corner of the overview, click Network Access, and then select the option “ADD IP ADDRESS”. Type 0.0.0.0/0 in the Access List Entry input, and confirm. This would enable you to connect from any IP address when developing/testing your application.
Step 21: In our application, we’ll create a Mongoose variable, and then add the application code like so;
Mongoose variable
const mongoose = require("mongoose");
Application code from MongoDB cloud
The application code connects the node.js application to the MongoDB database. When you add your application code to the connect method, you’ll be required to type in your own password.
mongoose
  .connect(
    "mongodb+srv://agoryejessica1:[email protected]/?retryWrites=true&w=majority&appName=NodeAPI"
  )
  .then(() => {
    console.log("connected");
  })
  .catch((error) => {
    console.log("error", error);
  });
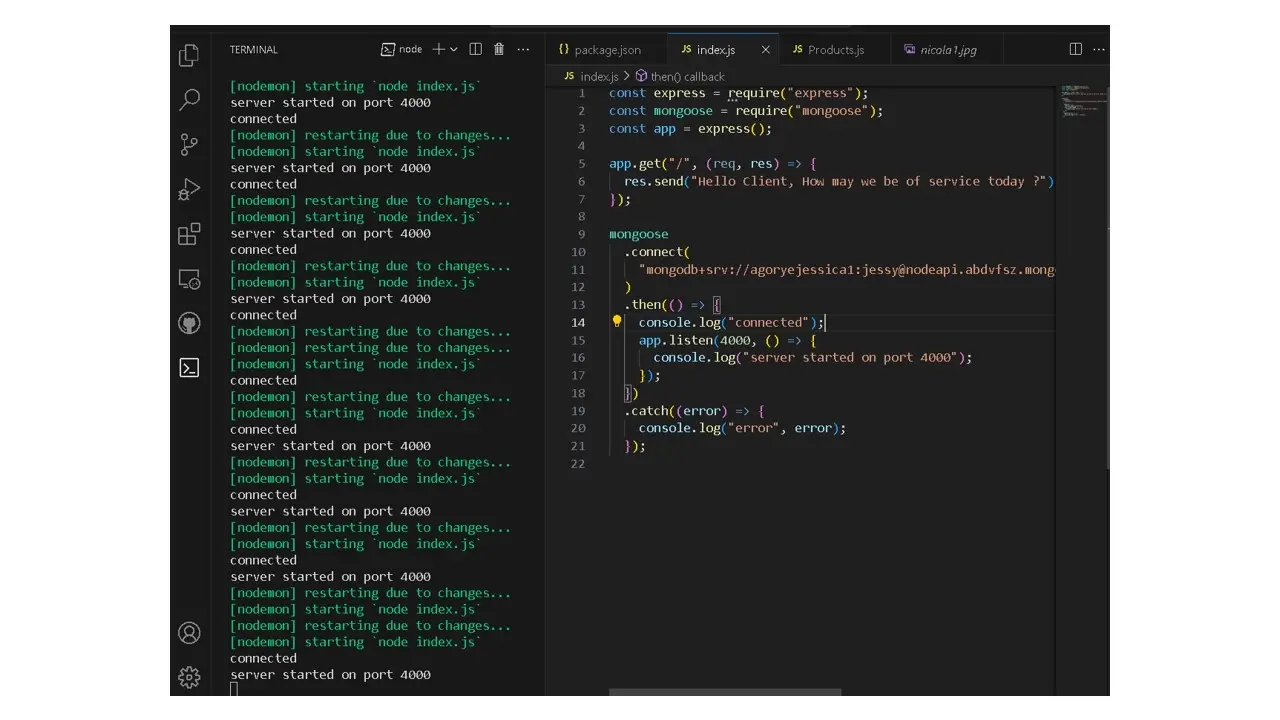
Step 22: Add the app. listen method that allows the server to listen for incoming requests into the .then() method which executes what we want to achieve when we successfully connect to MongoDB. This is what our project looks like;
Save Data to the Database
The next step is to save our data in the database. We use models to interact with the databases or to save data in our database.
Models are simply representations of data that define how data is organized and stored within a database.
Step 23: Create a folder in your project and name it models, in the models folder, create a file and name it product model.
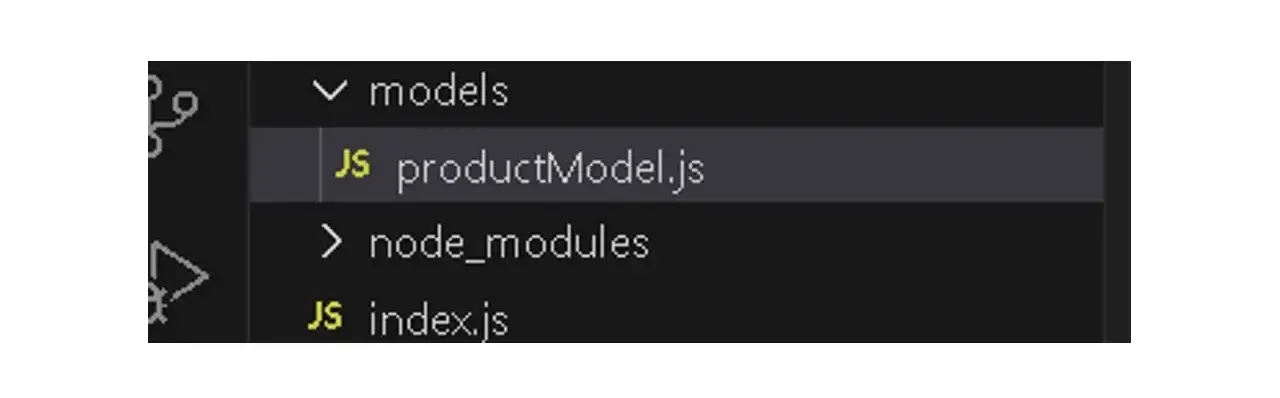
Step 24: Create a Product model by requiring Mongoose, then, create product schema, and product model, and export the product model.
const mongoose = require("mongoose");


const productSchema = new mongoose.Schema({
  name: {
    type: String,
    required: true,
  },
  price: {
    type: Number,
    required: true,
  },
  description: {
    type: String,
  },
  category: {
    type: String,
  },
  stock: {
    type: Number,
    default: 0,
  },
});


const Product = mongoose.model("Product", productSchema);


module.exports = Product;
Use the Product model to send data to MongoDB
When sending data to a database you need to use a data model, and In other words, the product model must be used to send product data to the database.
Step 25: Let’s create a product route and send a get request, we’ll also be using Postman for testing.
Product Route
Create a product route inside the index.js file like so;
app.post("/product", (req, res) => {
  console.log(req.body);
  res.send(req.body);
});
This is what the code looks like below;
const express = require("express");
const mongoose = require("mongoose");
const app = express();


app.get("/", (req, res) => {
  res.send("Hello Client, How may we be of service today ?");
});


app.post("/product", (req, res) => {
  console.log(req.body);
  res.send(req.body);
});


mongoose
  .connect(
    "mongodb+srv://agoryejessica1:[email protected]/?retryWrites=true&w=majority&appName=NodeAPI"
  )
  .then(() => {
    console.log("connected");
    app.listen(4000, () => {
      console.log("server started on port 4000");
    });
  })
  .catch((error) => {
    console.log("error", error);
  });
Step 26: In Postman, create a folder (Node API) by clicking the + sign beside the collection, click on the three dots beside the new folder created, and select New request.
After selecting New Request, click the method selector to change the initial HTTP verb GET to POST, then save.
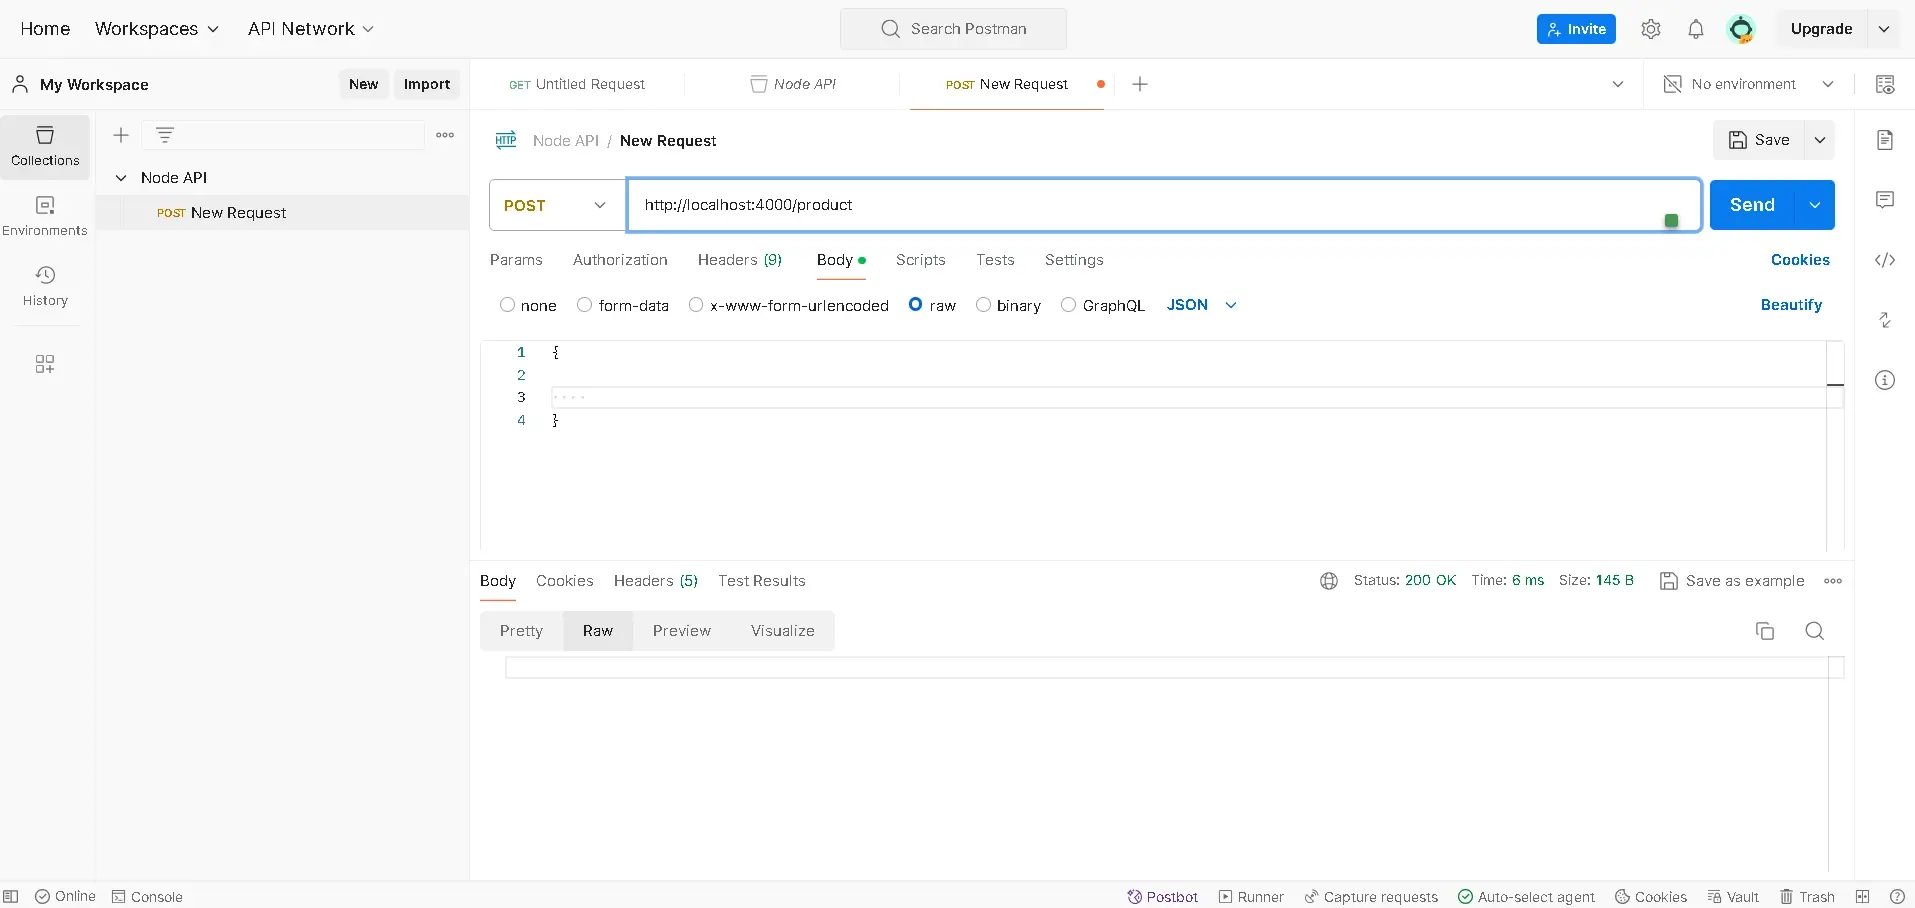
It’s currently empty because we haven’t sent anything to http://localhost:4000/product URL.
Save Data to the Database
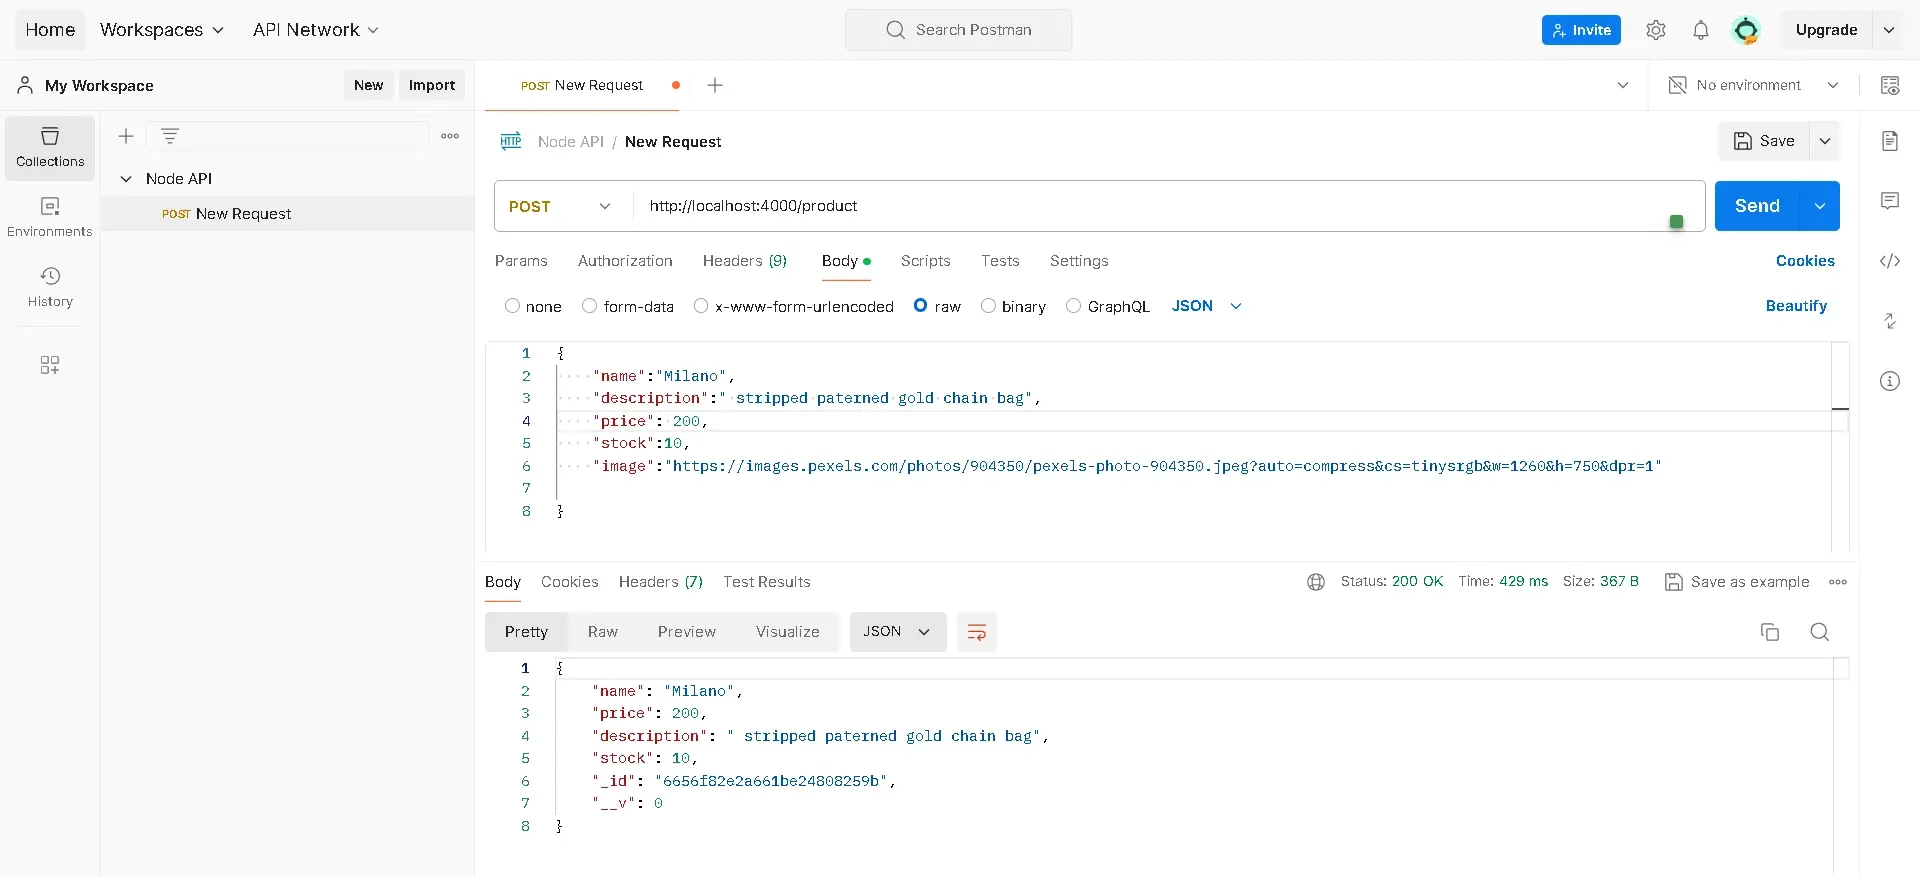
Step 27: Create JSON data - click on a body, then raw, and select JSON. First, specify middleware so that our application can understand JSON data type.
app.use(express.json()) // add this to your code.
Like so;

Step 28: Create the JSON data in Postman by following the schema created earlier. Type the following in the body.
{
    "name": "Dygon",
    "description": "flowered patterned silver chain bag",
    "price": 200,
    "stock":20,
    "image": "https://images.pexels.com/photos/904350/pexels-photo-904350.jpeg?auto=compress&cs=tinysrgb&w=1260&h=750&dpr=1"
}
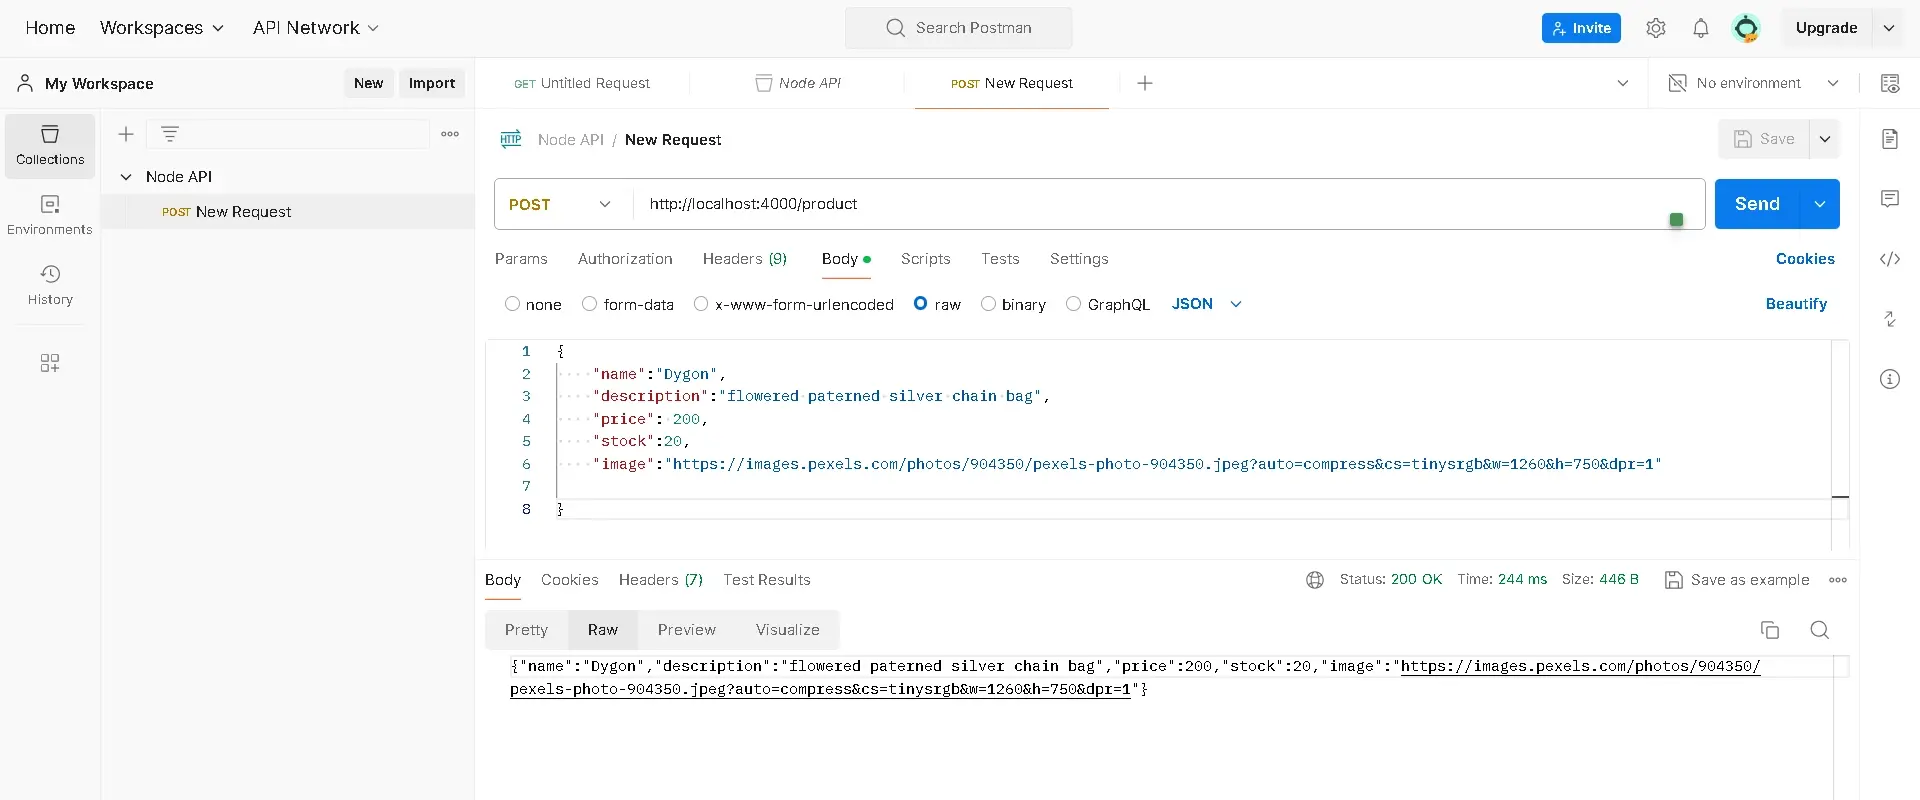
Click send, and the result is displayed at the bottom of the page.
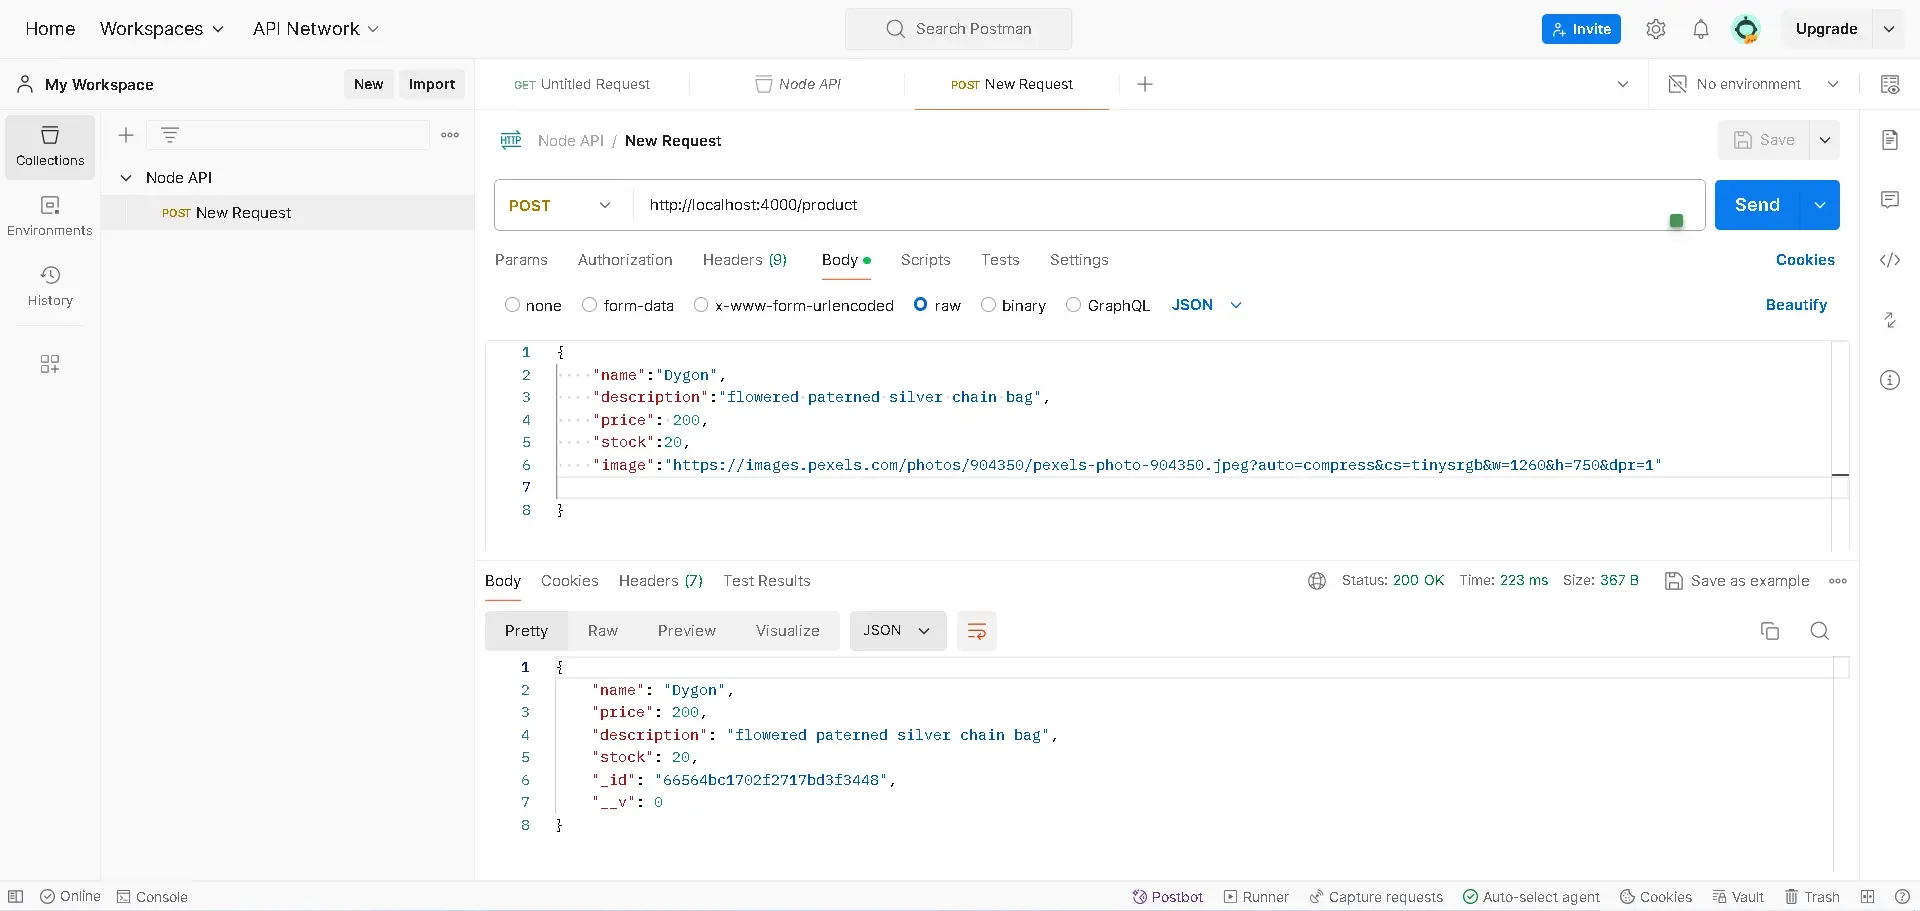
Step 29: Adjust the app. post method to send data to the database. Use the following code
const express = require("express");
const mongoose = require("mongoose");
const Product = require("./models/productModel");


const app = express();


// Middleware to parse JSON requests
app.use(express.json());


app.get("/", (req, res) => {
  res.send("Hello Client, How may we be of service today?");
});


app.post("/product", async (req, res) => {
  try {
    const product = await Product.create(req.body);
    res.status(200).json(product);
  } catch (error) {
    console.error("Error creating product:", error.message);
    res.status(500).json({ message: error.message });
  }
});


mongoose
  .connect(
    "mongodb+srv://agoryejessica1:[email protected]/?retryWrites=true&w=majority&appName=NodeAPI"
  )
  .then(() => {
    console.log("connected to MongoDB");
    app.listen(4000, () => {
      console.log("server started on port 4000");
    });
  })
  .catch((error) => {
    console.error("Error connecting to MongoDB:", error.message);
  });
The POST request creates a new product using the data sent in the request body ("req. body”)
In Postman, check to see if the URL works.
Check MongoDB to confirm that you’ve successfully added your data to a database.
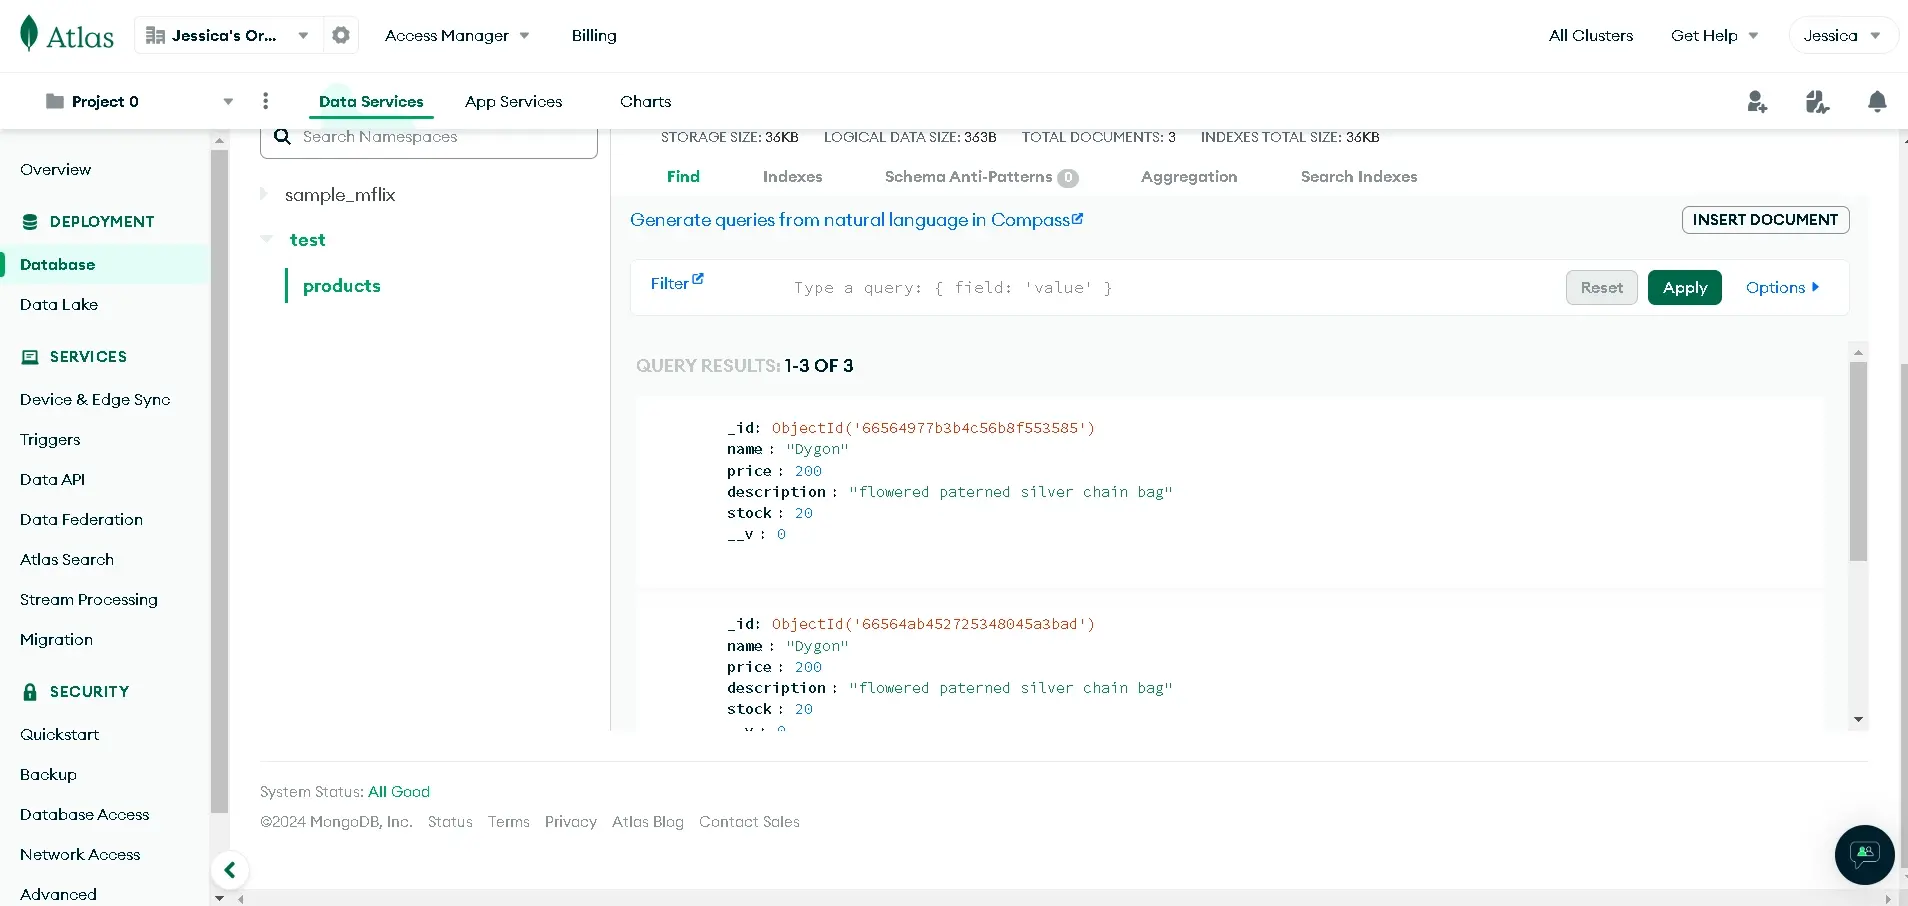
Fetch Data from MongoDB Database
Step 30:
Create more data and send it to the MongoDB database. To achieve this go back to Postman and edit the body where we initially defined the data we sent to the database.
In the image below, the JSON data has been edited and contains new information which would be sent as a POST request to the database.
Check MongoDB to see that our request has been received.
Step 31: Update the code with a GET request to fetch data from the database.
app.get("/product", async (req, res) => {
  try {
    const product = await product.find({});
    res.status(200).json(product);
  } catch (error) {
    res.status(500).json({ message: error.message });
  }
});
Step 32: In the Postman NodeAPI folder add a new request, and change the method selector to GET. Copy the URL http://localhost:4000/product paste it into the request URL input and hit send.
All the data from the database will be displayed, and the result will look like the image below.
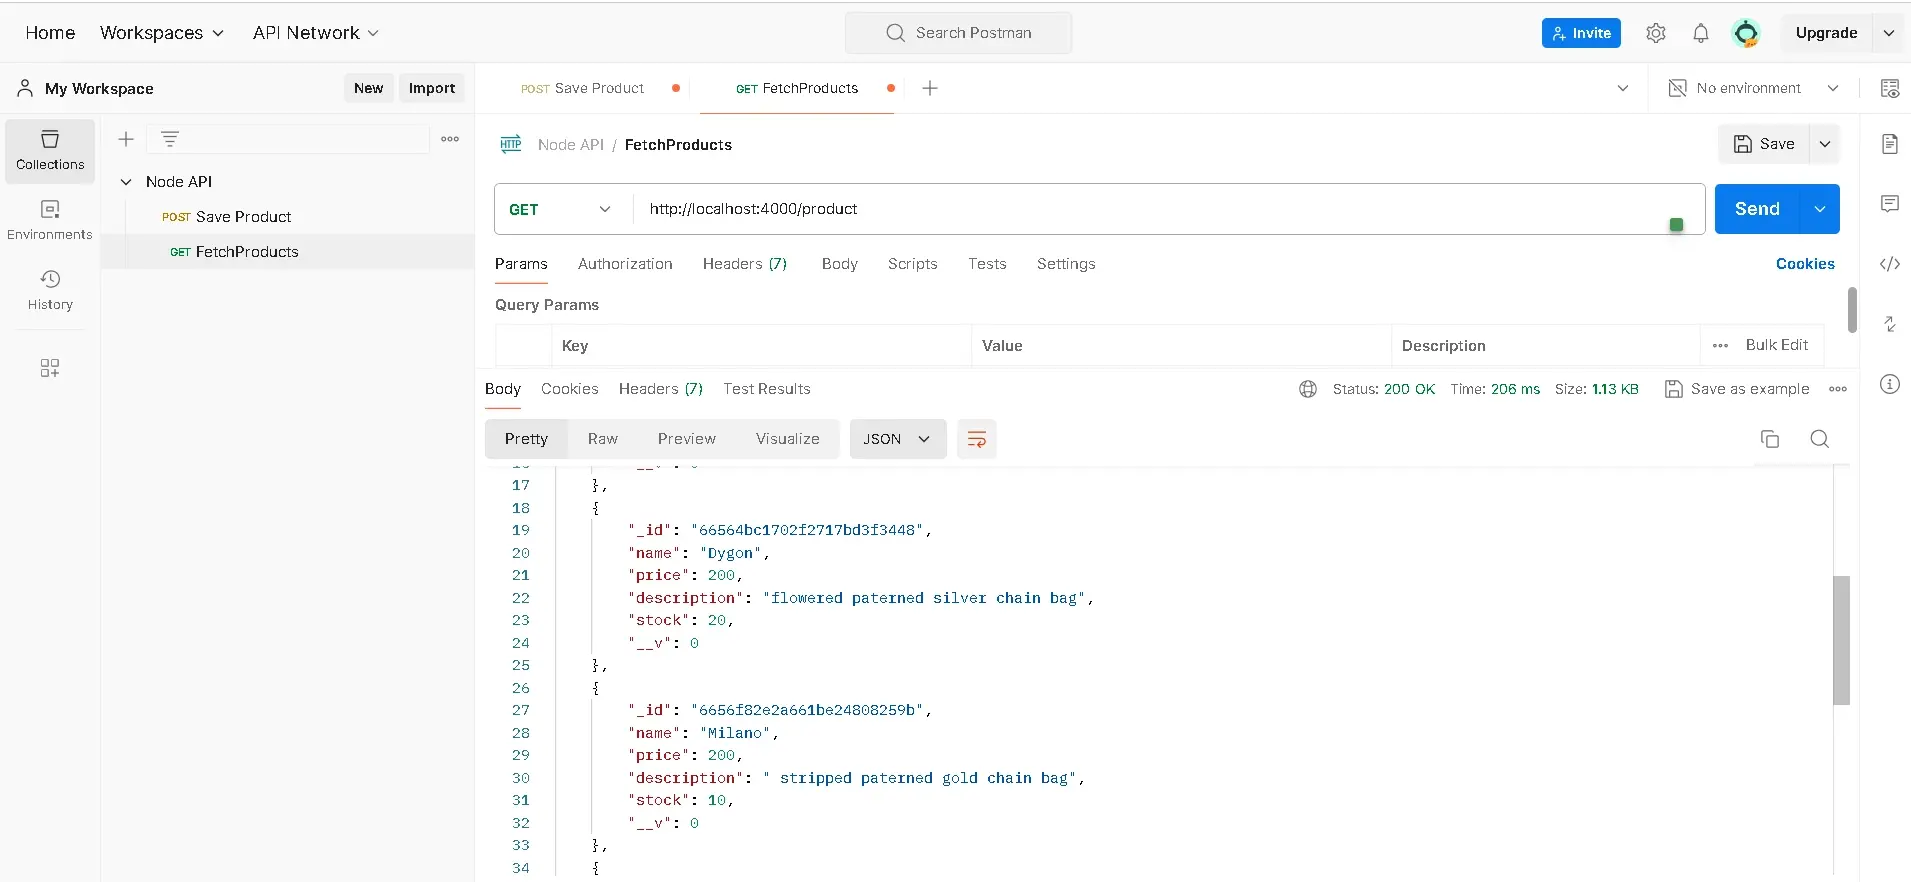
Note: The file name in the NodeAPI folder was changed to FetchProduct, and the POST request was changed to Save Product.
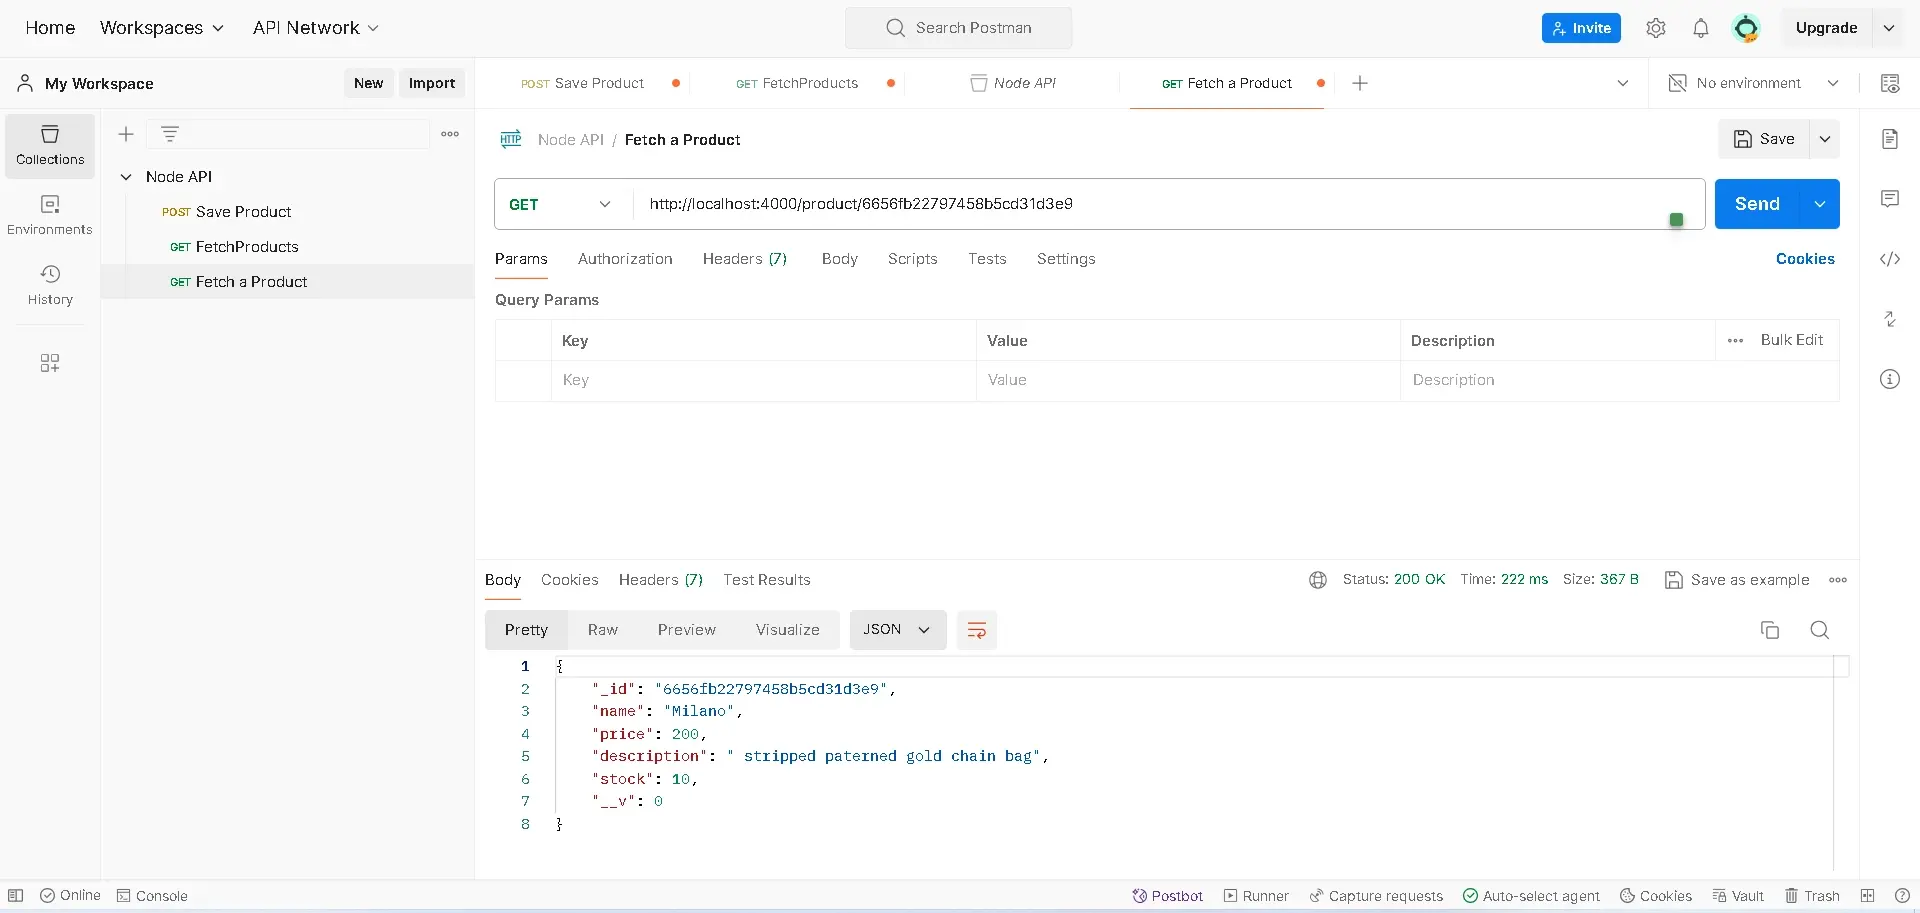
Fetch a Single Product
Step 33: To get a single product, create a new request in Postman Node API and name it “fetch a product”. In the index.js file, we’ll create a Get request to get a single product using the product ID.
app.get("/product/:id", async (req, res) => {
  try {
    const { id } = req.params;
    const product = await Product.findById(id);
    res.status(200).json(product);
  } catch (error) {
  res.status(500).json({ message: error.message });

}
});
Step 34: Copy the URL http://localhost:4000/product and paste it into the request URL input, this time add another slash with the ID of a product. You can pick an ID from one of the products fetched earlier and then hit send.
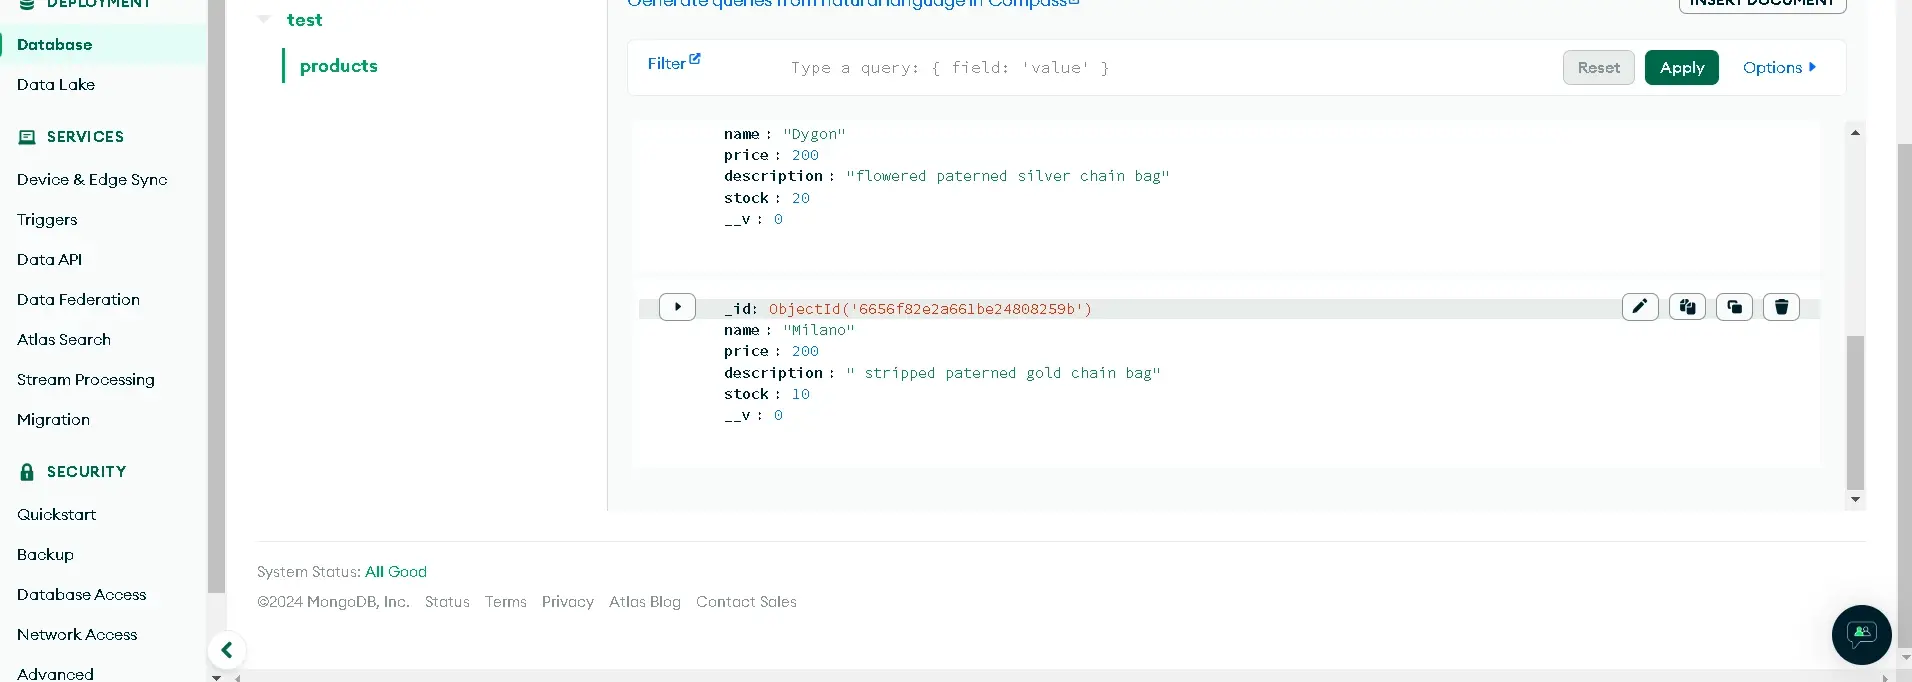
A single product is displayed in Postman.
Update Data
Step 35: Create a new route - To update data we’ll use the PUT method like so;
app.put("/product/:id", async (req, res) => {
  try {
    const { id } = req.params;


    //Find ID and update


    const product = await Product.findByIdAndUpdate(id, req.body);


    //if the product is not in the database


    if (!product) {
      return res
        .status(404)
        .json({ message: `cannot find any product with ID ${id}` });
    }
      const updatedProduct = await Product.findById(id);
      res.status(200).json(updatedProduct);


  } catch (error) {
    res.status(500).json({ message: error.message });
  }
});
Step 36: Create a new request in Postman Node API and name it “Update product” Change the method selector to PUT. Copy the URL with the ID of the product you want to change and paste it into the URL input.
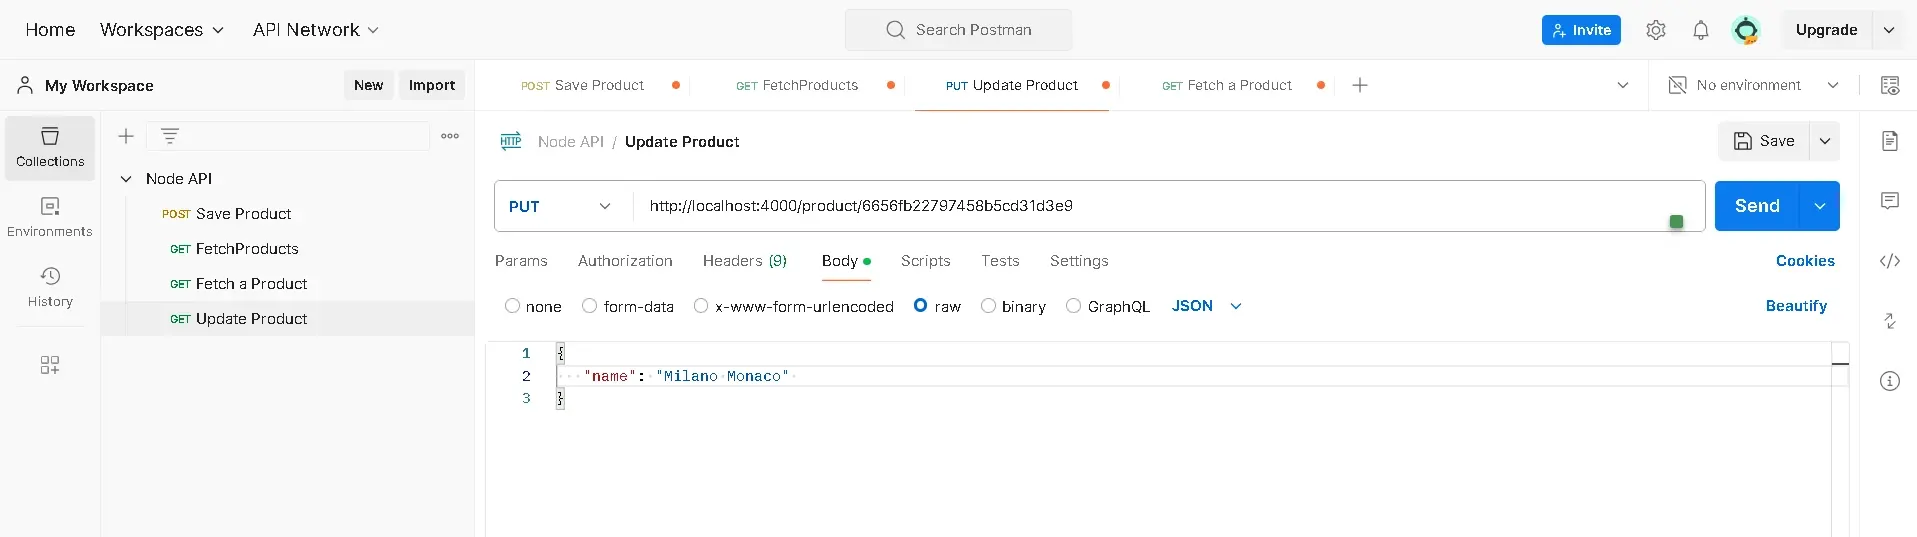
Select body, raw, then JSON, add a JSON object to the body, change the product name from “Milano” to “Milano Monaco”, and then hit send. The response would look like the image below, you’ll notice the product name has been updated.
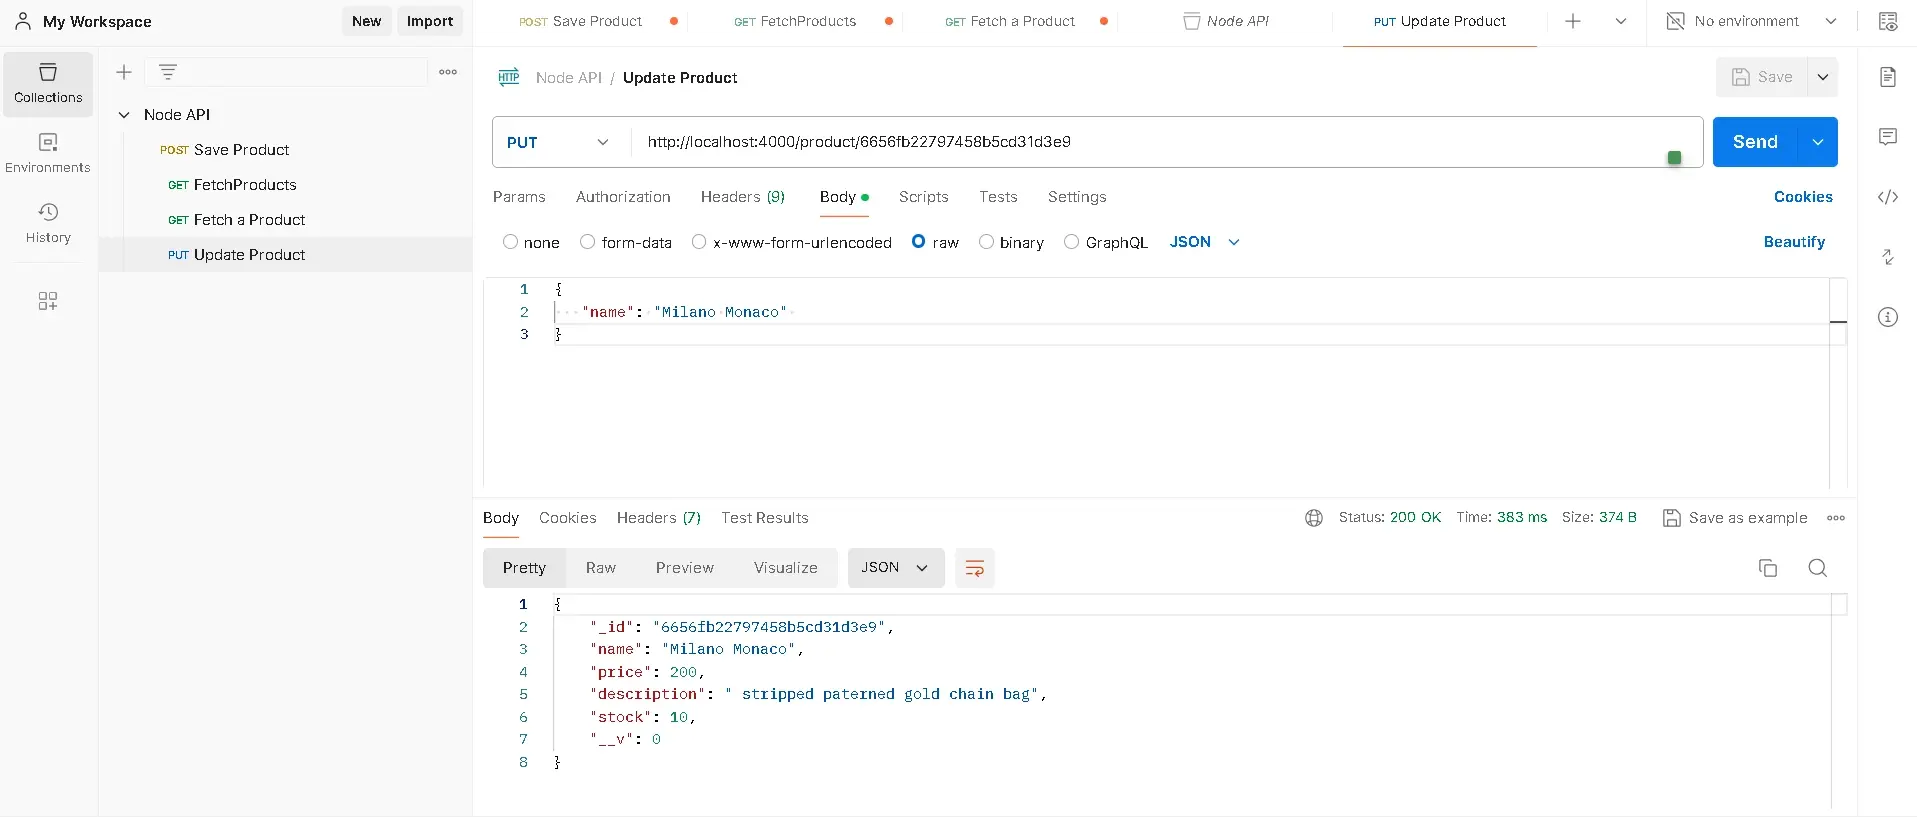
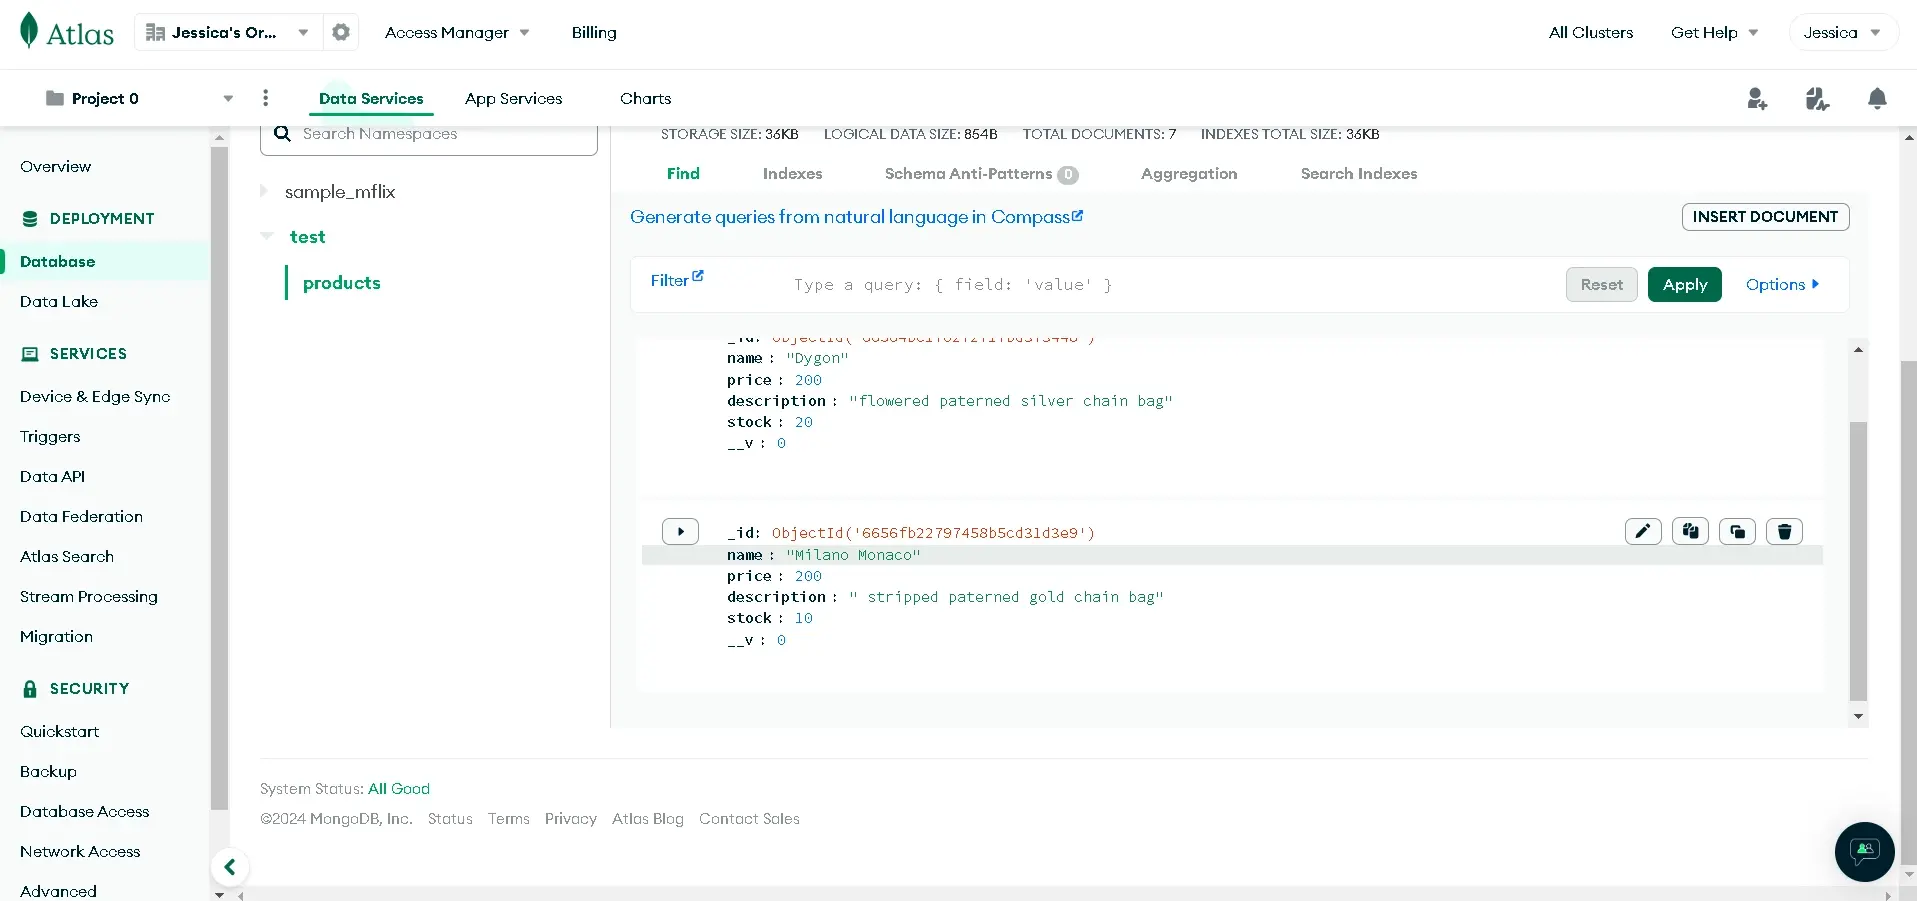
When we hit send, the change is reflected in the database
Delete Data from the Database
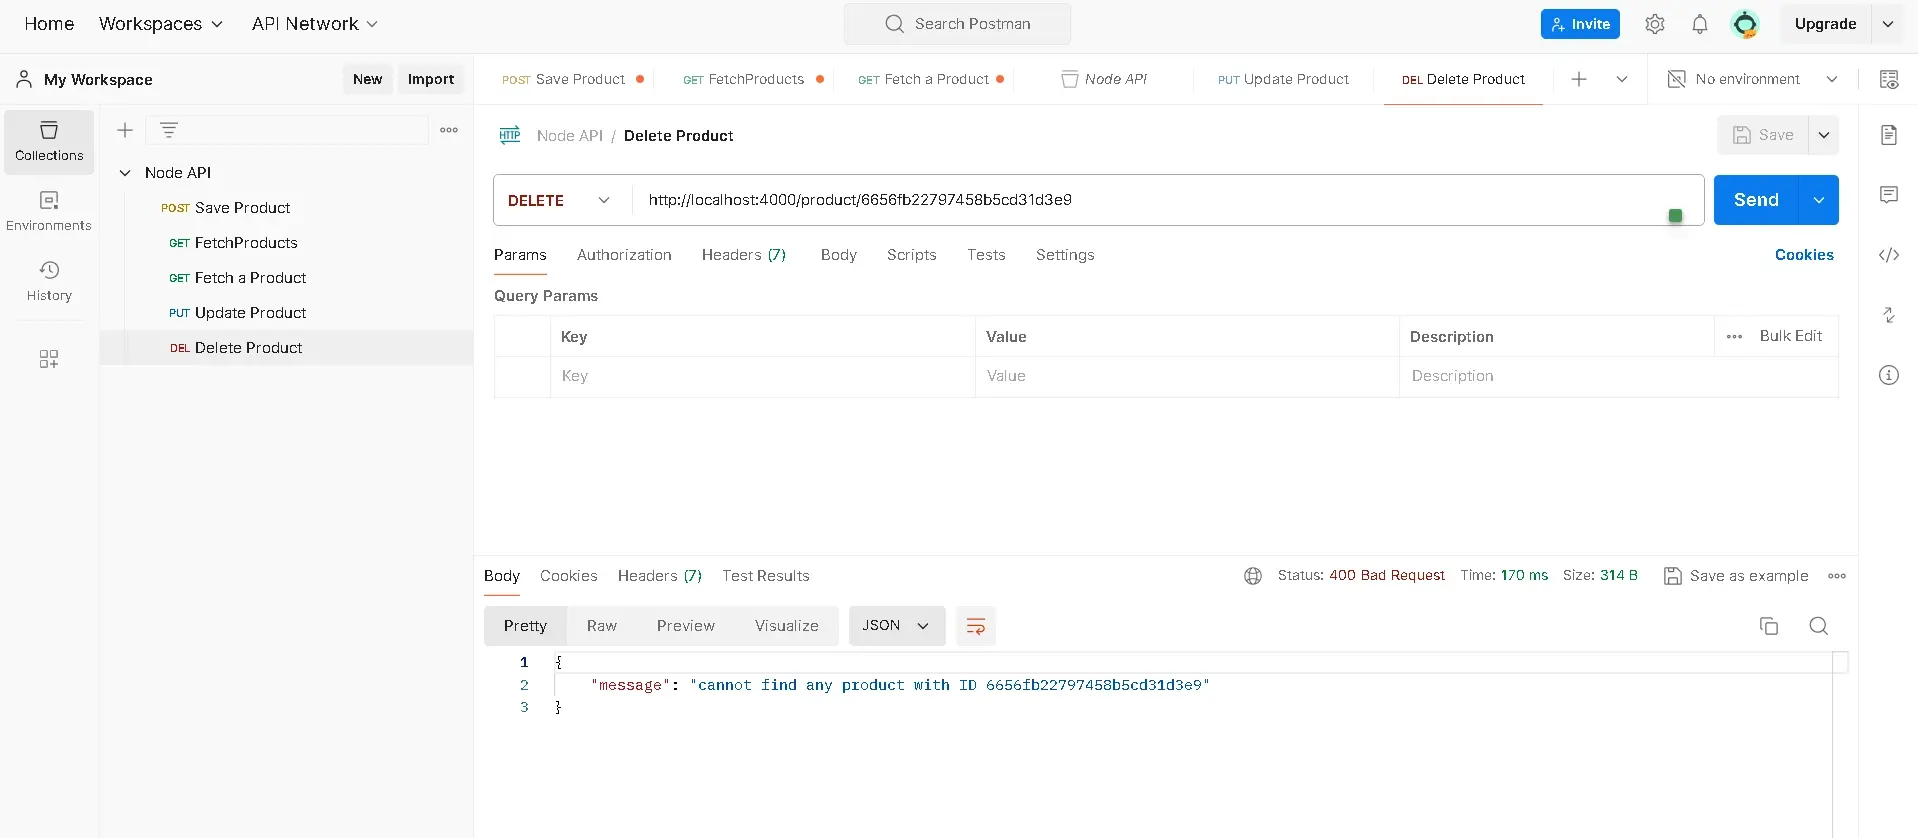
Step 37: Create a new request in Postman Node API and name it “Delete product” Change the method selector to delete. Copy the URL with the ID of the product you want to delete and paste it into the URL input, then hit send.
It will initially show you the product in the body, but, when you hit send the second time you’ll get a response that says “Can’t find the product with id …” Check the database to confirm that the product is deleted, you can also perform a Get request to check if the product is deleted as well.
The entire code for reference;
const express = require("express");
const mongoose = require("mongoose");
const Product = require("./models/productModel");


const app = express();


// Middleware to parse JSON requests
app.use(express.json());


app.get("/", (req, res) => {
  res.send("Hello Client, How may we be of service today?");
});


app.get("/product", async (req, res) => {
  try {
    const product = await Product.find({});
    res.status(200).json(product);
  } catch (error) {
    res.status(500).json({ message: error.message });
  }
});


app.get("/product/:id", async (req, res) => {
  try {
    const { id } = req.params;
    const product = await Product.findById(id);
    res.status(200).json(product);
  } catch (error) {
    res.status(500).json({ message: error.message });
  }
});


app.post("/product", async (req, res) => {
  try {
    const product = await Product.create(req.body);
    res.status(200).json(product);
  } catch (error) {
    console.error("Error creating product:", error.message);
    res.status(500).json({ message: error.message });
  }
});


app.put("/product/:id", async (req, res) => {
  try {
    const { id } = req.params;


    //Find ID and update


    const product = await Product.findByIdAndUpdate(id, req.body);
    //if the product is not in the database


    if (!product) {
      return res
        .status(404)
        .json({ message: `cannot find any product with ID ${id}` });
    }
    const updatedProduct = await Product.findById(id);
    res.status(200).json(updatedProduct);
  } catch (error) {
    res.status(500).json({ message: error.message });
  }
});


app.delete("/product/:id", async (req, res) => {
  try {
    const { id } = req.params;
    const product = await Product.findByIdAndDelete(id);


    if (!product) {
      return res
        .status(400)
        .json({ message: `cannot find any product with ID ${id}` });
    }
    res.status(200).json(product);
  } catch (error) {
    res.status(500).json({ message: error.message });
  }
});
mongoose
  .connect(
    "mongodb+srv://agoryejessica1:[email protected]/?retryWrites=true&w=majority&appName=NodeAPI"
  )
  .then(() => {
    console.log("connected to MongoDB");
    app.listen(4000, () => {
      console.log("server started on port 4000");
    });
  })
  .catch((error) => {
    console.error("Error connecting to MongoDB:", error.message);
  });
Summary
Node.js makes it easy for developers to create a backend for their web applications. Through Node.js libraries and drivers, like Mongoose and the MongoDB driver, developers can easily interact with MongoDB databases to store different information and perform more complex operations.
Frequently Asked Questions
Can I use custom domain names with Verpex's Node.js hosting?
Yes, you can easily configure custom domain names with Verpex's Node.js hosting services. We provide DNS management tools to help you set up and manage your custom domains seamlessly.
How does Verpex ensure optimal performance for Node.js-based web applications?
Verpex optimizes performance for Node.js-based web applications through server-side optimizations and caching mechanisms and by providing resources scalable to your application's needs.
How does Verpex ensure the security of Node.js applications hosted on their platform?
Verpex employs a multi-layered security approach for Node.js applications, including regular security updates, firewall configurations, intrusion detection systems, and security enhancements tailored to Node.js. We also offer SSL certificates for encrypted data transmission.
Do you provide SSH access for Node.js hosting, and how is it secured?
Yes, we offer SSH access for Node.js hosting, but it's restricted to authorized users for security reasons. We implement strict security measures, including key-based authentication and firewall rules, to protect SSH access.

Jessica Agorye is a developer based in Lagos, Nigeria. A witty creative with a love for life, she is dedicated to sharing insights and inspiring others through her writing. With over 5 years of writing experience, she believes that content is king.
View all posts by Jessica Agorye