Have you ever wanted to get started with AWS, but not known where to start? It’s a common sentiment among web developers encountering it for the first time. Without question, AWS is a fantastic resource for hosting websites, but the fact that it offers over 200 separate services makes it daunting to newcomers.
So, in this tutorial, I’m going to help you overcome any trepidation that you may have and get you off to a good start. Specifically, you’re going to start small and learn the essentials of how to serve a small website’s image assets using two AWS services, Amazon S3 and CloudFront.
Quick Overview
You’re going to start with a small website written in PHP, one whose images and stylesheets are stored locally. Then, you’re going to set up an S3 Bucket and a CloudFront Distribution. After that, you’re going to upload the static files to the S3 Bucket. Finally, you’re going to update the links to the images and stylesheets to point to ones now stored in AWS.
My hope is that, after you’ve completed this tutorial, you’ll be comfortable enough with AWS to begin exploring more of the over 200 services available and work through the relevant documentation to help you continue growing your skills.
What are AWS S3 and CloudFront?
Before you dive in and start setting everything up, here’s a quick overview of each of the three Amazon services that you’ll be using:
Amazon S3 is where you store any number and type of files that you later need to access. Within S3, you create a Bucket in which to store files for a given purpose.
Amazon CloudFront is, effectively, a CDN (Content Delivery Network) allowing you to reduce latency and improve your website’s performance.
The Tutorial Prerequisites
To successfully complete this tutorial, you will need the following:
Some familiarity with the command-line
An AWS account
Git 2.37
PHP 7.4 or 8 to power the website
Your favourite code editor or IDE
Install the demo website
Right. Time to begin. Clone the demo website to your local machine and change into the cloned directory by running the following command.
bash
git clone [email protected]:settermjd/small-image-gallery.git small-image-gallery
cd small-image-gallery
If you have a static (or small) website that you’d prefer to use, feel free to use it instead.
Test that the website works
With the site available locally, quickly check that it works by running the following command.
bash
php -S 0.0.0.0:8080 -t public
This will start the application with PHP’s in-built web server. It will listen on localhost on port 8080. With the web server running, open http://localhost:8080 in your browser of choice. It should look like the screenshot below.
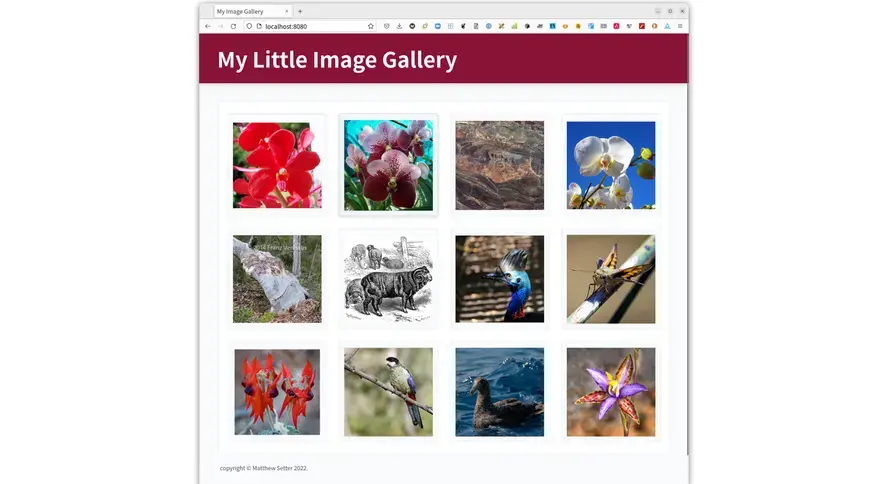
Now that you know that the website works as expected, press ctrl+c to stop the web server.
Create and configure an S3 Bucket
The first thing to do is to create an S3 Bucket to store the static files. To do that, sign in to your AWS account and navigate to your S3 Buckets list. It should look similar to the screenshot below.
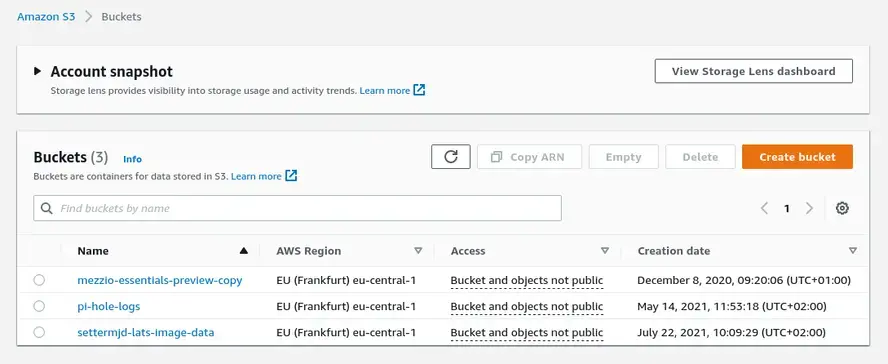
To create a new bucket, click the “Create bucket” on the right-hand side of the page.
In that form enter a name for the new bucket and pick the AWS region closest to you.
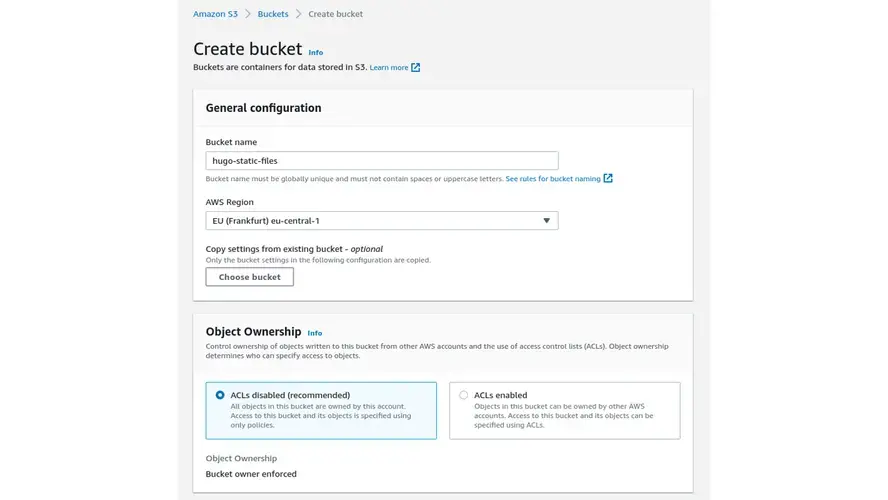
After that, leave “Block Public Access settings for this bucket” set to "Block all public access", "Bucket Versioning" set to "Disabled", and "Default encryption" set to "Disabled". Then, at the bottom of the page, click the "Create bucket" button.
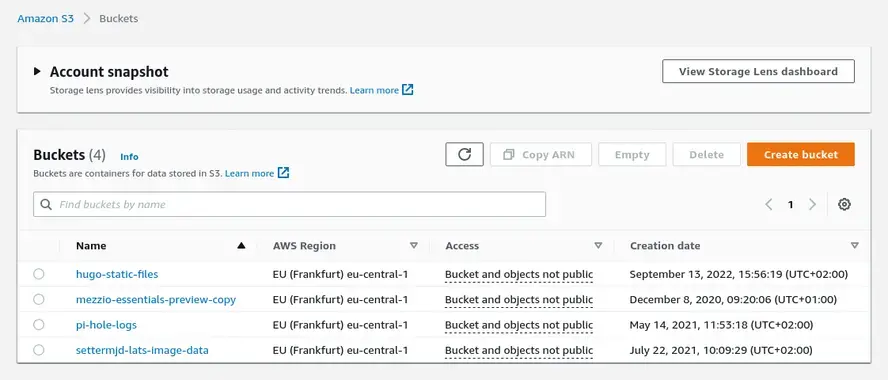
You’ll be redirected back to the S3 Buckets list where you will see your new bucket at the top of the list (or the only one, if this is your first bucket).
Upload the website’s static files to the S3 Bucket
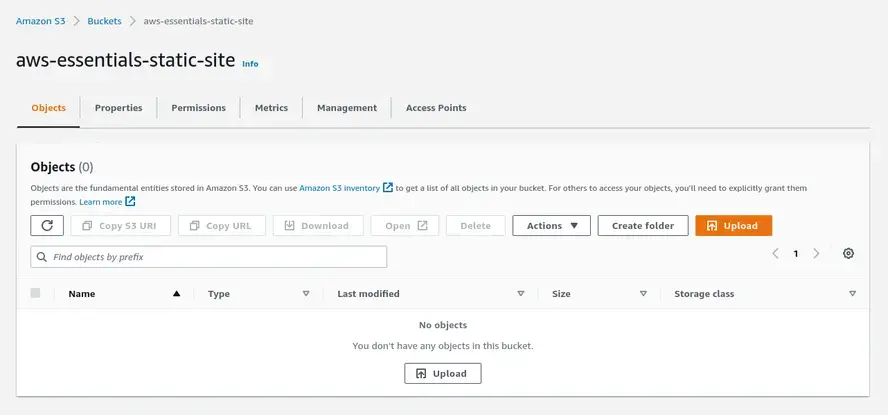
With all of the AWS services set up and configured, it’s time to upload the website’s static files to the S3 Bucket. To do that, open your new bucket and click “Upload”. That will open a standard file chooser dialog where you can pick the files and directories that you want to upload. Alternatively, select and drag the files and directories from your computer to the bucket. You’ll see the page change to indicate that you can drop them and they will be uploaded.
After you’ve chosen your files or dragged and dropped them onto the Bucket, double-check that you want to upload them and then click “Upload” in the bottom right-hand corner. Allowing for the speed of your internet connection and the number and size of the files you’re uploading, they should be uploaded quite quickly.
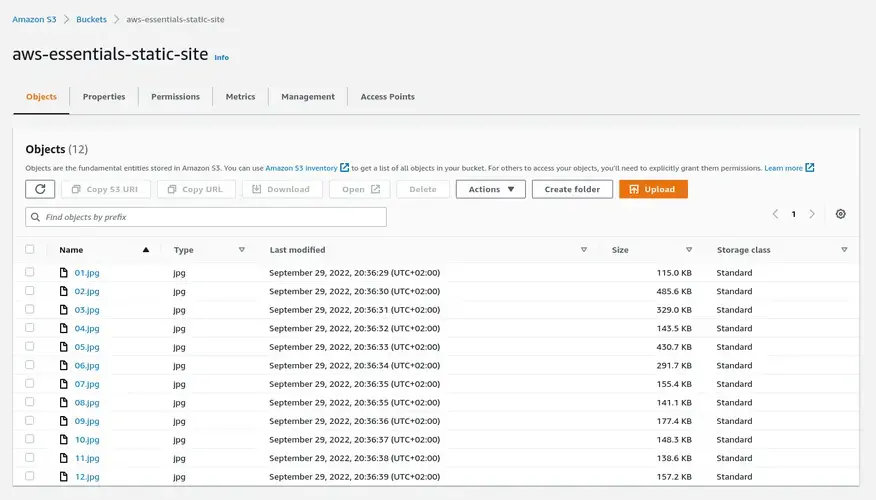
Note: While uploading files and directories manually is fine the first time, it’s worth getting to know tools that automate this for you, or coding up a small tool instead.
Create a CloudFront Distribution

The next thing to do is to create a CloudFront Distribution. To do that, navigate to your CloudFront Distributions list and click the “Create distribution” button on the upper right-hand side of the page.
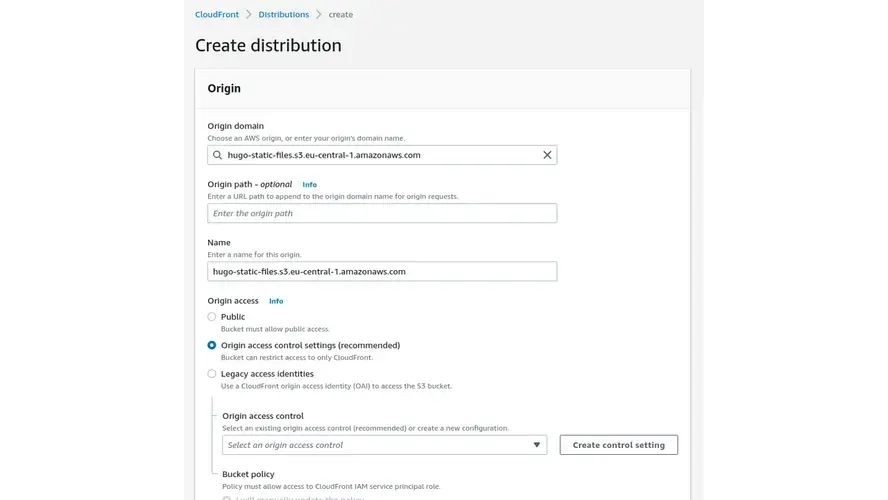
There, click “Origin domain” and pick the item under “Amazon S3” that starts with the name of the S3 Bucket that you just created. The “Name” for the distribution should auto-populate.
Change “Origin access” from “Public” to “Origin access control settings (recommended)”. Leave “Origin path - optional” blank and “Enable Origin Shield” set to “No”.
After that’s done, click “Create distribution” at the bottom of the page. You’ll see a confirmation that the Distribution has been created. Navigate back to the Distribution’s list, where’ll you’ll see that it’s deploying, which should only take a minute or two.

Give the CloudFront Distribution access to the S3 Bucket

To do this, click on the Distribution that you just created, then click on the Origins tab. From there, click the radio button next to the Origin name (there should be only one) and click “Edit” in the Origins tab.
Then, a bit further down, click “Create control setting” next to “Origin access control” and at the bottom of the modal dialog that appears, click “Create” in the bottom right-hand corner. With the Origin access control created, under Bucket Policy, click “Copy policy” and click “Save changes”.
The changes made to the CloudFront Distribution will need to be deployed, so while that’s happening, open the S3 Bucket, then open the “Permissions”. There, in the “Bucket policy” section, click “Edit” to edit the policy. In the “Edit bucket policy” form paste the copied policy into the “Policy” textarea and click “Save changes”.
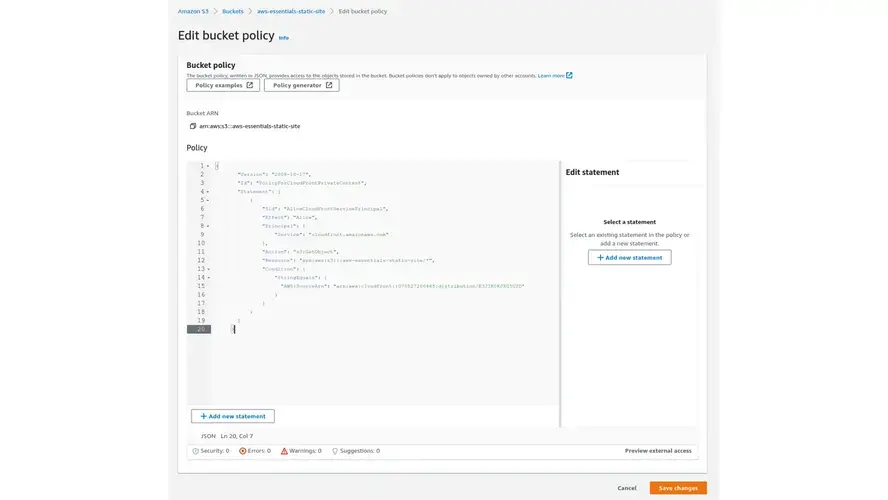
Tip: If you encounter an “Unknown Error” which, when expanded, shows the error message “Policies must be valid JSON and the first byte must be '{'”, use a tool such as JSONLint to reformat the JSON to be valid and save it again. Sometimes, when copying the policy, the formatting gets a bit messed up.
At this point, you can view the files that you’ve uploaded to your S3 Bucket through your CloudFront Distribution in your browser of choice, or download them with a tool such as cURL or wget.
View the details of the new Distribution and copy the Distribution’s domain name, which you can find in the Details section, by clicking the copy icon next to the name. Paste a forward slash followed by the name into your favourite browser’s URL/address bar.
Then, in the Objects list of your S3 Bucket, copy the name and paste it at the end of your browser’s address bar. For example, if your Distribution’s domain name is “https
Update the links to the static assets in your website
Now, as the tutorial is about AWS and not about PHP, there is only one small change needed to be made. In your favourite IDE or code editor, open src/templates/default.html.twig.
Then, in the General tab of the CloudFront distribution that you created, copy the Distribution domain name by clicking the copy icon to the left of the name. Then, paste the name in place of <<DISTRIBUTION_DOMAIN_NAME>> in src/templates/default.html.twig.
Test that the website still works
With all of the links updated, start the web server again, by running the command below.
bash
php -S 0.0.0.0:8080 -t public
With the web server running, open http://localhost:8080, again, in your browser of choice. All being well, it should look just like before. However, it’s always good to be sure and not guess.
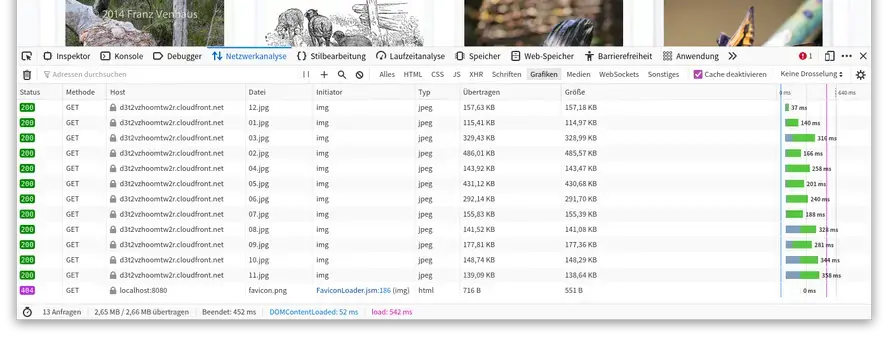
To do that, open your browser’s developer tools, change to the Network tab, and filter by images, as you can see in the screenshot above.
Additionally, open CloudFront and click Popular objects in the left-hand side navigation menu, under Reports & analytics. You shouldn’t need to, but if you have more than one distribution, choose the distribution that you created in this tutorial from the drop-down list in the upper-right corner and click “Browse” next to the list.
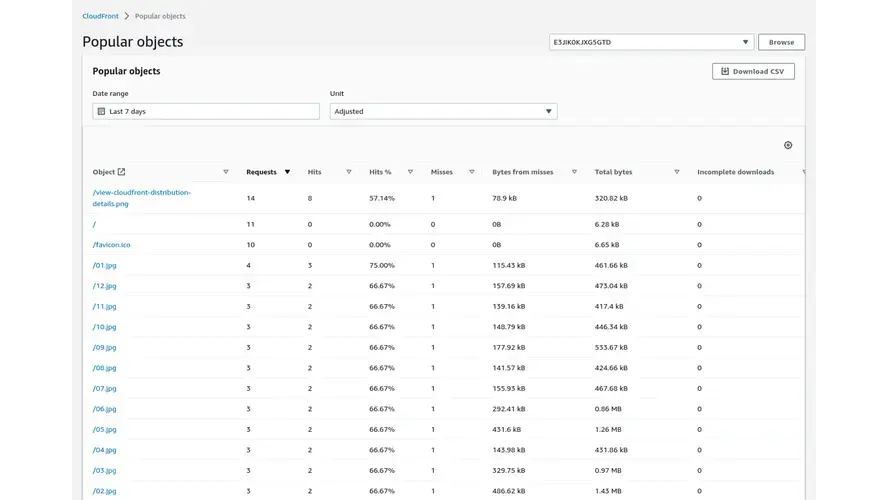
You should then see all of the files in the bucket that have been requested, along with a range of informative usage statistics, such as number of requests, the total bytes sent, and the count of HTTP status code groups (such as HTTP 200 OK and HTTP 404 Not Found).
However, if the site doesn’t render as expected, here are several links you can use to debug the setup:
The AWS Service Status Twitter Account: This will quickly tell you if there are any service issues across the AWS suite
AWS Open Issues: This will tell you in far more detail, if something is going wrong, what that is.
That’s how to get started with AWS for Beginners
Now that you’ve completed the tutorial, you’ve learned the basics of two of the most common AWS services: S3 and CloudFront. I hope that this has shown you that AWS, while extremely large in scale, isn’t that intimidating after all.
I strongly recommend diving into the documentation for these three services, and having a look at which service you could use next to continue building your AWS skills.
Image Credits
(01) “Red Vanda” from Jun Acullador
(02) “Waling Waling / Vanda” from Jun Acullado
(03) “Gosses Bluff” from NASA Goddard Space Flight Center
(04) “Phalaenopsis” from Sheila in Moonducks
(05) “140531_Bairne_Trail_8530.jpg” Franz Venhaus
(06) “Image from page 481 of "The animals of the world. Brehm's life of animals;" (1895)” from Internet Archive Book Images
(07) “Cassowary” from Stebbing
(08) “Moth” from Paul Balfe
(09) “Sturt's Desert Peas” from Paul Balfe
(10) “Northern Rosella (Platycercus venustus)” Graham Winterflood
(11) “Northern Giant-Petrel” Ed Dunens
(12) “Thelymitra pulcherrima P2” Jean and Fred Hort
Frequently Asked Questions
Will cloud hosted websites be backed up?
Yes, Verpex performs daily backups of all sites hosted.
How easy is it to increase bandwidth on cloud servers?
Incredibly easy. Since you’re in a pool of other servers you can draw on those resources at any time. If you need to increase your bandwidth or storage limits just give us a call and it can be done instantly.
How easily can I switch between VPS and cloud hosting?
Generally, there shouldn’t be an issue when switching. However, if you’ve done a lot of heavy customization to your VPS solution you might find making the switch a little more time-consuming.
Why should I try a managed cloud server?
We’d highly recommend using a managed service, especially if you don’t have the technical skills to run a website. It might cost a little extra, but it certainly takes the stress out of site management.

I’m a software developer with over 15 years of experience, designing, developing, and deploying web-based applications. I’m also an experienced online educator, technical writer, and trainer, having written over 150 articles, published 3 books and 6 online courses, and launched two podcasts in the last ten years. The author of Mezzio Essentials and Deploy With Docker Compose.
View all posts by Matthew Setter


