Managing multiple websites can be a hassle, but cPanel, especially when paired with Verpex Hosting, makes it a breeze. As a top web hosting control panel, cPanel’s intuitive design and robust features allow you to handle multiple domains from a single account effortlessly.
Verpex Hosting enhances this experience with reliable performance and seamless integration, perfect for personal blogs, business sites, and client projects. This guide will walk you through adding, configuring, and troubleshooting multiple domains in cPanel, empowering you to streamline your online operations like a pro.
Prerequisites Before Adding Multiple Domains
Domain Registration: Ensure that the additional domains are registered with a domain registrar. Without a registered domain, you will not be able to manage or configure it in cPanel.
Hosting Plan Compatibility: Verify that your hosting plan supports multiple domains. Some hosting plans, particularly basic ones, may only allow a single domain, so an upgrade may be necessary.
DNS Settings Access: You need access to the DNS settings for each domain. This is important for pointing the domain to your hosting server via nameservers or A records.
Addon Domains Enabled: Make sure your hosting provider allows multiple domains, as this is required to host multiple domains under a single cPanel account.
Sufficient Disk Space: Confirm that your hosting account has enough disk space and resources to accommodate additional domains and their associated files. Managing multiple websites can significantly increase storage and resource demands.
How to Add a Domain in cPanel
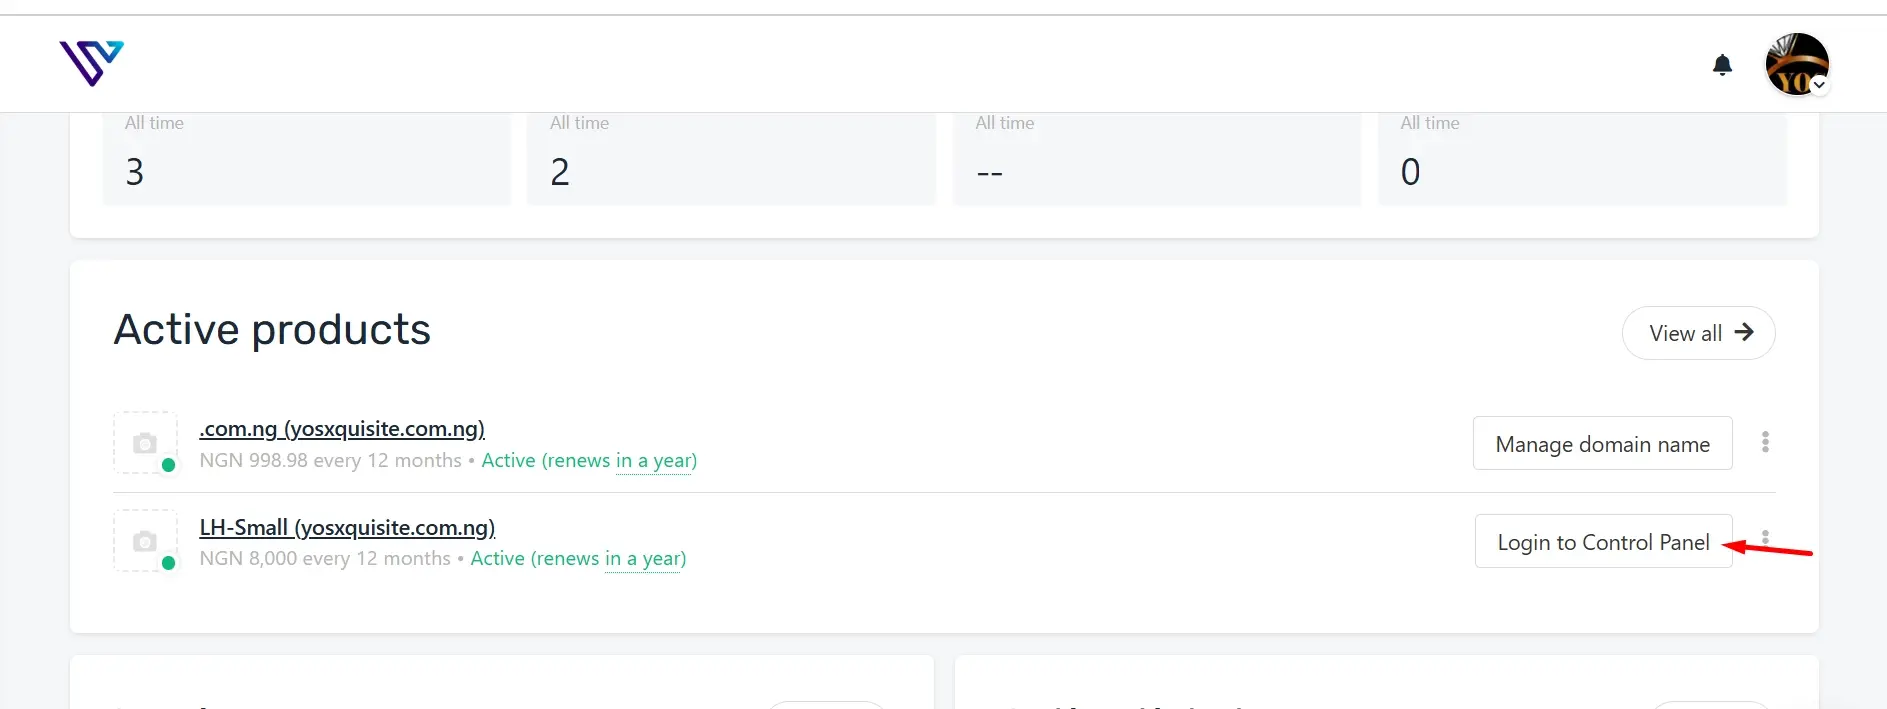
Step 1: Access the cPanel Dashboard
Log into your web hosting account and navigate to your cPanel dashboard. This is the main interface where you can manage various hosting tasks. Under the "Domains" tab, you will find the "Addon Domains" section.

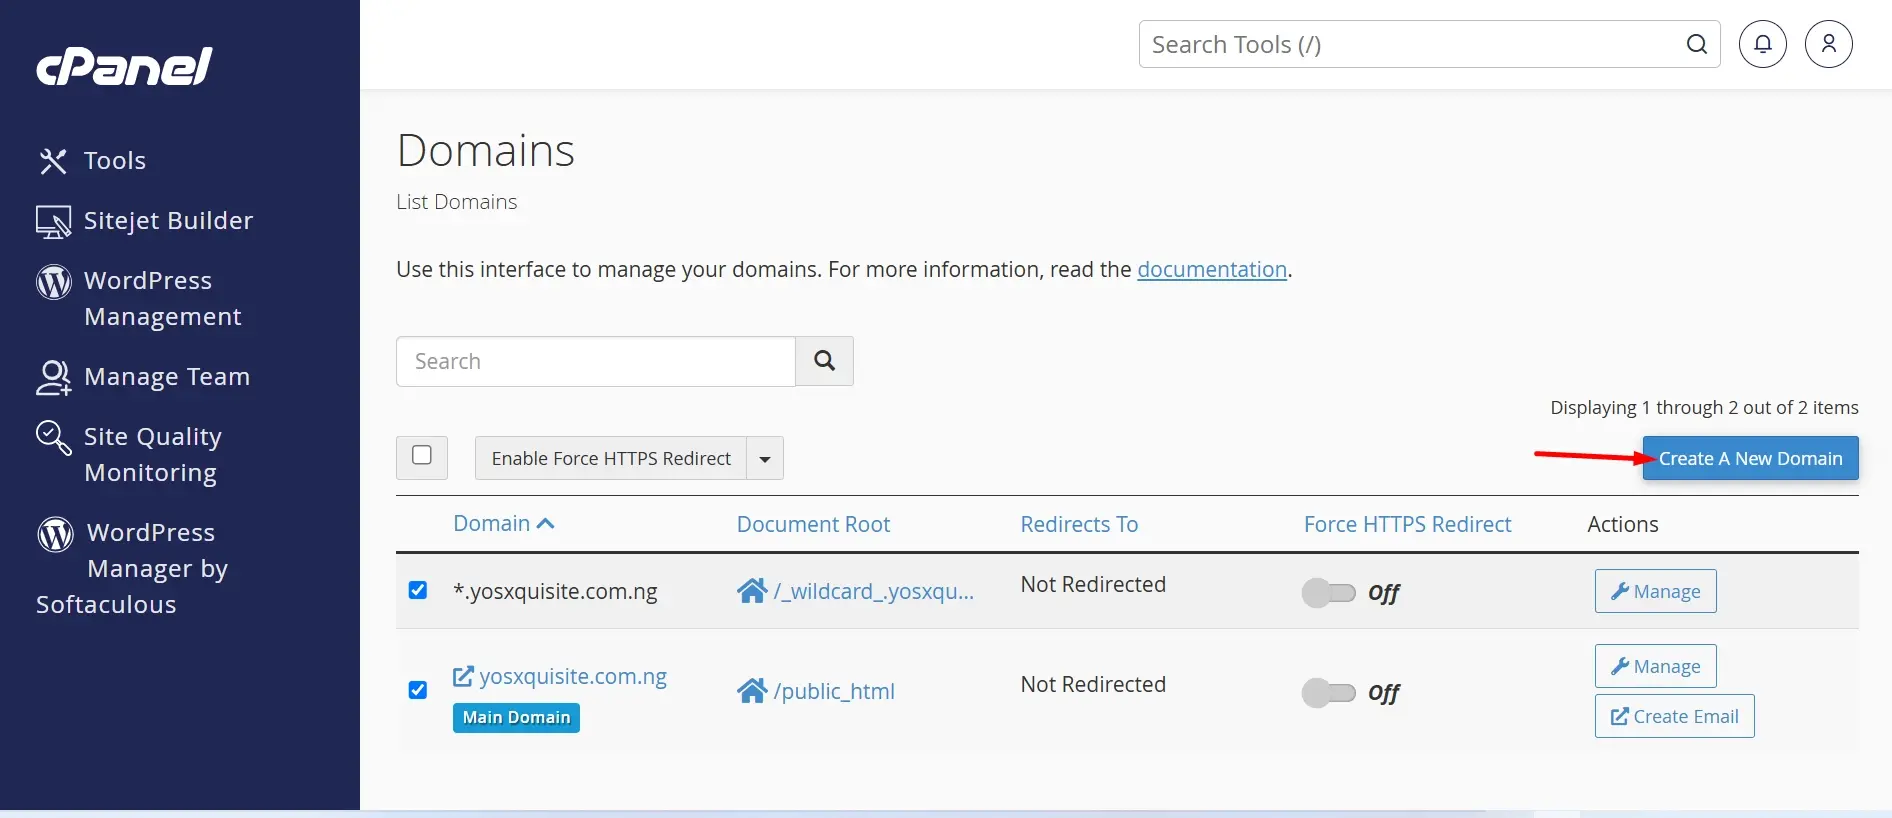
Step 2: Navigate to 'Domains' Section
In the " Domains" section, you can add additional domains to your hosting account. This allows you to manage multiple websites from one cPanel account. Click on "Create a New Domain" to start the process.

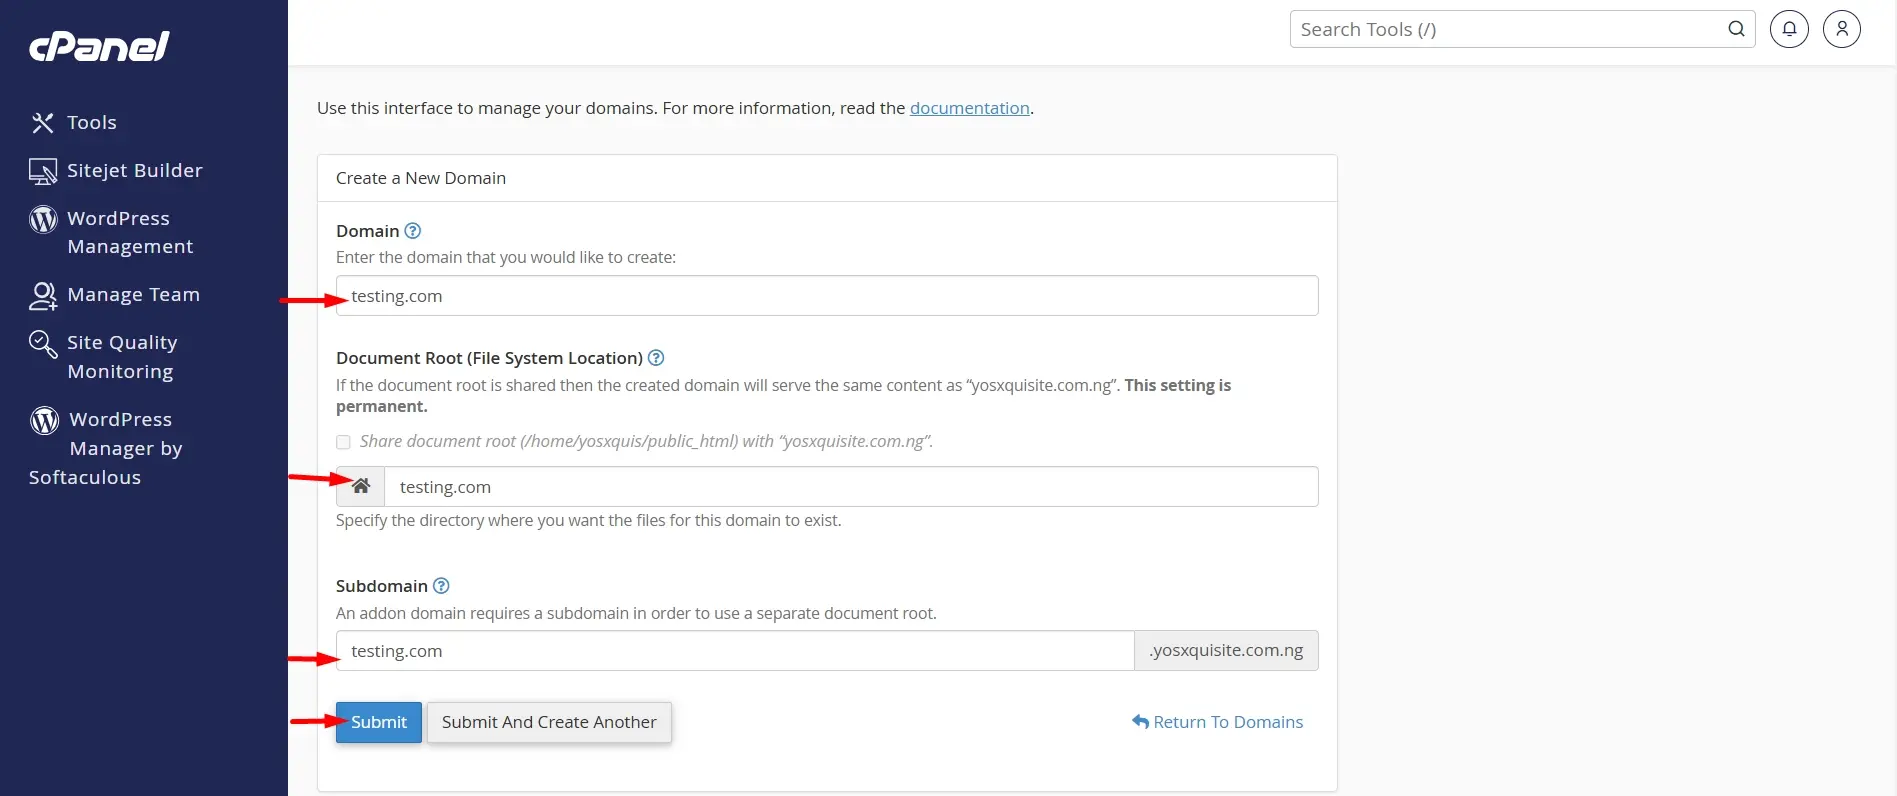
Step 3: Enter Domain Information
Enter the new domain name, and cPanel will suggest a subdomain and document root, which you can modify or keep as default. Ensure the document root, usually in the public_html directory, is correct for file storage. Optionally, create an FTP account for the domain if separate access is needed. Once all fields are complete, click "Add Domain" to finalize the setup. The system will configure your hosting account, display a success message, and list the new domain in your cPanel.

Step 4: Update DNS Settings
For your new domain to function, you must point its DNS settings to your web host. This typically involves updating the nameservers at the domain registrar to match your hosting provider's nameservers. Once updated, the domain will be live within a few hours, depending on DNS propagation.
Configuring DNS Settings for Multiple Domains

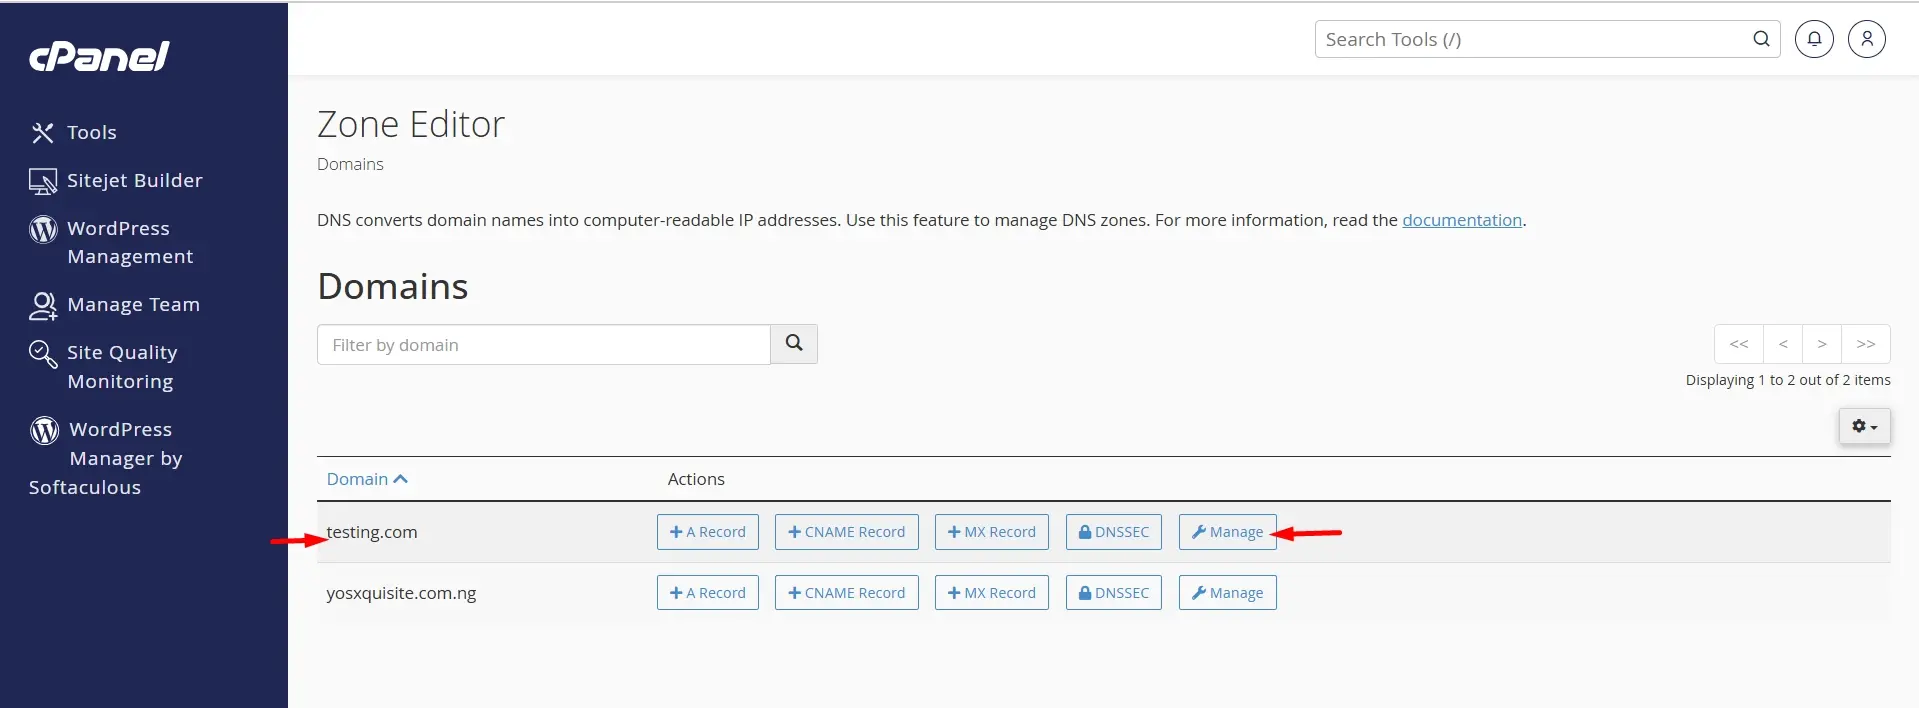
Access DNS Zone Editor: Go to the DNS Zone Editor in cPanel to manage DNS records for your domains, including adding, editing, or deleting them.
Add DNS Records: For each domain, add DNS records like A, CNAME, MX, and TXT. Enter the details and save to ensure proper domain resolution and email functionality.
Update Nameservers: Make sure your domains use the nameservers provided by your hosting or DNS service. Update the nameserver settings in cPanel to ensure proper domain management.
Check Propagation: After DNS changes, use DNS checkers to confirm updates have propagated and domains resolve correctly.
Manage Domain Records: Regularly review and update DNS records to align with current needs, including changes for new services or domain configurations.
DNS Configuration for Multiple Domains
1. A Records (Address Records): These map domain names to IP addresses, directing web traffic to the correct server. For multiple domains, you’ll need to create individual A records for each domain, pointing to the appropriate IP address for each.
2. CNAME Records (Canonical Name Records): CNAME records allow you to alias one domain to another, which can simplify management by pointing multiple subdomains or domains to a single canonical domain. This is useful for managing domains that share the same content or services.
3. MX Records (Mail Exchange Records): MX records specify the mail servers responsible for receiving email for the domain. When configuring multiple domains, ensure each domain has its own MX records or points to the correct mail servers to handle email delivery.
4. TXT Records (Text Records): TXT records are used to store arbitrary text, often for verification purposes such as domain ownership and SPF (Sender Policy Framework) settings. For multiple domains, configure TXT records to support email security and domain validation for each domain separately.
5. NS Records (Name Server Records): NS records designate the authoritative DNS servers for the domain, determining where DNS queries should be sent. Each domain should have NS records pointing to the DNS servers that manage the domain's zone file.
Key Strategies for Securing Multiple Domains
Use Strong, Unique Passwords: Ensure each domain account has a distinct, complex password to prevent unauthorised access and reduce the risk of a security breach from one compromised account affecting others.
Enable Two-Factor Authentication (2FA): Activate 2FA on domain registrar accounts to add an extra layer of security, requiring both a password and a secondary authentication method (like a phone code) to access the account.
Regularly Update Domain Registrant Information: Keep your domain registration details, including email addresses and contact information, current to ensure you receive important notifications and can promptly address any security issues
Monitor Domain Expirations and Renewals: Set up reminders or enable auto-renewal for your domains to prevent accidental lapses in registration, which can make your domains vulnerable to unauthorised transfer or loss.
Implement Domain Privacy Protection: Use WHOIS privacy protection services to hide your personal information from public view, reducing the risk of domain-related scams and unsolicited contacts.
Common Problems and Troubleshooting Tips for Adding Multiple Domains in cPanel
1. Domain Name System (DNS) Configuration Errors: Incorrect DNS settings can prevent your domains from resolving properly. Ensure that DNS records such as A records, CNAME records, and nameservers are accurately configured and match those provided by your hosting provider.
2. Domain Ownership Verification Issues: Some registrars or hosting providers require domain ownership verification before adding them to cPanel. Verify ownership by responding to confirmation emails or uploading specific files to your domain's root directory as instructed.
3. cPanel Quota Limits: cPanel may impose limits on the number of domains you can add based on your hosting plan. Check your hosting plan’s domain limits and contact your hosting provider to upgrade your plan if necessary.
4. Incorrect Domain Setup: Adding domains incorrectly as a new domain can lead to issues with domain functionality or access. Follow cPanel’s step-by-step guide for adding a new domain and ensure that the correct directory paths and subdomains are set.
5. Permissions and File Ownership Problems: Incorrect file permissions or ownership settings can prevent proper access to your domain directories. Verify and adjust permissions to ensure that directories and files are accessible as needed by cPanel and your web server.
Best Practices for Managing Files for Multiple Domains
1. Organise by Folder Structure: Create distinct folders for each domain within the main directory to keep files well-organised and easily accessible. This prevents file conflicts and simplifies the management of domain-specific content.
2. Use Clear Naming Conventions: Apply consistent and descriptive naming conventions for files and folders to quickly identify their purpose and associated domain. This reduces confusion and minimises the risk of overwriting or misplacing files.
3. Implement Access Controls: Set appropriate file permissions and access controls for different users based on their roles and domain requirements. This ensures that only authorised personnel can modify or view certain files, enhancing overall security.
4. Regular Backups: Schedule regular backups for all domain files to safeguard against data loss from accidental deletions or server issues. Store backups in multiple locations, such as cloud storage, to ensure they are secure and easily restorable.
5. Monitor and Clean Up: Regularly review and clean up outdated or unused files and folders. This practice helps maintain server performance and reduces the risk of file clutter and potential conflicts.
Conclusion
Efficiently managing multiple domains with cPanel, especially when using Verpex Hosting, centralizes your web hosting tasks and simplifies domain administration. By following the steps provided, you can seamlessly add and configure domains, ensuring smooth operation and avoiding conflicts.
Verpex Hosting enhances this experience with reliable performance, making domain management even more effective. Mastering these techniques not only boosts your web presence but also streamlines your hosting environment, saving time and increasing productivity.
Embracing these practices equips you with the skills needed for effective domain management and optimal website performance.
Frequently Asked Questions
How do I access my domain's DNS settings?
You can access your domain's DNS settings through your domain registrar's control panel. Log in to your registrar’s account, find the DNS management section, and you can adjust the DNS records as needed.
What should I do if my new domain is not linking correctly?
If your new domain is not linking correctly, ensure that the domain's DNS settings are properly configured to point to your hosting provider’s servers. You may also want to contact your hosting provider's support team for assistance.
How can I create email addresses for my addon domain?
To create email addresses for your addon domain, go to the email management section in cPanel. Select your addon domain, and then follow the prompts to set up new email accounts.
Can I use the file manager to manage files for multiple domains?
Yes, you can use the file manager in cPanel to manage files for multiple domains. Simply navigate to the document root directory associated with each addon domain to access and manage its files.

Yetunde Salami is a seasoned technical writer with expertise in the hosting industry. With 8 years of experience in the field, she has a deep understanding of complex technical concepts and the ability to communicate them clearly and concisely to a wide range of audiences. At Verpex Hosting, she is responsible for writing blog posts, knowledgebase articles, and other resources that help customers understand and use the company's products and services. When she is not writing, Yetunde is an avid reader of romance novels and enjoys fine dining.
View all posts by Yetunde Salami


