Mastering domain management in cPanel with Verpex Hosting transforms your web hosting experience, allowing effortless control of multiple sites from one account. This streamlined process enhances SEO, sharpens marketing efforts, and simplifies organization.
Whether you are new to cPanel or a seasoned pro, this guide provides a clear, step-by-step approach to adding new domains and expanding your online footprint with ease.
Domain Types in cPanel
Understanding different domain types(Addon, Parked, Subdomain, and Primary) is crucial for effective domain management. Each type serves a specific purpose and impacts how you organize and optimize your websites.
This section will briefly introduce these domain types to provide context and help you make informed decisions about managing your domains.
1. Addon Domain: An addon domain is a secondary domain that points to a subdirectory within your primary domain's public_html folder. It allows you to host multiple websites from a single account. Addon domains share the same storage space and bandwidth as the primary domain.
2. Parked Domain: A parked domain is an alias for an existing domain, allowing multiple domains to point to the same website. It is useful for branding and marketing purposes. Parked domains do not have their own content or email accounts.
3. Subdomain: A subdomain is a domain that exists under a primary domain, using a prefix. It is useful for organising content or creating separate sections within a website. Subdomains share the same storage space and bandwidth as the primary domain.
4. Primary Domain: The primary domain is the main domain associated with your cPanel account. It is the default domain that appears in the address bar when visitors access your website. The primary domain has its own storage space, bandwidth, and email accounts.
Requirements for Adding a New Domain in cPanel
Domain Registration: You must register the new domain through a registrar like Verpex before adding it to cPanel. Ensure the domain is active and not pending registration. Verify domain ownership.
cPanel Account Access: You need access to your cPanel account, including login credentials and permissions to manage domains. Ensure your account is active and not suspended.
Available Hosting Space: Ensure your hosting plan has sufficient storage space and bandwidth to accommodate the new domain. Check your account's resource limits.
DNS Setup: Set up DNS (Domain Name System) records for the new domain, either through your registrar or cPanel. Update nameservers (NS) records.
Domain Nameservers Update: Update the domain's nameservers to point to your hosting provider's nameservers. This step may require contacting your registrar or updating settings.
Step-by-Step Guide For Adding a New Domain in cPanel
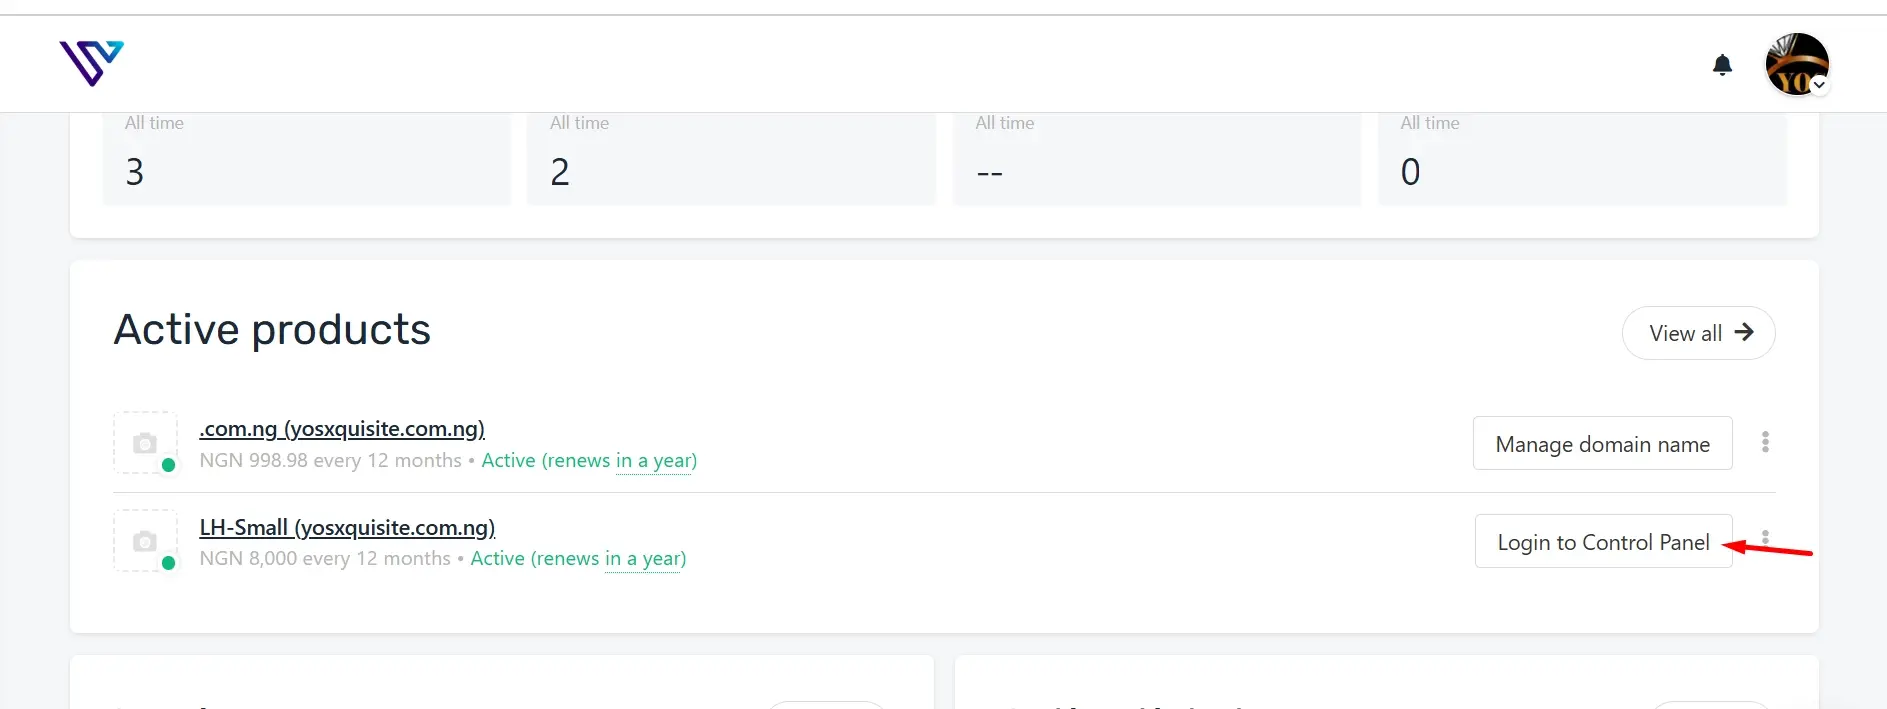
Step 1: Log into cPanel
Begin by logging into your cPanel account using your username and password provided by your hosting service. You can usually access cPanel by entering "yourdomain.com/cpanel" or a similar URL into your browser.

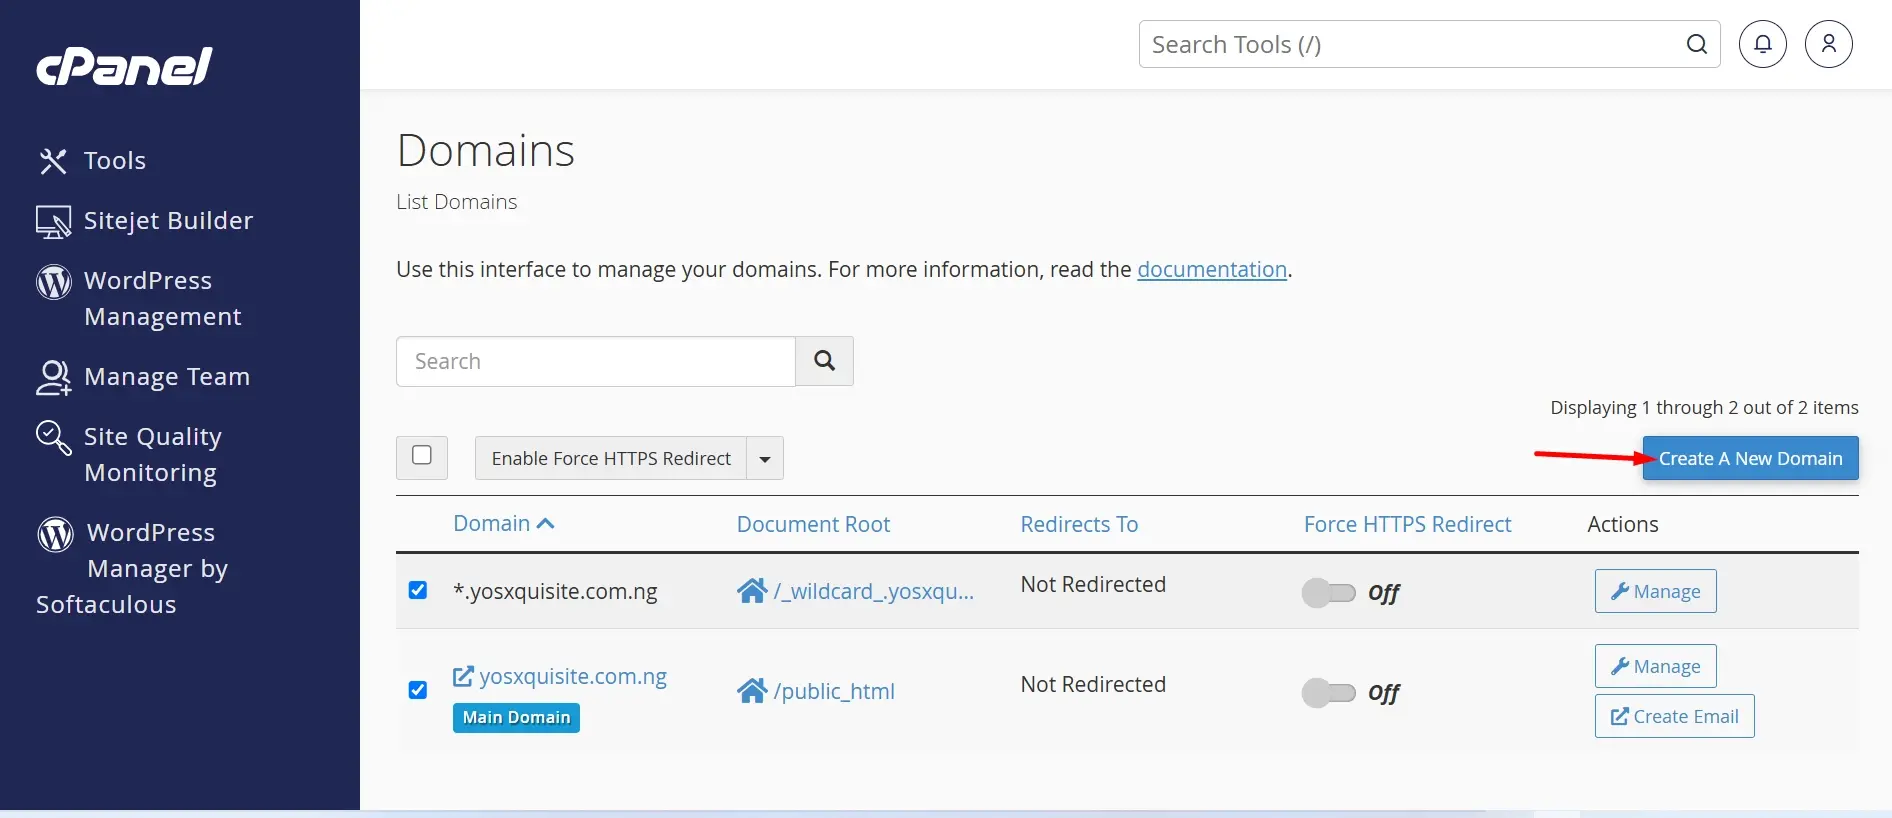
Step 2: Create a New Domain
Once logged in, locate the "Domains" section by scrolling down or using the search bar. Click on "Create a New Domain" to open a new window where you can enter the domain name you wish to add. Here, you can also specify whether it should have a separate document root.

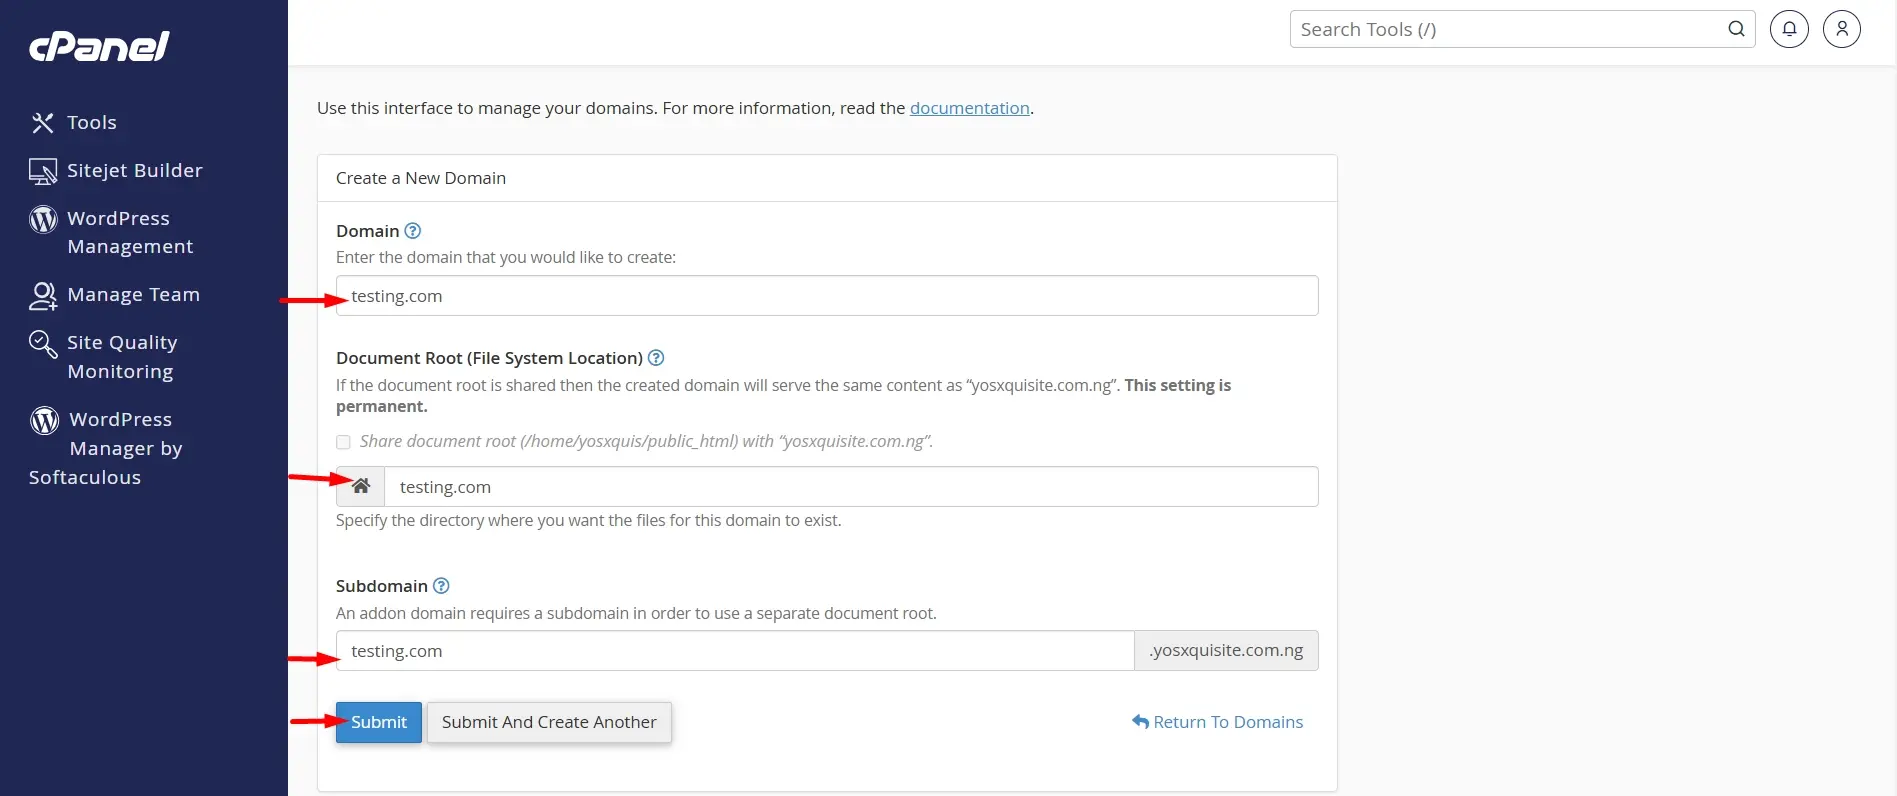
Step 3: Enter the Domain Name and Assign It to a Directory
Type in the full domain name you want to add, omitting "www." cPanel will suggest a default directory to store your website’s files, usually named after your domain. You have the option to accept this directory or customize it to a different location. If the new domain will share content with your main domain, consider checking the "Share Document Root" option. This allows the domain to redirect to an existing website or mirror the content of your main site.

Step 4: Configure DNS Settings
After adding the domain in cPanel, you’ll need to update the domain’s DNS settings with your hosting provider’s nameservers. You can obtain these nameservers from your hosting provider and input them through your domain registrar’s DNS management panel.
Step 5: Wait for DNS Propagation
DNS changes can take between 24 to 48 hours to fully propagate across the internet. During this time, your new domain may not immediately show your website, so be patient while the changes take effect.
Step 6: Verify the Domain in cPanel
Once DNS propagation is complete, return to cPanel's "Domains" section to verify that the new domain has been successfully added. From here, you can manage your new domain’s features such as email, SSL certificates, or redirect settings.
Step 7: Upload Website Files (Optional)
If the domain is intended for a new website, upload the necessary website files to the new document root directory through cPanel's File Manager or via FTP. This will ensure that your site is live and ready to be viewed once DNS propagation is complete.
Security Considerations When Adding a New Domain in cPanel
SSL/TLS Encryption: Ensure that the new domain is secured with an SSL/TLS certificate to encrypt data between the server and users, preventing interception by attackers. This helps build trust and improve SEO rankings.
Strong Passwords: Use strong, unique passwords for associated accounts like FTP, email, and cPanel access. Weak passwords can easily be exploited, leading to unauthorized access.
Directory Permissions: Set proper file and directory permissions to prevent unauthorized users from accessing sensitive areas. Incorrect permissions can leave files exposed to modification or deletion.
Firewall Protection: Implement firewall rules to restrict unwanted traffic and block potentially malicious activities targeting the new domain. This reduces the risk of DDoS attacks and unauthorized access attempts.
Regular Software Updates: Ensure that all CMS, plugins, and scripts installed on the new domain are regularly updated. Outdated software often contains security vulnerabilities that hackers can exploit.
Verifying Domain Addition
1. Check Domain Status: Verify the domain's status in cPanel's Domain Manager or Zone Editor. Ensure it's listed as "Active" or "OK". This indicates the domain is properly configured.
2. Visit the Domain: Enter the new domain name in a web browser to ensure it resolves correctly. Your website or a default page should load, confirming the domain is pointing to your hosting account.
3. Check Email Functionality: Test email functionality by sending and receiving emails using an email client or webmail. This verifies that MX records are properly configured and email is working.
4. Verify DNS Propagation: Use online tools like What's My DNS or DNS Checker to verify DNS propagation. This ensures your DNS changes have propagated globally and your domain is resolvable worldwide.
5. Check for SSL Certificate: If you have installed an SSL certificate, verify it is working correctly by visiting your domain with "https" and checking for a padlock icon in the browser. This confirms secure connections.
Managing Files for the New Domain
File Manager: Use cPanel's File Manager to upload, download, and manage files for your new domain. Navigate to the domain's document root (public_html/domain.com) to access files. You can also create new folders and files.
FTP Accounts: Create FTP accounts to connect to your domain's file system using an FTP client like FileZilla. Set up a new FTP account in cPanel, specifying the domain's document root as the home directory.
File Uploads: Upload files to your domain using the File Manager or FTP client. Ensure files are uploaded to the correct directory (public_html/domain.com) for your website to function correctly.
Directory Indexing: Set directory indexing to control how files are displayed when a visitor accesses a directory without an index file. Choose from options like "Standard Indexing" or "No Indexing" in cPanel's Directory Privacy settings.
File Permissions: Manage file permissions to control access and execute files on your domain. Set permissions using cPanel's File Manager or FTP client, ensuring correct permissions (e.g., 755 for directories, 644 for files).
Common Issues When Adding a New Domain in cPanel and How to Resolve Them
1. Domain Name Already in Use: If you encounter an error stating that the domain name is already in use, it means the domain might already be added to another account or within the same account under a different subdomain. Verify if the domain is listed under the “Domains” or “Addon Domains” section in cPanel and ensure it is not currently being used. If it is, you may need to remove or adjust its configuration.
2. DNS Propagation Delays: After adding a new domain, DNS changes may take time to propagate across the internet, potentially causing access issues. Check the domain’s DNS settings in cPanel and ensure they match the nameservers provided by your hosting provider. You may need to wait up to 48 hours for DNS changes to fully propagate.
3. Incorrect DNS Settings: Incorrect DNS settings can prevent the new domain from resolving correctly. Double-check the DNS records associated with the domain in cPanel’s DNS Zone Editor, ensuring A records, CNAME records, and nameservers are correctly configured. Correct any discrepancies and recheck the domain’s functionality.
4. File Path Conflicts: If the new domain points to a directory that already contains files or a website, there may be conflicts causing errors or misconfigurations. Make sure the directory specified for the new domain is empty or properly set up for the new site. You can create a new directory if needed or adjust file permissions.
5. Account Permissions Issues: Sometimes, insufficient permissions can prevent you from adding a new domain. Ensure that your cPanel account has the necessary permissions to add domains and that you are not exceeding any account limits imposed by your hosting provider. Contact your hosting provider if you suspect permission issues.
Best Practices for Adding a New Domain in cPanel
1. Verify Domain Registration: Ensure your domain is active and properly registered before adding it to cPanel. Check that it's not expired or suspended to avoid setup issues and ensure a smooth integration.
2. Update Nameservers: Update your domain's nameservers to those from your hosting provider to ensure proper resolution and traffic direction. You can do this via your domain registrar or cPanel.
3. Use a Unique Document Root: Assign a distinct document root for each domain to keep files organized and avoid conflicts. Use cPanel’s “Assign Domain” feature to manage this efficiently.
4. Configure DNS Settings: Set up DNS records (A, CNAME, MX) correctly to avoid resolution issues. The proper configuration ensures your domain functions correctly. Use the DNS Zone Editor in cPanel.
5. Test Domain Setup: After adding the domain, ensure it's configured correctly by testing website loading, email functionality, and DNS propagation using online tools.
Conclusion
By efficiently managing multiple domains in cPanel, you ensure that each domain is utilized and organized to its full potential. Verpex Hosting offers cPanel-based hosting services that simplify this process, enabling you to manage multiple domains effortlessly within a single account.
With Verpex's robust support and cPanel’s features, you can streamline domain management and optimize your digital assets for enhanced performance.
Leveraging cPanel's capabilities helps maintain a well-structured and efficient domain setup, contributing to a seamless online experience. Embrace these tools to enhance your domain management strategy and maximize the effectiveness of your online presence.
Frequently Asked Questions
How do I create an addon domain in cPanel?
To create an addon domain, log into your cPanel account, navigate to the "Domains" section, click on "Addon Domains," enter the new domain name in the provided text box, and fill in the document root field. Finally, click "Add Domain" to complete the setup.
Can I manage multiple domains with a single cPanel account?
Yes, a single cPanel account allows you to manage multiple domains efficiently. You can add and organize these domains using the "Addon Domains" feature within your cPanel account.
What should I do if cPanel automatically fills the document root text box?
If cPanel automatically fills the document root text box, you can either accept the default directory or enter a custom directory if needed. This directory determines where the files for your new addon domain will be stored.
How do I create FTP accounts for new addon domains?
To create FTP accounts for new addon domains, go to the "FTP Accounts" section in cPanel, enter the desired FTP username and password, and specify the domain's directory where the FTP account will have access. Click "Create FTP Account" to set it up.

Yetunde Salami is a seasoned technical writer with expertise in the hosting industry. With 8 years of experience in the field, she has a deep understanding of complex technical concepts and the ability to communicate them clearly and concisely to a wide range of audiences. At Verpex Hosting, she is responsible for writing blog posts, knowledgebase articles, and other resources that help customers understand and use the company's products and services. When she is not writing, Yetunde is an avid reader of romance novels and enjoys fine dining.
View all posts by Yetunde Salami


