
If you have just purchased a domain and aren't sure what to do next, you've come to the right place.
In this article, we're going to discuss the steps to take so you know exactly what to do after buying your new domain name.
Without further ado, let’s dive right in!
1. Choose the Right Hosting
Once you've purchased your domain, the next step is to get a reliable hosting plan. Web hosting is a service that allows you to publish your website online. When you subscribe to a hosting plan, the web host provider allocates space and resources on its server to store all your website files and data.
Verpex is a great solution that offers fast-loading speeds and no downtime. The platform lets you choose between different types of hosting to suit your needs.
Here’s a quick breakdown of the different hosting plans to help you make an informed choice:
Cloud Web Hosting
This type of hosting involves the use of clusters of servers to host websites, as opposed to using one server. This means that if one server goes down for any reason, another server kicks in at once. This structure maximizes uptime and balances traffic load to prevent issues arising from unexpected traffic spikes.Shared Hosting
Shared hosting is the perfect way to power your new website or blog. It’s affordable, simple to set up, and incredibly easy to use. With Verpex Shared Hosting Plans, you can run up to 10 websites and manage them easily using the gold standard cPanel.WordPress Hosting
You want a host that allows you to streamline your WordPress website with industry-leading solutions. Verpex offers free migrations, one-click installations, and advanced security measures. You’ll also have tools to create and manage your WordPress website, even if you have very little technical know-how.Managed Cloud Servers
If you’ve outgrown shared hosting, or if you’re anticipating high levels of traffic on your new website, you can advance your site with fully managed cloud servers. The platform’s experts will handle everything technical leaving you free to focus on what you do best: growing your business.
2. Connect The Domain Name to Your Web Hosting Account
Once you’ve decided on which web hosting option to choose, it’s time to connect your domain name to the hosting account.
Different web hosts have different steps to achieve this. If using Verpex, you’ll receive a welcome email soon after logging in.
This email will contain details on how to log into your hosting control panel. Click the link in the email to access your Client Area where you can view your hosting package under the “Services” tab.
Click the hosting plan you want to log into, and you’ll be directed to your cPanel. This is where you’ll be able to change the nameservers to link your new domain with your hosting plan.
Note that if you purchased your domain name from Verpex, then this will be done automatically.
But, if you are transferring the domain, or if you want to use one that’s registered elsewhere, then you’ll have to log into the account where you purchased the domain and look for the domain nameservers settings under the Domain Management or Domain Overview menu.
You can then update the nameservers to the ones provided on your hosting account.
In the case of Verpex Hosting, you’d change them to:
ns1.verpex.com
ns2.verpex.com
ns3.verpex.com
ns4.verpex.com
The intuitive dashboard guides you through the process of changing your nameservers, which only takes a minute. After making the change, you’ll have to wait up to 24 hours (but typically much less time) for the change to propagate so you can see it in your browser.
Once that’s done, you’re ready for the next step.
3. Install WordPress
When your domain name changes have taken effect, it’s time to start building your new website.
There are many different ways to do this, such as hiring a developer, coding it manually, or using software for building websites, such as Wix or Squarespace.
These site builders are great for beginners as they come with pre-made templates and simple, drag-and-drop page editors to get you started. However, these platforms also come with certain limitations that make it hard to expand your website or grow your brand in the future.
That's why I recommend WordPress, the world's most popular CMS (Content Management System).

A CMS is a piece of software that simplifies the process of creating and modifying website content. There are several CMS platforms you can choose, including Joomla or Drupal, but in my experience, WordPress is one of the easiest ways to create a website for new users.
To install WordPress from your Verpex cPanel dashboard, scroll down to find the icon labeled “Softaculous Apps Installer”.
Here, you’ll see a list of all the different applications you can install.
Find the WordPress icon and click it. The system will ask for more information, and once you’ve entered it, click “Install” and you can then log into the admin area to start running your application.
Even if you’re using another type of installer on a different web host, the process should be similar to what I’ve described above.
Alternatively, you can download WordPress and install it manually by copying its files to your hosting account using a file manager or FTP client.
4. Install a Theme
With your WordPress app in place, you can now choose a theme for your website. A theme is the foundation of intelligent website design. It’s a piece of software that includes things like:
Page layouts
Color pallets
Typography, etc.
WordPress has thousands of free and premium themes to choose from. When you install the app, it comes with a pre-installed theme called Twenty Twenty-One. However, if you want to build a unique website, I would suggest that you change this theme to something more unique and suited to your specific website.
To install a WordPress theme, you can browse through the WordPress themes on the platform or upload a theme from a third-party vendor.
On your WordPress dashboard, go to Appearance > Themes.
You’ll be presented with the Add Themes page. Click Add New at the top of the page.

On the next screen, you'll be able to choose themes from a variety of categories, including Popular, Latest, Favorites, etc.
Browse through the themes, or if you already know the one you want to use, you can type its name into the field at the top labeled “Search Themes”.
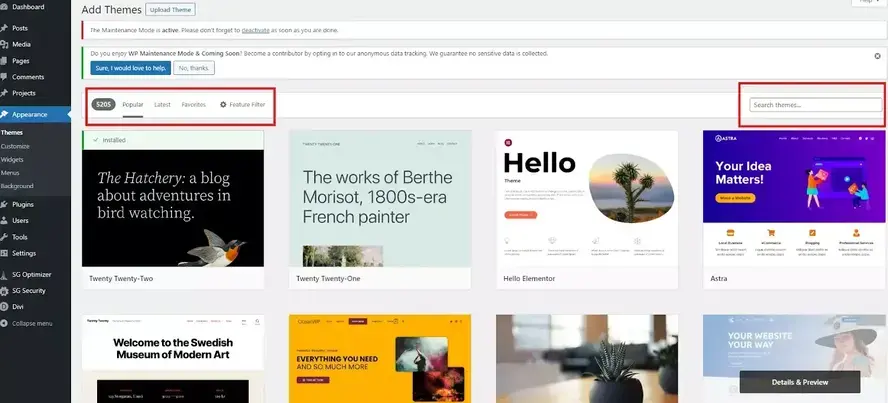
Once you find a theme you like, click Install, and WordPress will take care of all the rest.
If purchasing a theme on third-party marketplaces like ThemeForest, TemplateMonster, MyThemeShop, etc., you can download the theme as a zip file and then add it to your website by clicking Upload Theme on the Add Themes page.
Install Plugins
While you’re installing a theme, it's also a good idea to consider installing some plugins at the same time.
Plugins allow you to add more features to your WordPress website.
The WordPress directory has over 50,000 free and premium plugins to choose from, and you can find thousands more on multi-vendor marketplaces like Envato, Mojo Marketplace, Creative Market, and many others.
To add plugins, you need to follow these steps:
Step #1: Log in to your WordPress admin dashboard.
Step #2: Go to Plugins > Add New.
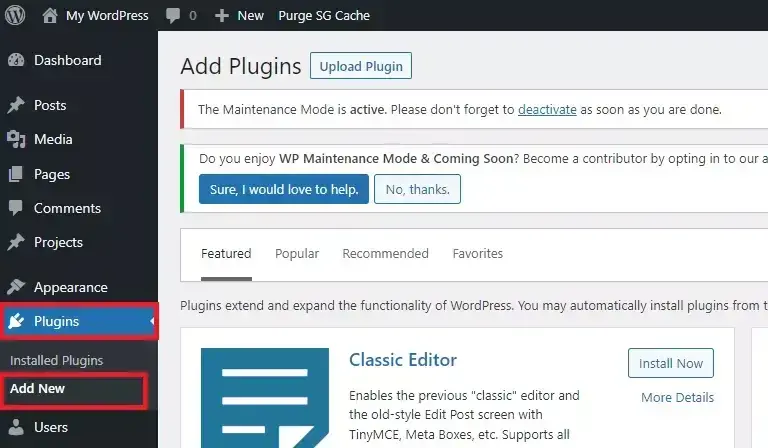
Step #3: Search for the plugin by typing the name into the search box at the top right-hand side of the page.
Step #4: Once you’ve found the desired plugin, click Install Now.
If you’ve already downloaded the plugin, click Upload Plugin at the top left corner and choose the corresponding .zip file.
- Step #5: Click the Activate Plugin button.
Here’s a list of a few must-have plugins to add to your WordPress website:
Yoast SEO
This plugin analyzes your website and blog content based on your main keyword or phrase and provides suggestions to improve your SEO.Visual Composer
This plugin provides a drag-and-drop page editor to help you develop your WordPress website without having to touch a single line of code.UpdraftPlus
This plugin is designed to help you back up your WordPress to Dropbox, Google Drive, or other integrated cloud services thereby simplifying site recovery.W3 Total Cache
This plugin speeds up your WordPress website by enabling features like lazy loading, cache, content delivery network (CDN), etc.WooCommerce
This is a great plugin to use if you want to add products to your new website. It enables eCommerce functionality such as inventory management, online payment, and order management.
5. Claim All Social Media Profiles
With your website in place, you must now secure social media handles that match your website. This will help you establish and grow a strong brand online.
It's a good idea to do this even if you aren't planning on using social media platforms right away.
Simply lock down specific usernames so you have the option of using them in the future. If you find that the branded version of your username is already taken, try adding qualifiers to the end of it. For example, you might add words like "the", "I am", “pro”, etc. it's fine if you can't get an exact match, just try to get as close as you can.
And do your best to match your usernames across different social media accounts as this will make it easier for your followers and fans to find your content on different platforms.
6. Create Email Accounts With Your New Domain
Your next step is to create one or more email accounts using your new domain name. A custom email address will help increase your credibility and build trust with your audience.
So, instead of [email protected], your email address will be a more professional [email protected].
Depending on whether you want to use your email as a contact/support address or as a way to communicate with your business partners, you might decide to create more than one domain-specific email.
If you're using Verpex hosting service, follow these steps to create an email address within your domain:
Step #1: Log into your cPanel through the platform’s Client Area.
Step #2: Once logged in to the cPanel dashboard, type Email Accounts in the search bar at the top right-hand corner of the page. Or, if the email accounts tab is visible on the page, go ahead and click it.

- Step #3: After the page loads, click the +Create button and enter your details to create a new email account.

- Step #4: Make sure to create a strong password for your new email account and once all your details are filled in, click Create.
You will be directed to the previous page where you'll see all your existing email accounts.
To access your inbox, simply click the Check Email button.

7. Start Creating Content
Now comes the fun part, building out your website.
First, you need to add the essential pages to your site. These include:
Homepage
About page
Product or service page
Blog page
Contact page
Once these pages are in place, you can start creating content for your new website. Try to have at least 10 articles or posts on your website before you start promoting it.
Of course, this all depends on whether you're setting up a blog, creating a website for an online service business, starting a news-style website, or building an eCommerce store.
Whatever your goals, just make sure you have enough content on your website so that your new visitors have something to return for.

Conclusion
As you've seen from the information above, buying a domain name is merely the start of your online journey. Fortunately, the rest doesn't have to be hard as long as you have a solid plan for building a successful website - and that’s exactly what this article has provided you with.
Has this article helped you understand what comes next after purchasing a new domain name? Share your thoughts below!
Frequently Asked Questions
What makes a certain domain valuable?
Valuable domains are usually memorable, easy to spell, pronounce, and short.
Is selling domain names for profit legal?
Yes, selling domain names for profit is perfectly legal. What’s not legal is purchasing a domain name that incorporates a trademarked name with the intention of getting profit from the reputation of the trademarked entity.
How much does a domain cost monthly?
Usually, domain names cost from $0.99 to $12 per month. However, at Verpex, we offer a free domain name with our hosting packages.
Can I move over an existing domain?
Yes, we make it easy to transfer over any domain or eCommerce store to our hosting plan.

Ron Stefanski is a website entrepreneur and marketing professor who has a passion for helping people create and market their own online business. You can learn more from him by visiting OneHourProfessor.com
View all posts by Ron Stefanski