When using Woocommerce to build an online store on Wordpress, knowing how to select and configure a ‘payment gateway’ is an essential skill to have. The payment gateway allows your customers to ‘check out’ online and is used to transfer funds from their bank account to your company's account every time they make a purchase.
One of the most popular payment gateways available is Stripe. Founded in 2010, Stripe was designed to make the process of accepting payments online simple, and now with over 3 million websites using it to handle payments, it’s an obvious choice for Woocommerce store owners.
In this article we’ll be covering how to integrate Stripe into your WooCommerce website, assuming you already have a Stripe account setup. If you don’t yet have an account then head over to https://stripe.com/ to get started. If you are setting up a Stripe account for the first time please be sure to make a note of your Stripe password, because you will be needing it again later on. The first thing though is to get the Woocommerce plugin successfully installed on your Wordpress website.
But before we start, just check you have a valid SSL certificate. Without this you will not be able to complete the process. If you’re not sure or don’t have one, please contact your webhost for help and/or to purchase one.
Step 1: Installing the Stripe Plugin
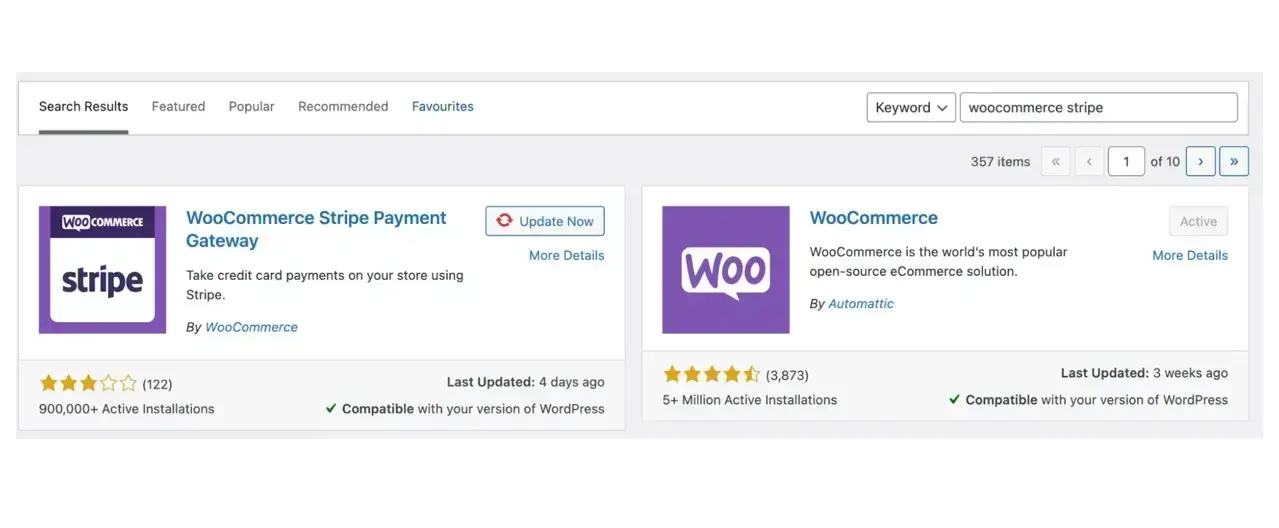
Firstly, log into your site and go to your Wordpress admin dashboard, navigate to ‘Plugins’ in the left hand-side menu and click the ‘Add New’ button. In the search field that appears type ‘Stripe’ and look for “WooCommerce Stripe Payment Gateway” as in Figure 1 below. Click ‘install’ and once the plugin has been installed, go ahead and activate it.
Figure 1. Selecting the Woocommerce Stripe payment gateway.
Step 2: Setting up Stripe to WooCommerce
Now that we have the WooCommerce Stripe Payment Gateway plugin installed and activated, we need to connect up your Stripe account to WooCommerce.
Navigate to ‘Woocommerce’ in the left hand-side menu and whilst hovering click ‘settings’ from the sub-menu that appears. You should see a screen of general WooCommerce settings with tabs across the top of the page such as ‘General’, ‘Products’ and ‘Tax’ (see Figure 2 below).
Figure 2. Woocommerce settings tabs.

Click on the ‘Payments’ tab from the above menu and find ‘Stripe’ in the list of options. Note: there will most likely be more than one item in the list containing the word ‘Stripe’ but the one we want to focus on for now is the first one that looks like Figure 3 below:
Figure 3. Stripe options.

Next, click the toggle switch to begin the Stripe setup process. You should be redirected to a screen that says “Get started with Stripe” and looks like Figure 4 below:
Figure 4. Get started with Stripe.
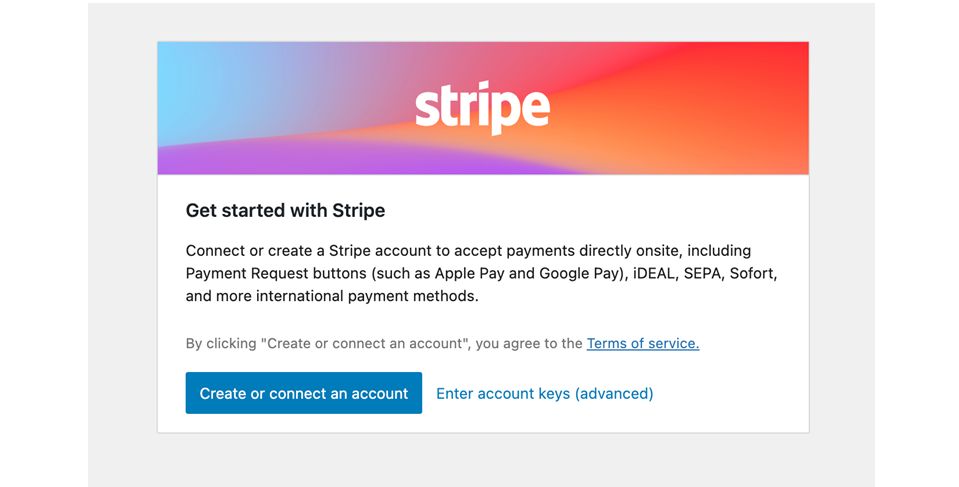
Step 3: Connecting Your Account - The Easy Way
On this page, click the blue ‘Create or connect an account’ button and you should be redirected to a page on Stripe.com that will ask you to enter your email address (Figure 5 below).
Please note that many users have reported that this button doesn’t always work reliably, so if you don’t get redirected immediately, skip this step and head straight to “Step 4: Connecting Your Account - The Manual Way”.
This is the process where we will be connecting your Stripe account to WooCommerce on your website so the email address you enter here must be that which you have used for your Stripe account.
Once you have entered your email address you will be prompted to enter your password - again, the password here is that which you set when creating your Stripe account initially that we asked you to note earlier on (Figure 5 below):
Figure 5. Entering your email address and password.

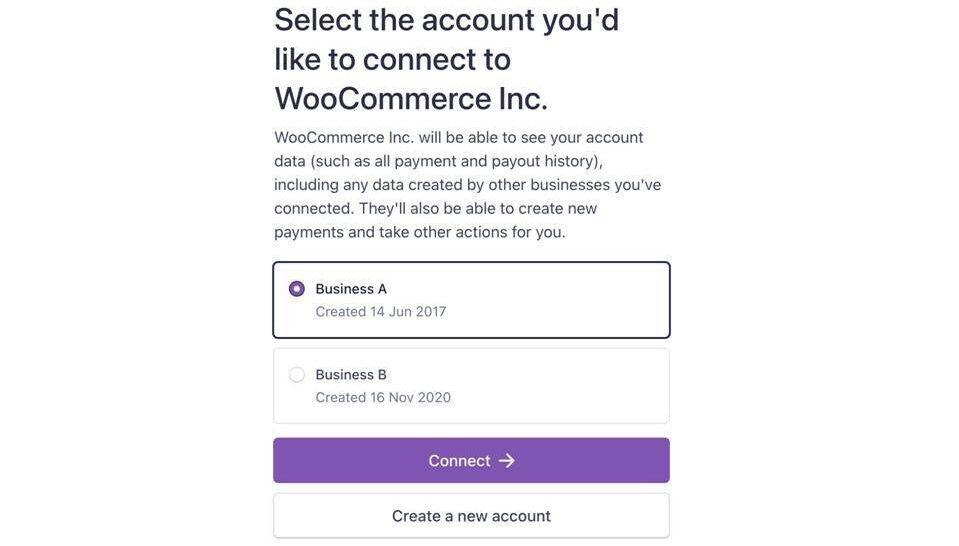
Note: if you have multiple businesses setup within the same Stripe account you may be asked to select which of those you would like to connect. It should look like Figure 6 below:
Figure 6. Selecting which business accounts to connect.
Once the above steps have been completed successfully, you should automatically get redirected to your Wordpress website where there are a few final steps to complete before you’re up and running and ready to start making some sales! Now, if all went well please skip ahead to Step 5.
Step 4: Connecting Your Account - The Manual Way
If for some reason you had issues with the redirect button above for connecting to your Stripe account, then don’t worry, you’re now in the right place to connect your Stripe account manually.
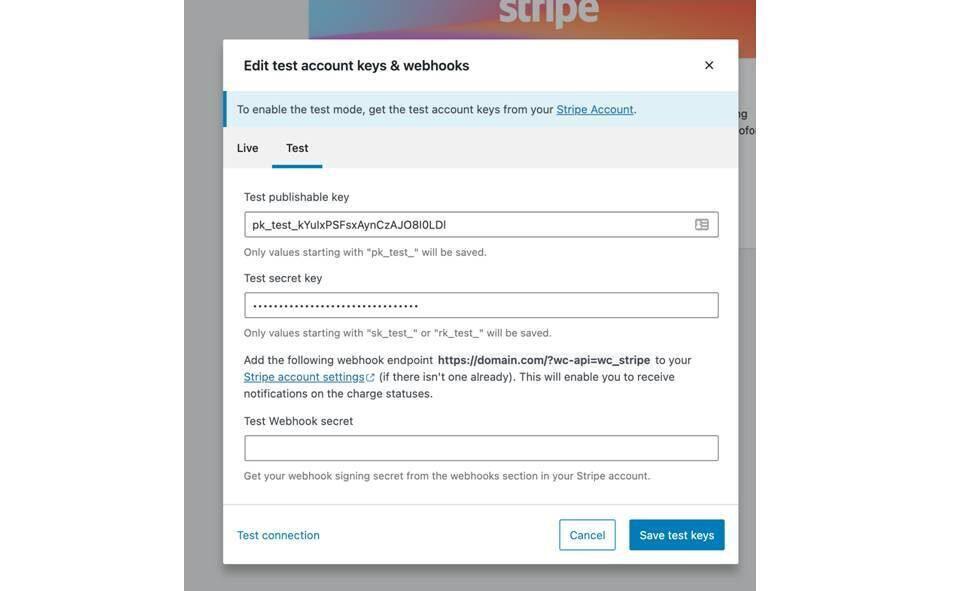
Instead of clicking the blue ‘Create or connect an account’ button, select the link to the right (see Figure 4 above) “Enter account keys (advanced)”. This should trigger a popup similar to Figure 7 below:
Figure 7. Entering account keys and webhooks.
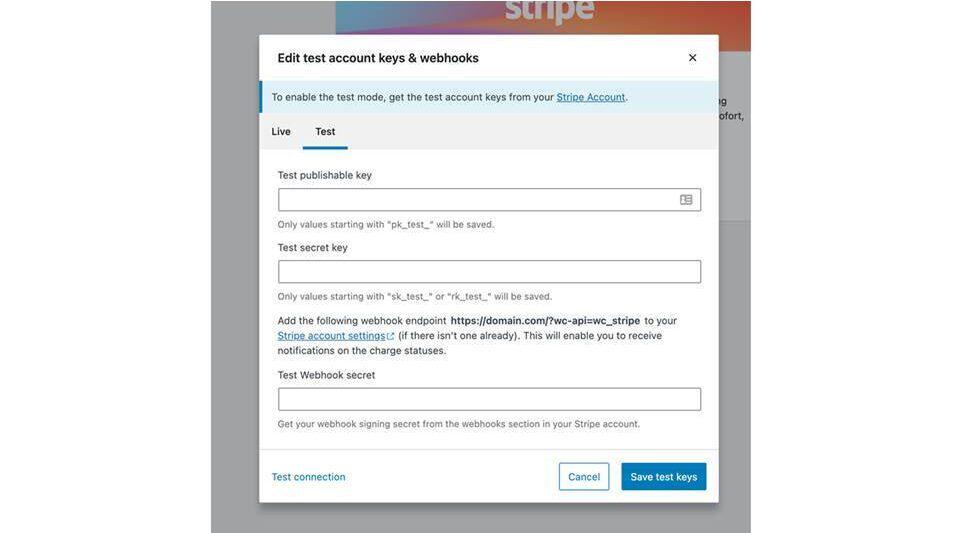
We will be populating API (Application Programming Interface) keys for both the ‘Live’ and ‘Test’ environments, but we will start with the testing keys. Select the ‘test’ tab at the top .
To retrieve the required information, you will then need to log in to your Stripe account and click the ‘Developers’ button in the top right hand corner of the page (Figure 8 below):
Figure 8. Select the developers button.

Ensure you are in ‘test mode’ by switching the toggle if necessary so that it looks like the above.
From the left hand sidebar, select API keys as in Figure 9.
Figure 9. Select the API keys.
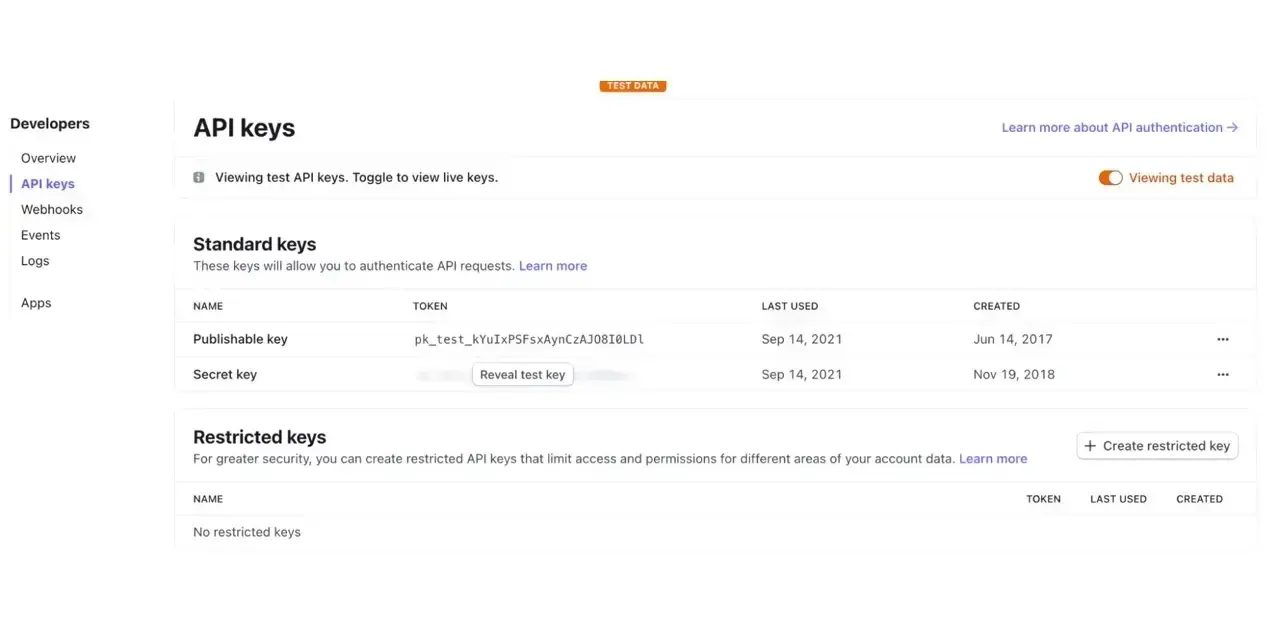
From here you can copy and paste your ‘Publishable key’ into the field in the popup on your WooCommerce site (it will begin ‘pktest’). Repeat this process for the Secret key (you will need to ‘reveal’ this key).
Once done it should look something similar to Figure 10 below (note: secret key has been redacted for security reasons):
Figure 10. Entering your publishable key.
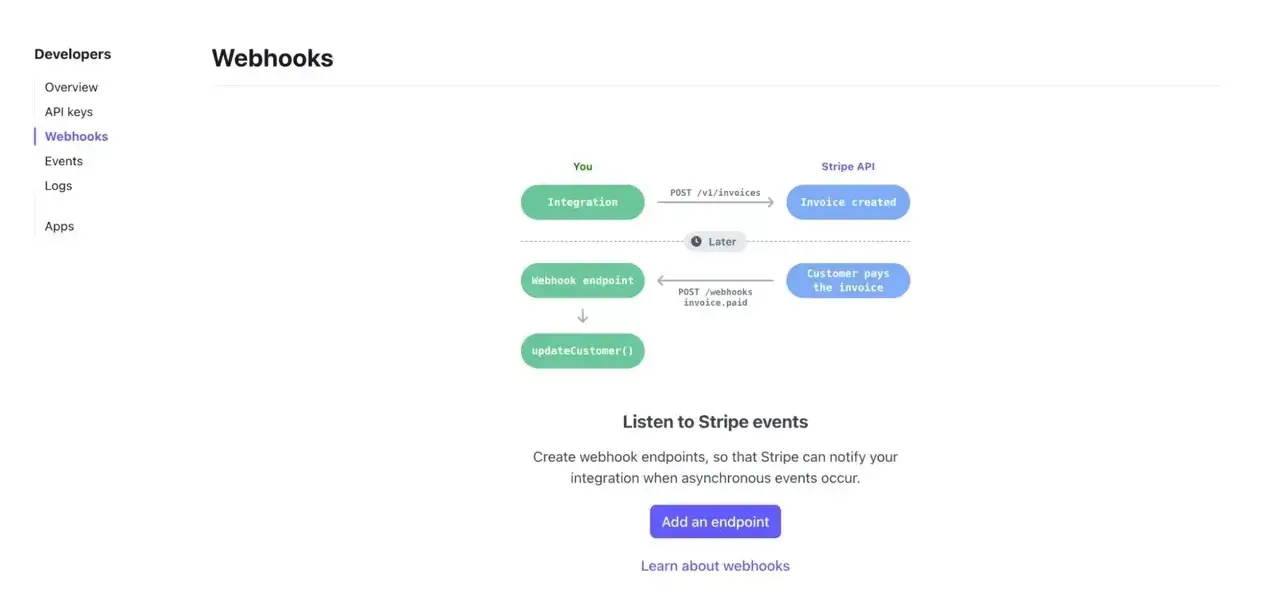
The next step is to generate a ‘Webhook secret’. Click on ‘Webook’s in the left hand sidebar and then click ‘Add an endpoint’ as shown in Figure 11 below:
Figure 11. Generating a Webhook secret.
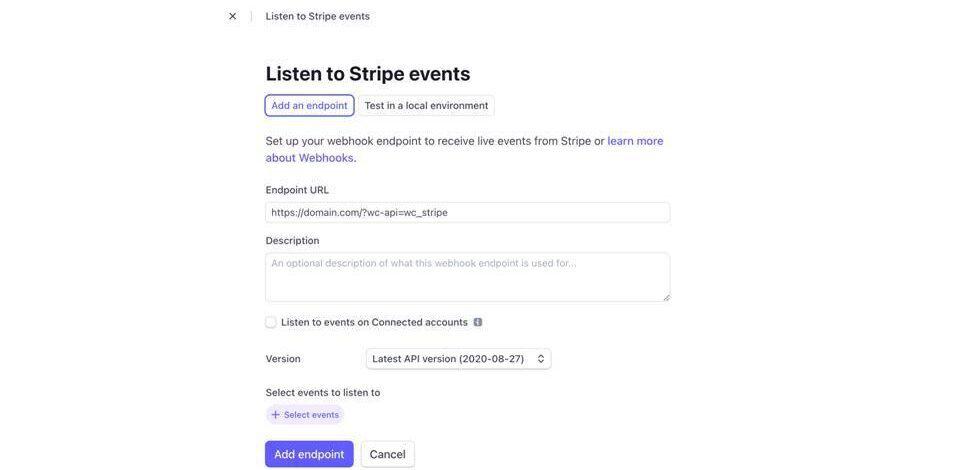
Copy and paste the url shown in the popup on your Wordpress site into the ‘Endpoint URL’ field on Stripe as in Figure 12:
Figure 12. Adding your website url.
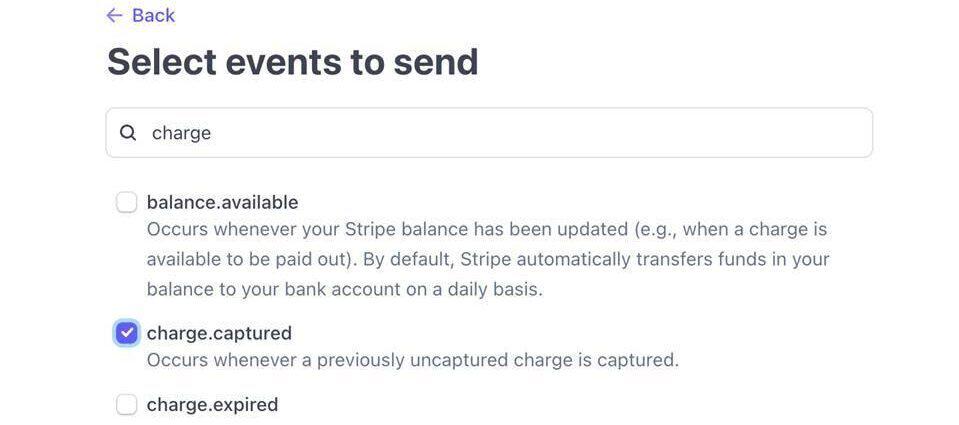
Click on ‘Select events’ and then ‘Select events to send’. From the list select ‘charge.captured’ (Figure 13).
Figure 13. Select 'charge.captured’
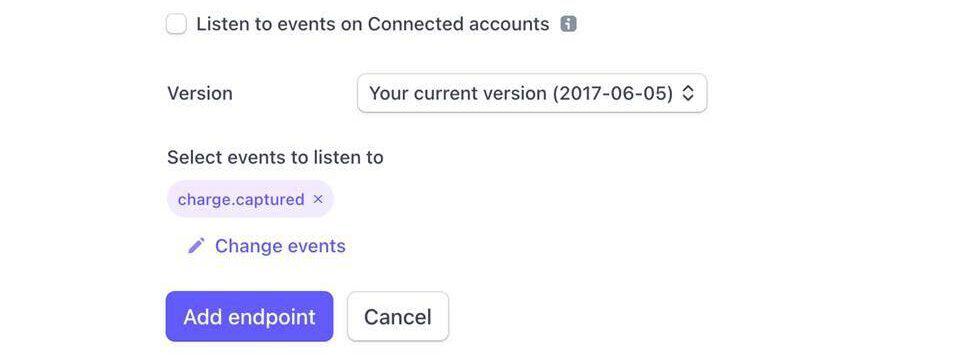
Then, click the ‘add events’ button and ‘add endpoint’ (Figure 14).
Figure 14. Add endpoint.
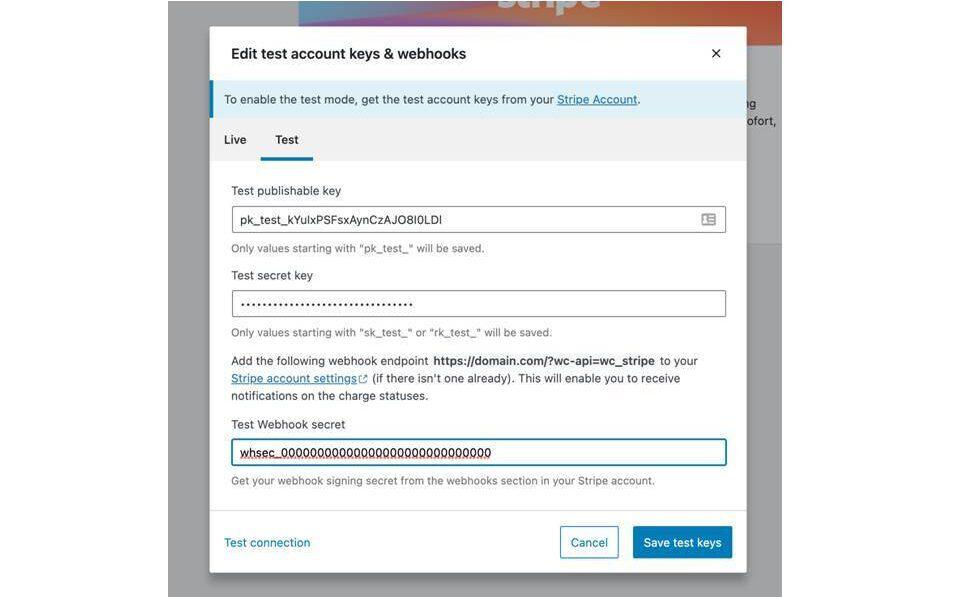
The webhook will have been generated as shown below (Figure 15) and you can ‘reveal’ the signing secret to copy and paste into Woocommerce as in Figure 7 above:
Figure 15. Copy and pasting in your webhook secret.

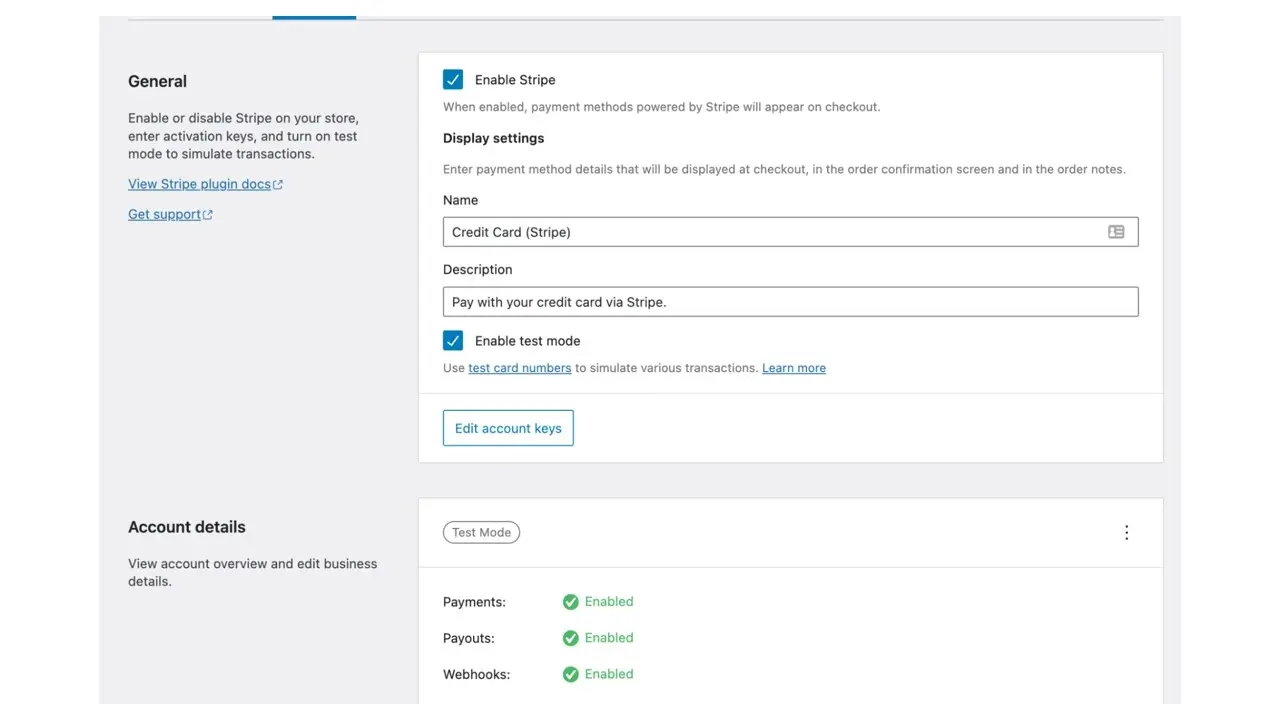
Then, click ‘Save test keys’. You will be redirected to a page that looks like Figure 16 below:
Figure 16. Stripe settings within WooCommerce
In the ‘Account detail’s section, click the 3 dots next to ‘test mode’ and select ‘edit account keys,’ then repeat the above process (publishable key, secret key and webhook secret) for the live environment by toggling the ‘test’ switch in your Stripe account to OFF (Figure 17). Now we’re almost there!
Figure 17. Toggling the ‘test’ switch to off.

Congratulations, your Stripe account is now connected!
Step 5: Configuring the Statement Descriptor
It’s important that customers are able to identify any charges they make through your store on their bank statements. For this reason, we recommend that you set the ‘statement descriptor’ to be your website’s name. In order to do this, scroll to the bottom of the settings page to the section titled ‘Payments & transactions’ (Figure 18):
Figure 18. Payments & Transactions page.
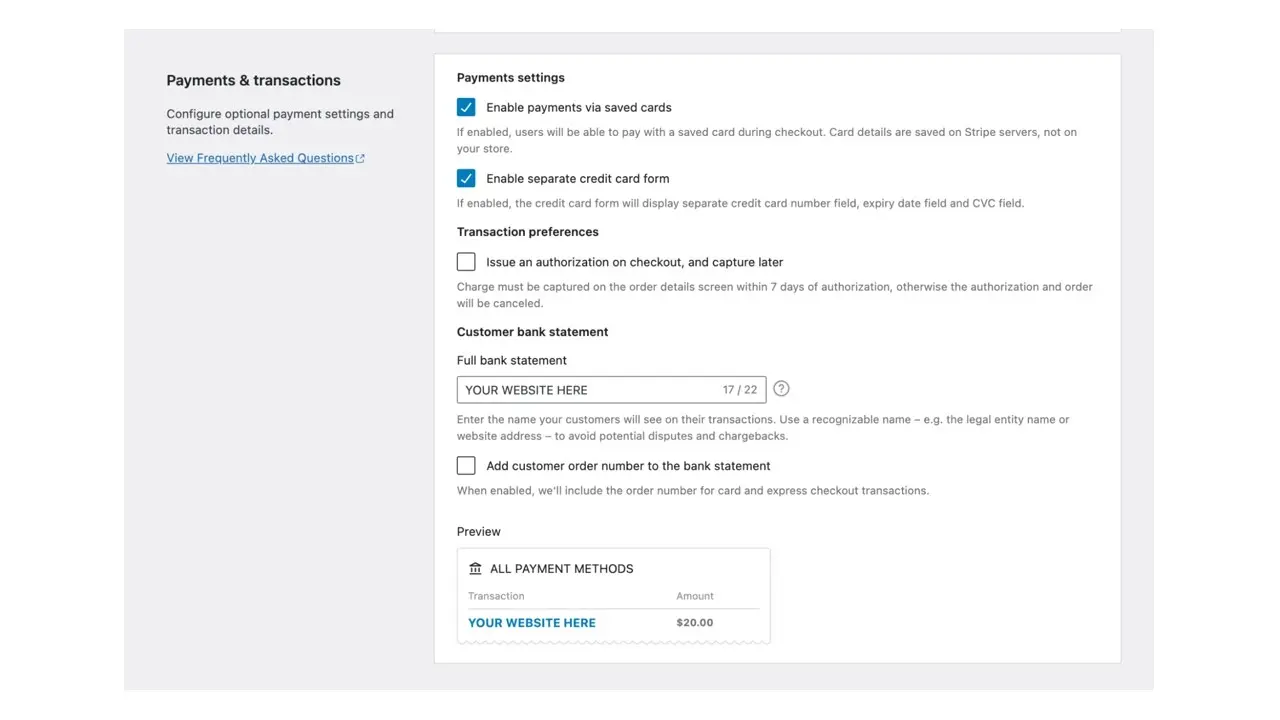
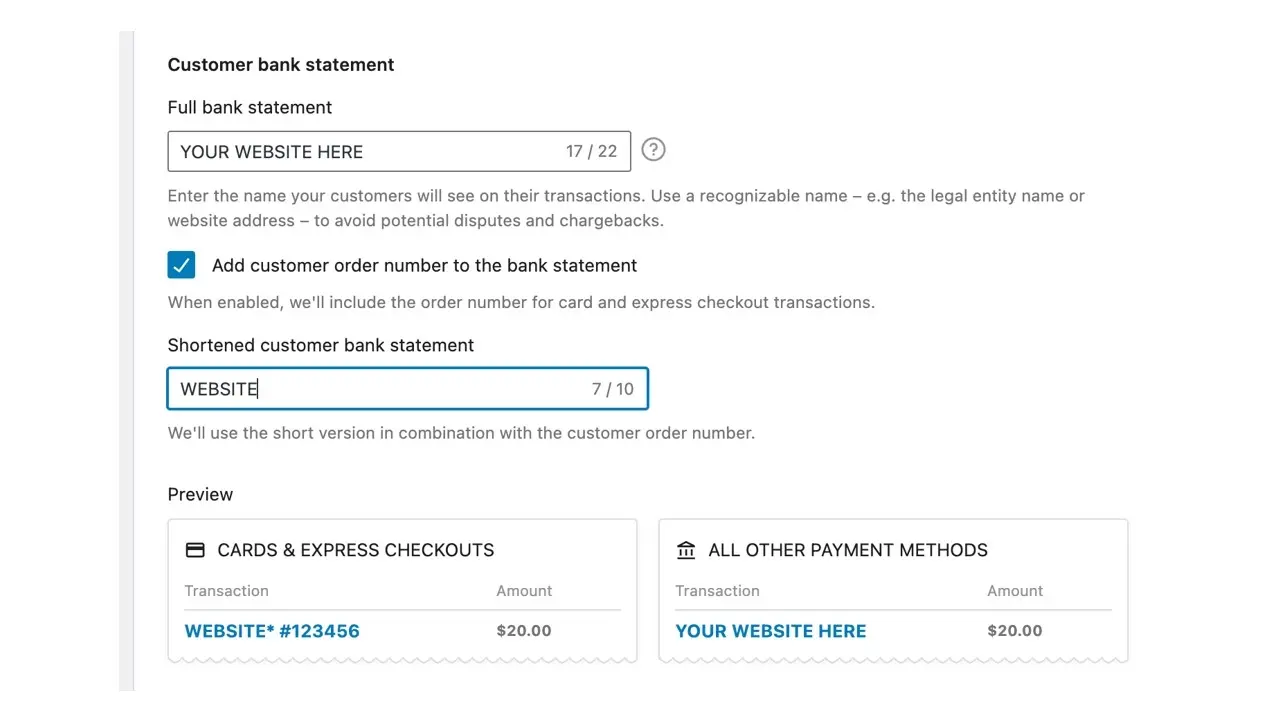
From here you will be able to type in your website’s name in the field that appears under ‘Customer Bank Statement’. You may also wish to display the order number on the customers’ bank statement which can be done by selecting the tickbox next to ‘Add customer number to the bank statement’. This will require that you provide a shortened version of the website name (up to 10 characters - for example, Amazon might become AMZN) so that there will be enough space to include the order number too (Figure 19).
Figure 19. Adding a shortened version of your website name.
Once done, click ‘save changes’ at the bottom of the screen.
Step 6: Test Purchase
Once you’ve completed the above steps, your Stripe account should now be successfully connected up to your WooCommerce site and you’re almost ready to take payments.
Before allowing customers to make purchases, it’s always a good idea to carry out an end-to-end test of the payment process to check everything is working as expected.
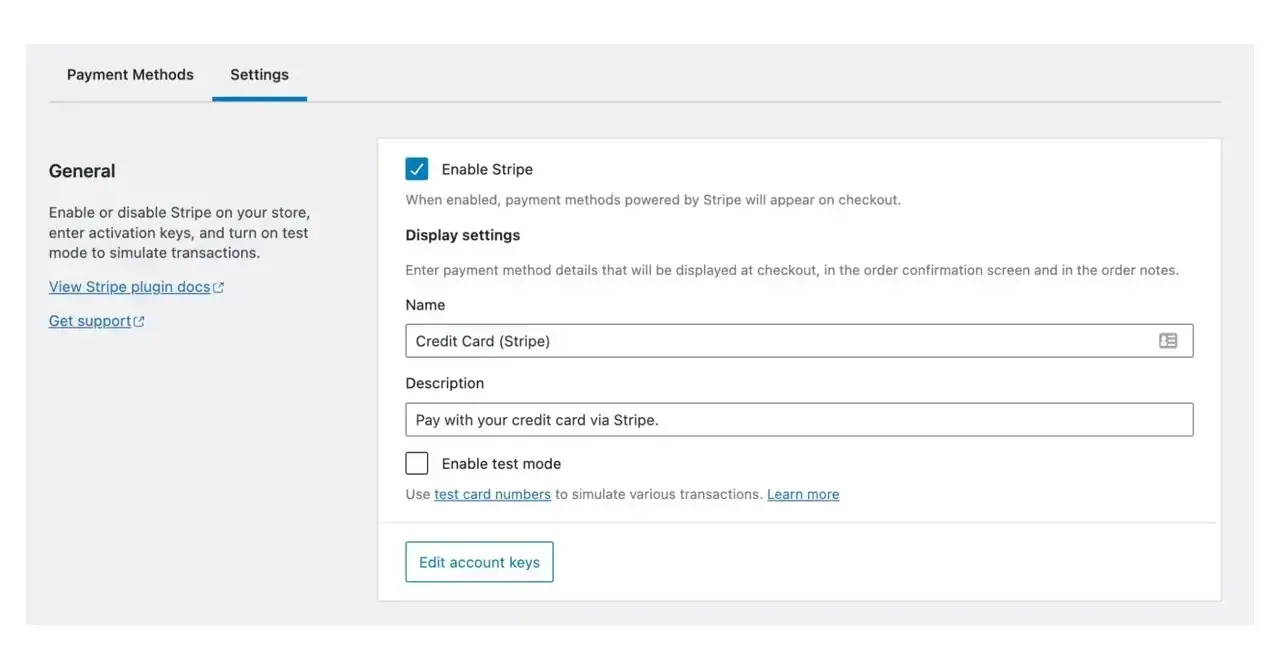
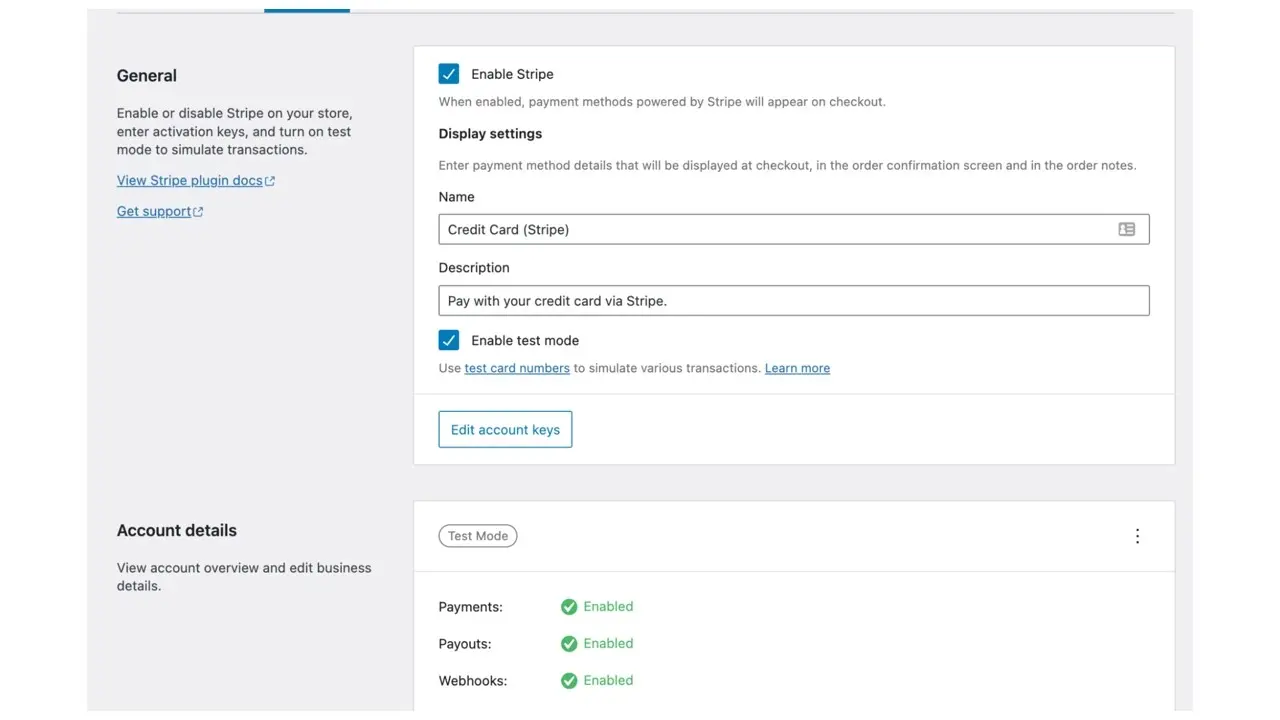
Navigate to: WooCommerce > Settings > Payments > Stripe > Settings and ensure that “Enable test mode” is checked (Figure 20):
Figure 20. Make sure ‘Enable test mode’ is checked.
Next, visit the front-end of your website and add a product from your store to cart. Then attempt to go to through the checkout process and fill in the required billing/shipping information.
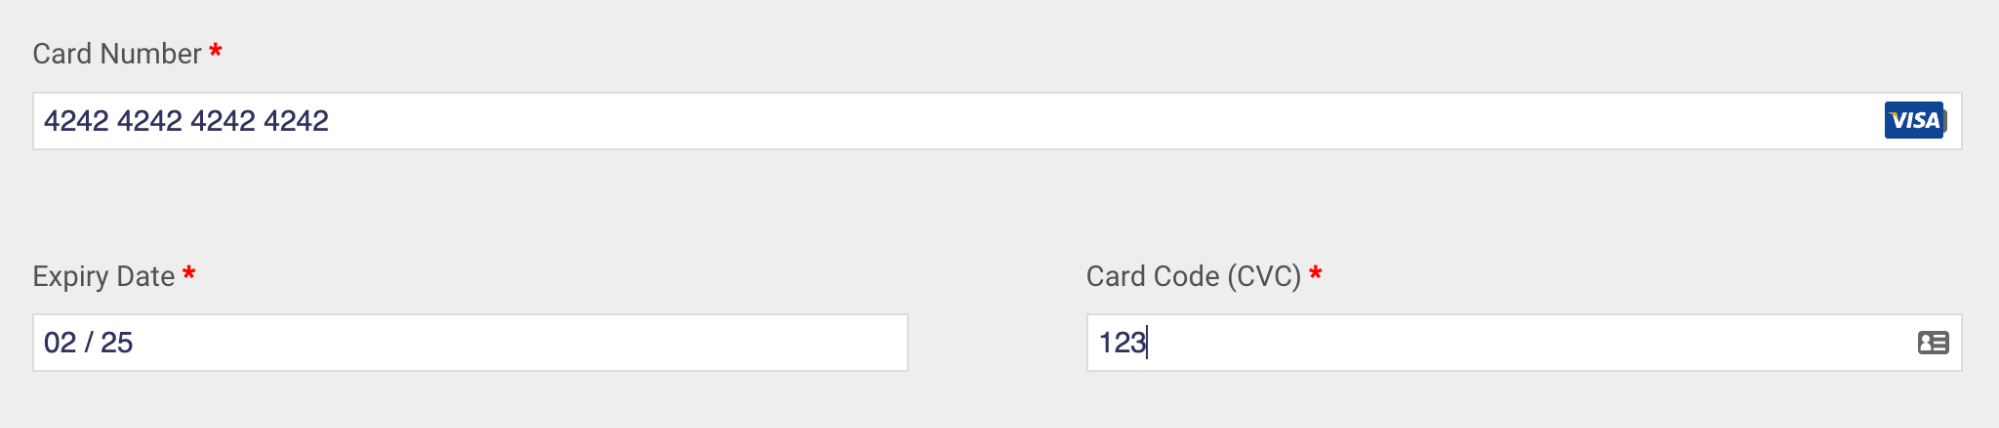
Depending on your theme, at the bottom of the checkout screen you should now see fields that allow the customer to input their: card number, expiry date and card code (CVC) It should something like Figure 21 below:
Figure 21. Inputting of customer card details.
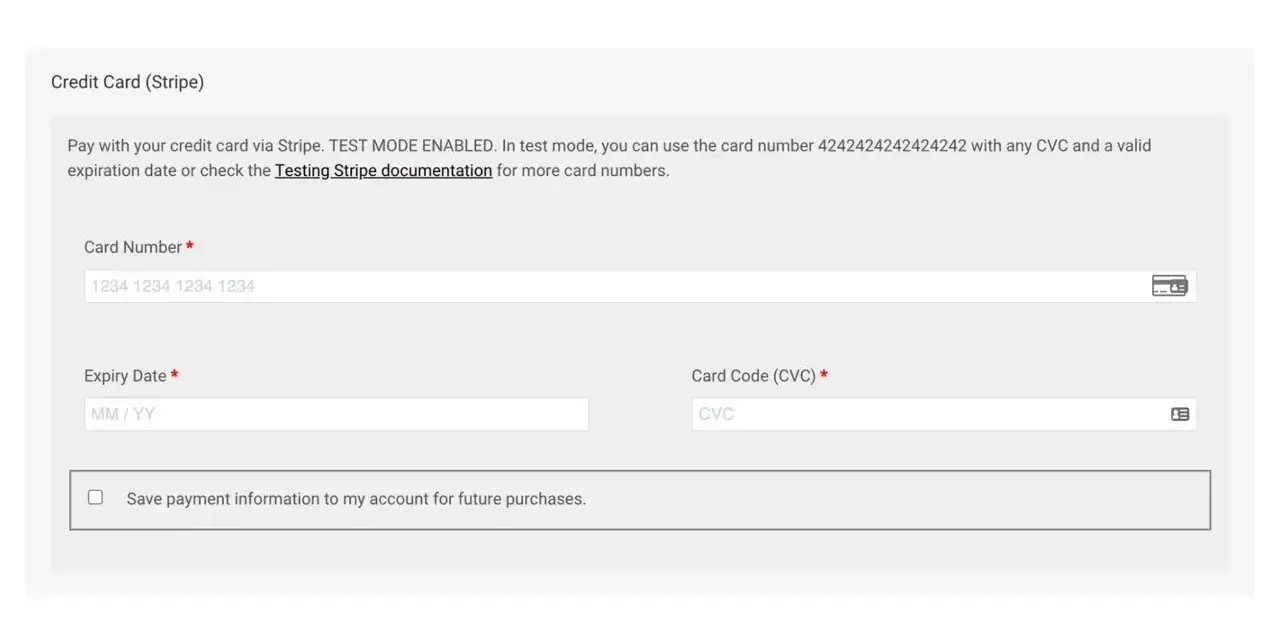
As we are in test mode, normal bank cards will not work so for this test purchase you will need to use the following card details as in Figure 22:
Card Number: 4242 4242 4242 4242
Expiry Date: 02/25 (can be any date in the future)
CVC: 123 (can be any 3 digit number)
Figure 22. Adding the test card details.
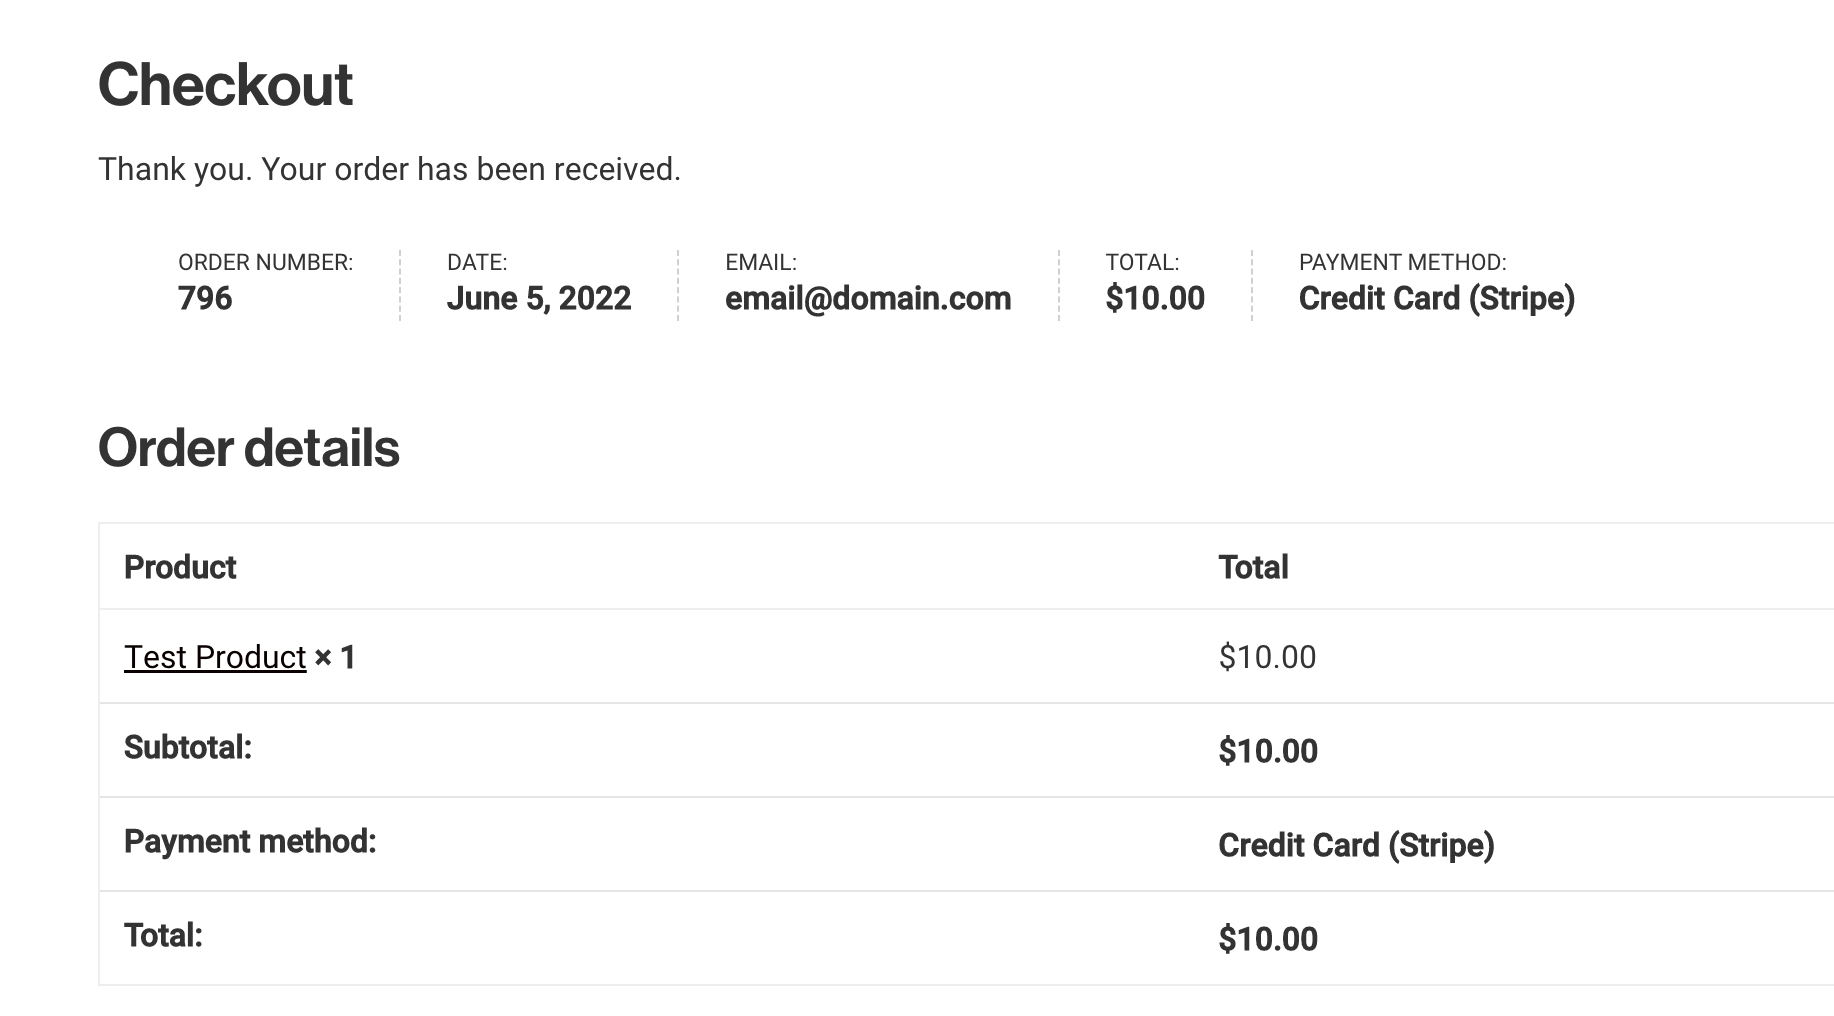
If successful, you should be redirected to the checkout successful screen which (depending on your theme) will look similar to Figure 23.below:
Figure 23. Your test checkout screen.
You can also check your payment was successful by going to Stripe (with test mode toggled ON) and clicking on the ‘Payments’ button at the top (Figure 24) which will give you a list of payments that will look like Figure 25.
Figure 24. Clicking the payments tab at the top.

A successful payment should look like Figure 25 below:
Figure 25. A successful test payment.

Step 7: Disabling Test Mode and Going Live
Now that you’ve successfully been able to put through a test purchase on your WooCommerce website and have verified the purchase that came through to your Stripe account, you’re ready to disable test mode and go live!
Navigate to: WooCommerce > Settings > Payments > Stripe > Settings and ensure that “Enable test mode” is un-checked (Figure 26):
Figure 26. Uncheck ‘enable test mode.’
Thanks for reading. We hope you found the above guide helpful.
Frequently Asked Questions
How customizable is my ecommerce store?
This depends on the eCommerce tool you use. For example, Magento is 100% customizable, and you can amend just about every aspect. Shopify on the other hand has far fewer customization options.
How much does WooCommerce hosting cost?
Prices are very reasonable and start from just $3.50 per month at Verpex.
How long does It take to set up a WooCommerce store?
You can install WooCommerce to your WordPress site with just one click. Then, you just need to add your products and you’re off. You could be up and running in just a few hours.
How easy is it to switch between WooCommerce and Magento?
At Verpex we can host either site no problem. However, you’ll need to be aware that there can be some difficulties due to the customizable nature of Magento, and functionality could be lost.

Dylan is the founder of Winn-Brown & Co., an agency he started at the age of 16, specializing in website development and digital transformation. Since starting the company he has worked on hundreds of projects and with clients across a broad range of industries. Now in 2022, the agency continues to service new and existing clients alongside incubating some exciting side projects.
View all posts by Dylan Winn-Brown